Auto Layout is a challenging topic to master. Stack Views and layout anchors introduced in iOS 9 help but it can still be difficult to see how to create certain layouts.
In this post I want to look at a common situation where you need to position views at fixed proportions along an axis. It may not be obvious but that can be easily done using center alignments with a multiplier. A technique you can apply with and without stack views.
Last updated: Jun 12, 2020
The Problem
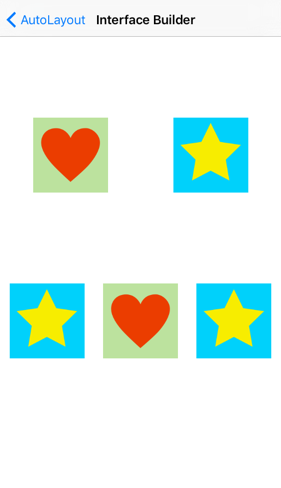
Suppose I want to create this layout. It has two rows of image views that are all positioned based on some percentage of the super view width and height. I am using image views so it will be obvious if they get stretched or compressed by mistake.
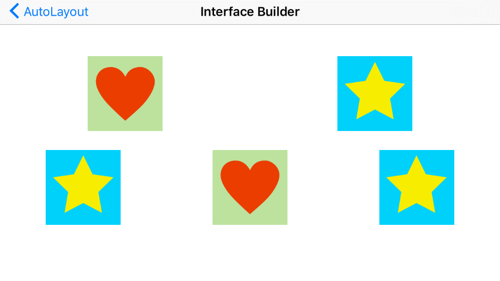
The layout should keep the same proportions when the view adapts to different screen sizes. Here is the same view in landscape mode:
Once you spot that we are aligning based on view centers you should see we can create the whole layout with nothing more than center aligned constraints. We need a pair for each imageView to fix the x and y position. The general form is:
imageView.CenterX = view.CenterX * modifier
imageView.CenterY = view.CenterY * modifier
The modifier positions the imageView at some percentage of the super view dimension as shown below:

For fun and education here are three ways to create the layout first using Interface Builder, then adding the constraints in code and finally with a stack view.
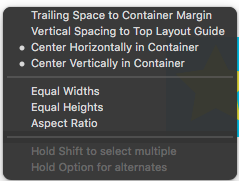
Building The Constraints In Interface Builder
We need to add two constraints for each image view. Using either the document outline or directly in the view canvas control-drag from the image view to the super view. Add both a “Center Horizontally in Container” and “Center Vertically in Container” constraint.
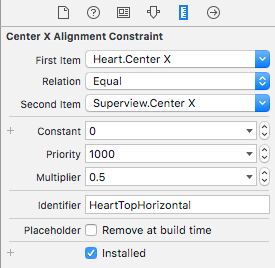
Now edit each constraint to set the percentage we need. Here are the modified horizontal and vertical constraints for the top left heart image view:
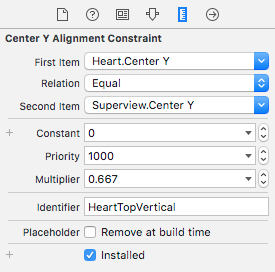
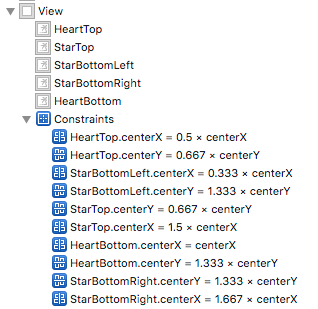
Note that this is also a good time to add identifiers to our constraints. When finished you should end up with ten constraints as follows:
Building The Constraints In Code
Before we look at the code to add our constraints I need to cover a common mistake. When adding a view in code you need to turn off the translation of the view’s autoresizing mask into constraints. If you don’t the system will automatically create constraints that will conflict with ours.
// ...code to create image view...
imageView.translatesAutoresizingMaskIntoConstraints = false
view.addSubview(imageView)
There are a few ways to create the constraints. I am going to do it from the viewDidLoad method of the view controller. A simple helper function will make it less painful to create each NSLayoutConstraint:
func addConstraintFromView(subview: UIView?,
                         attribute: NSLayoutAttribute,
                        multiplier: CGFloat,
                        identifier: String) {
  if let subview = subview {
    let constraint = NSLayoutConstraint(item: subview,
            attribute: attribute,
            relatedBy: .Equal,
            toItem: view,
            attribute: attribute,
            multiplier: multiplier,
            constant: 0)
    constraint.identifier = identifier
    view.addConstraint(constraint)
  }
}
This creates and adds a constraint to the superview (using the view property of the view controller). The NSLayoutAttribute argument will either be .centerX for the horizontal constraint or .centerY for the vertical constraint. For example here are the constraints for the heart image view in the top row:
// vertical constraint
addConstraintFromView(heartTop,
              attribute: .centerY,
             multiplier: 0.667,
             identifier: "heartTop center Y")

// horizontal constraint
addConstraintFromView(heartTop,
              attribute: .centerX,
             multiplier: 0.5,
             identifier: "heartTop center X")
The rest follow a similar pattern, see the sample code for the full setup.
What About A Stack View?
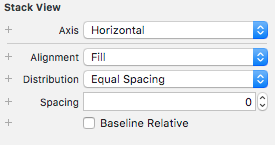
Whenever you see a horizontal or vertical layout you should be thinking stack view. Adding the image views to a stack view is simple enough but how to configure it? We don’t want the views to fill the stack view so configure a horizontal stack view using an “Equal Spacing” distribution:
Now we need to constrain the size and position of the stack view:
-
Set the vertical position of each stack view in the same way we set the vertical postion of the image views. A center constraint with a modifier (e.g stackView.centerY = 0.667 * superview.centerY for the top stack view).
-
Add a constraint to horizontally center each stack view.
-
The final constraint is a little tricky. We need to fix the width of the stack view. This is easiest if you think about the leading and trailing edges of the stack view:
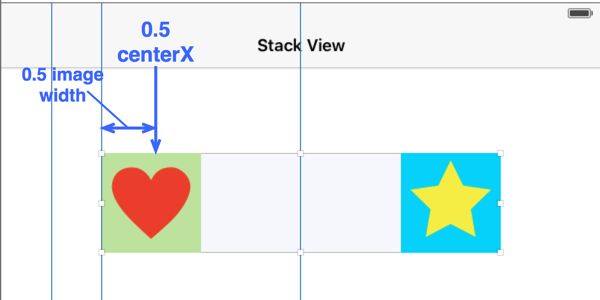
The center of the top left image view should be 0.5 the super view center. So we need the stack view left edge to be half the image view width further to the left. The image views are 100x100 so we need to subtract 50 in our constraint:
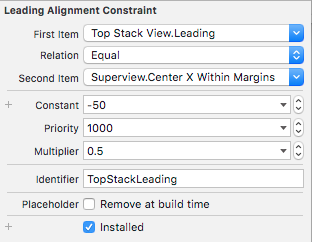
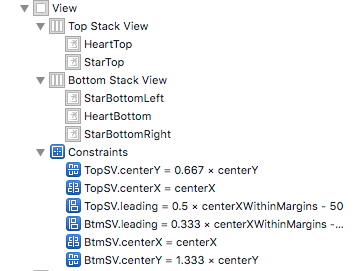
Note that when adding this constraint in Interface Builder you will need to change the second item to be the superview center. The equal spacing distribution then fixes the trailing edge for us. A similar approach handles the lower stack view so that we end up with this:
This is one situation where I find adding the constraints in code to be easier especially as we can calculate the size of the image view at runtime rather than hard coding it in Interface Builder.
Update 31-Jan-2016: There is also an easier approach. Add a constraint for the center of the left most image. The stack view then sizes to fit without need to calculate the image size. See the code for details.
Further Reading
You can find the code for this post in my GitHub CodeExamples repository. It includes both the Interface Builder, code and stack view versions so you can compare the approaches.