During his WWDC10 keynote Steve Jobs mentions that developers can add iAds to an existing application “in an afternoon”. This does indeed seem to be the case but I found some of the documentation to be unclear so here are my notes on integrating iAds with a typical table based app.
Assumptions
I am assuming the Base SDK is set to iPhone Device 4.0 and also that the iPhone OS Deployment Target is set to iPhone OS 3.1 so that we need to maintain backward compatibility with older devices. There is not much choice for the Base SDK setting as all new App Store submissions must be with iOS 4. The minimum deployment target is up to you and I will try to highlight the sections that are specifically aimed at backward compatibility.
![]()
The existing App
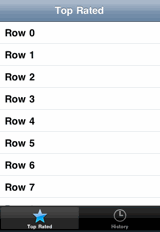
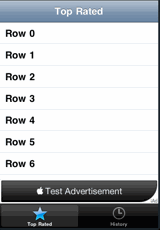
To best understand the process I will start with an existing app that I made using the tab bar template in Xcode. The app contains two tab bar items both of which contain UINavigationControllers. The first navigation controller also contains a UITableViewController which when a row is selected drills down into a detailed view controller. The basic appearance of the app when the first tab bar item (“Top rated”) is selected to show the table view is as follows:
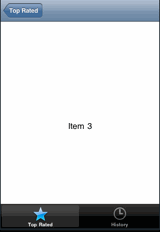
The detailed view which is pushed onto the navigation controller stack when a table row is selected simply shows the row number in a text label as follows:
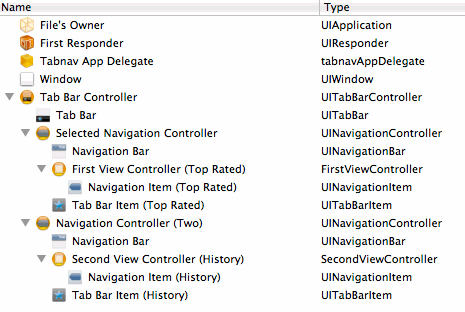
The main NIB file for this app is as follows:
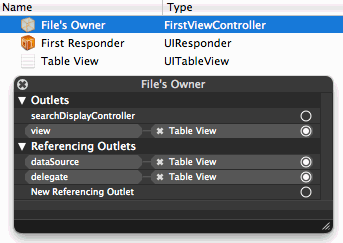
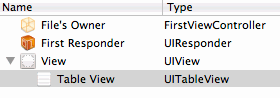
The table view controller is named FirstViewController and has its view loaded from a Nib file (FirstView.xib) which looks like this:
The definition for FirstViewController is trivial at this point as it simply implements a UITableViewController:
@interface FirstViewController : UITableViewController {
}
@end
This is all pretty standard stuff but I hope it will make what is to come easier to follow.
Adding the framework
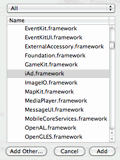
The iAd framework is new in iOS 4 so the first thing we need to do is include the framework in the application. Right-click on the Frameworks group in the Xcode project and select Add -> Existing Frameworks… and select the iAd.framework.
If you are just targeting iOS 4 devices this will work fine but if you want the app to also work on older versions of the OS this will cause a problem. Since the iAd framework is not available with those versions of the OS you will get a runtime error similar to the one below:
dyld: Library not loaded: /System/Library/Frameworks/iAd.framework/iAd
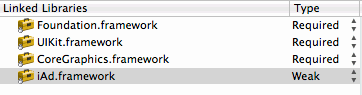
This error is generated because when you add a framework to an application it is set as Required by default. This means that is has to be present when the product loads which is not possible on pre iOS 4 systems. The only way to avoid this is to weak link the iAd framework which relaxes this restriction. Of course if we make any reference to the missing framework on an earlier version of the OS we will still get a runtime error leading to an application crash. To change the iAd framework to be weak linked right-click on the application target and from the General tab of the Info dialog change the Type for iAd.framework from Required to Weak.
Making space for the banner view
The iAd Framework is very simple and there is really only one class that we need to worry about. The ADBannerView needs to be added to the view hierarchy and connected to a view controller to display Ads when they become available.
The key to adding the ADBannerView to a table view is to ensure there is a container view for the table and then ensuring that the resize masks for the table view are set correctly. The reason we need a container view is that we want the ADBannerView and the UITableView to be at the same level in the view hierarchy.
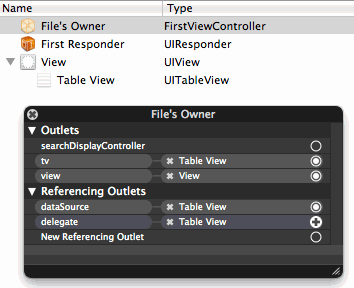
To add the additional banner view we need to first change our table view controller (FirstViewController) as it currently expects to directly load a table view from its Nib file. To get around this we need to introduce a containing UIView and make the table view a subview of this new view. This makes the Nib file look as follows:
We also now need to adjust the definition for FirstViewController as it will now no longer have its view set directly to the UITableView. This means that the FirstViewController cannot now directly implement UITableViewController but must instead implement UIViewController and maintain a separate reference to the table view as follows:
@interface FirstViewController : UIViewController {
  UITableView *tv;
}
@property (nonatomic, retain) IBOutlet UITableView *tv;
@end
The view controller implementation (FirstViewController.m) contains the corresponding synthesize and release code:
@implementation FirstViewController

@synthesize tv;

- (void)viewDidUnload {
    [super viewDidUnload];
    self.tv = nil;
}

- (void)dealloc {
    [tv release];
    [super dealloc];
}
The Nib file, after rewiring the view connections now looks like this (note how the view outlet is now connected to the new container View instead of the Table View):
There is one additional thing we need to take care of when changing the way our table view controller works. Since our view controller no longer directly sub-classes UITableViewController we lose the default viewWillAppear behaviour that clears table row selection each time the table is displayed. We need to add this same functionality into our own viewWillAppear:
- (void)viewWillAppear:(BOOL)animated {
  NSIndexPath *indexPath = [self.tv indexPathForSelectedRow];
  if (indexPath) {
    [self.tv deselectRowAtIndexPath:indexPath animated:YES];
  }
}
Understanding how to rearrange the view hierarchy to make space for the banner view is probably the hardest part of integrating iAds. This technique for introducing a container view for a table is actually also very useful in other situations where, for example, you want to show a toolbar alongside your table.
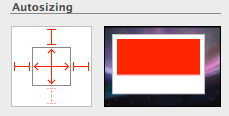
Check your autosizing masks
Before moving on there is one important tip that I need to point out here that caused me to waste some time. Since we will be inserting and removing our Ad Banner View into the view hierarchy we need to make sure that our table view resizes correctly. If you do not get this step right you will most likely never see the Ad Banner as it will be hidden behind the table view.
When you add a table view in Interface builder it sets things up assuming that the table view will occupy the entire view. You can see this in the inspector if you look at the autosizing masks:
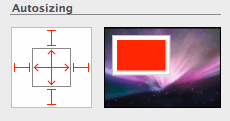
In this example I intend to place the Ad Banner View at the bottom of the screen, just above the tab bar. So rather than having a fixed strut at the bottom of the view the space is flexible. That way the table height will expand or contract to fill the available space.
Creating the Banner View
At this point if I was building an app only for iOS 4 I would probably just drag an Ad BannerView object from the Interface Builder library and drop it under my new view and be done. However since I want to maintain backwards compatibility I cannot place the ADBannerView object directly into the Nib file. If I do that I will get a runtime error when the Nib file is loaded on a pre iOS 4 version of the system. Instead we will need to create the ADBannerView object in code.
First we will make some changes to the view controller interface (FirstViewController.h):
- Import the iAd.h header file
- Set the
ADBannerViewDelegate - Retain a reference to the
ADBannerViewthat we will create
The resulting header file now looks like this:
#import <UIKit/UIKit.h>
#import <iAd/iAd.h>

@interface FirstViewController : UIViewController <ADBannerViewDelegate> {
  UITableView *tv;
  ADBannerView *bannerView;
}
@property (nonatomic, retain) IBOutlet UITableView *tv;
@property (nonatomic, retain) ADBannerView *bannerView;
@end
In the controller implementation we synthesize the bannerView and make sure we also release it with the controller. There is an important extra step we need to take of when releasing the bannerView which is to ensure we also remove the banner view delegate. Failure to remove the delegate can cause an app crash if the iAd framework calls it after the view controller has been released. We will see where the delegate gets set shortly but for now we will modify the viewDidUnload and dealloc methods to ensure we clean up correctly:
@implementation FirstViewController

@synthesize tv, bannerView;

- (void)viewDidUnload {
  [super viewDidUnload];

  if (self.bannerView) {
    bannerView.delegate = nil;
    self.bannerView = nil;
  }
  self.tv = nil;
}

- (void)dealloc {
  if (bannerView) {
    bannerView.delegate = nil;
    [bannerView release];
  }
  [tv release];
  [super dealloc];
}
After all that we can finally take a look at the method used to create the banner view:
- (void)createBannerView {

  Class cls = NSClassFromString(@"ADBannerView");
  if (cls) {
    ADBannerView *adView = [[cls alloc] initWithFrame:CGRectZero];
    adView.requiredContentSizeIdentifiers = [NSSet setWithObjects:
                              ADBannerContentSizeIdentifier320x50,
                              ADBannerContentSizeIdentifier480x32,
                              nil];

    // Set the current size based on device orientation
    adView.currentContentSizeIdentifier = ADBannerContentSizeIdentifier320x50;
    adView.delegate = self;

    adView.autoresizingMask = UIViewAutoresizingFlexibleTopMargin |
                              UIViewAutoresizingFlexibleRightMargin;

    // Set initial frame to be offscreen
    CGRect bannerFrame =adView.frame;
    bannerFrame.origin.y = self.view.frame.size.height;
    adView.frame = bannerFrame;

    self.bannerView = adView;
    [self.view addSubview:adView];
    [adView release];
  }
}
Some additional comments:
- to maintain backward compatibility with iOS 3.x versions we cannot call
[ADBannerView alloc]directly. To work around this use theNSClassFromStringmethod to get a reference to the class and test if it exists. WhencreateBannerViewis called on iOS 3.x it simply returns without doing anything. - the
ADBannerViewpropertiesrequiredContentSizeIdentifiersandcurrentContentSizeIdentifierset the possible sizes of the banner view and then the current size of the banner view respectively. There are currently only two possible sizes 320x50 for portrait mode and 480x32 for landscape mode. We start off in portrait mode but will handle rotation shortly. - We set the delegate of the
ADBannerViewto be this view controller. - We set the autoresizing mask of the banner view to have flexible top and right margins so that it resized correctly when it rotates. If you were placing the banner view at the top of view you would replace the flexible top with a flexible bottom margin.
- We start with the banner view positioned off-screen so that it is hidden from the user. We will then implement delegate methods that only move the view onscreen when the iAd framework tells us it has an Ad to display.
- Finally we retain a reference to the banner view, add it to our view hierarchy and release the local reference.
We call this method to create the banner view in viewDidLoad so that it is created once and only once when the view is first loaded:
- (void)viewDidLoad {
  [self createBannerView];
}
Showing the banner
To display the banner we need to do two things:
- reduce the size of the table view frame to make space for the banner view. The height of the table view frame needs to be reduced by the height of the banner view.
- move the origin of the banner view frame so that it now onscreen in the space left by the table view. The y coordinate of the banner frame is set to the full height of the view frame (that is the container view not the table view) minus the height of the banner view. This ensures that the banner view is lower than the table view but above any tab bar at the bottom of the screen.
To make things look smooth the changes to the frame are animated so that the banner view will slide into view:
- (void)showBanner {
  CGFloat fullViewHeight = self.view.frame.size.height;
  CGRect tableFrame = self.tv.frame;
  CGRect bannerFrame = self.bannerView.frame;

  // Shrink the tableview to create space for banner
  tableFrame.size.height = fullViewHeight - bannerFrame.size.height;

  // Move banner onscreen
  bannerFrame.origin.y = fullViewHeight - bannerFrame.size.height;

  [UIView beginAnimations:@"showBanner" context:NULL];
  self.tv.frame = tableFrame;
  self.bannerView.frame = bannerFrame;
  [UIView commitAnimations];
}
Hiding the banner
To hide the banner is the reverse of showing the banner:
- increase the size of the table view frame to fill the container view with the table. The height of the table frame is set to the full height of the container view frame.
- move the origin of the banner view so that it is now offscreen. The y coordinate of the banner view frame is set to the full height of the container view.
We do not bother to animate the frame changes this time:
- (void)hideBanner {

  // Grow the tableview to occupy space left by banner
  CGFloat fullViewHeight = self.view.frame.size.height;
  CGRect tableFrame = self.tv.frame;
  tableFrame.size.height = fullViewHeight;

  // Move the banner view offscreen
  CGRect bannerFrame = self.bannerView.frame;
  bannerFrame.origin.y = fullViewHeight;

  self.tv.frame = tableFrame;
  self.bannerView.frame = bannerFrame;
}
Implementing the ADBannerView delegate methods
We use the ADBannerView delegate methods to actually invoke the showBanner and hideBanner methods. There is no guarantee that there will always be an Ad to display. In fact at time of writing iAds are only available in the US. To ensure that we do not display a blank space when there is no Ad available we rely on the delegate method bannerViewDidLoadAd to tell us when an ad is available. Likewise when the iAd framework no longer has an Ad to display it will call the bannerView:didFailToReceiveAdWithError delegate method so we should hide the view:
- (void)bannerViewDidLoadAd:(ADBannerView *)banner {
  [self showBanner];
}

- (void)bannerView:(ADBannerView *)banner
        didFailToReceiveAdWithError:(NSError *)error {
  [self hideBanner];
}
Handling rotation
The final thing we need to handle is device rotation. To change the size of the banner view we just need to set the currentContentSizeIdentifier property of the bannerView to the correct constant based on the device orientation. We will first create a helper method:
- (void)changeBannerOrientation:(UIInterfaceOrientation)toOrientation {
  if (UIInterfaceOrientationIsLandscape(toOrientation)) {
    self.bannerView.currentContentSizeIdentifier =
                    ADBannerContentSizeIdentifier480x32;
  }
  else {
    self.bannerView.currentContentSizeIdentifier =
                    ADBannerContentSizeIdentifier320x50;
  }
}
Then in addition to ensuring that shouldAutorotateToInterfaceOrientation allows the view to rotate we also need to implement willRotateToInterfaceOrientation to fix the banner view by calling our helper method:
- (BOOL)shouldAutorotateToInterfaceOrientation:
        (UIInterfaceOrientation)interfaceOrientation {
  return YES;
}

- (void)willRotateToInterfaceOrientation:
       (UIInterfaceOrientation)toInterfaceOrientation
       duration:(NSTimeInterval)duration {

  if (bannerView) {
    [self changeBannerOrientation:toInterfaceOrientation];
  }
}
Almost done
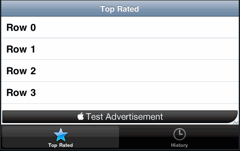
We are just about done. If we take a look at the app now in the simulator we should see a test Ad slide into view a few seconds after the app starts. The Ad should slide to the left along with that table when we select a row in the table. Also rotating the device should cause the banner view to rotate and resize correctly:
One final problem
There is one final problem with the banner view not resizing correctly in certain situations. This happens if the device is rotated when our view controller (FirstViewController) is not actually handling the view. So for example if we select a row in the table to drill down to the detail view and then rotate the device. Since in this situation the willRotateToInterfaceOrientation method we added to the controller will not be called we do not get a chance to resize the banner view.
To fix this situation we get the current device orientation in viewWillAppear and use it to call our helper method to set the banner size based on the orientation. The modified viewWillAppear method now looks like this:
- (void)viewWillAppear:(BOOL)animated {

  NSIndexPath *indexPath = [self.tv indexPathForSelectedRow];

  if (indexPath) {
    [self.tv deselectRowAtIndexPath:indexPath animated:YES];
  }

  if (bannerView) {
    UIInterfaceOrientation orientation = self.interfaceOrientation;
    [self changeBannerOrientation:orientation];
  }
}
All Done
This may well be the longest post that I have made on this site so I will leave it to you to decide if Steve was right about doing this in an afternoon. I think once you have seen what to do it is fairly quick but there are a couple of tricks to learn to make it go smoothly. Anyway I hope it was useful and if I missed something by all means let me know.