Apple replaced Peek and Pop with context menus in iOS 13. They don’t depend on hardware support for 3D Touch so are available on all devices running at least iOS 13. Here’s my guide to adding context menus to your App.
Why The Change?
Apple introduced Peek and pop in iOS 9 with the launch of the iPhone 6S and 3D Touch. The focus was on previewing (peeking at) content prior to transitioning (popping) to the destination view controller. Actions are accessible by swiping up from the preview.
Unfortunately 3D Touch turned out to be a bit of a hardware dead-end. Apple never managed to add 3D Touch to the iPad and has dropped it from recent iPhone models.
Starting with iOS 13, the UIViewControllerPreviewing protocol used for peek and pop is deprecated. You’ll see warnings and suggestions to replace it with UIContextMenuInteraction when your minimum deployment target is iOS 13.0. In my limited testing, it seems that if you have both registered with a view the context menu wins on iOS 13.
Introducing Contextual Menus
Contextual menus replace Peek and Pop and change the focus from previewing to providing actions. You access contextual menus using a touch and hold gesture or 3D Touch if you have it. This makes it available on all devices running iOS 13 or later.
The contextual menu presents a menu of actions and a preview of the affected item. You can create submenus though Apple recommends limiting them to one level. The layout automatically adapts to the available space shifting the preview to the side of the menu if necessary.
Context menus, like all features accessed with a gesture, suffer from a lack of discoverability. You cannot rely on a user realizing a context menu exists. I recommend spending a minute to read the relevant section of the iOS Human Interface Guidelines before you start.
In summary, be consistent. It’s interesting to compare iOS to macOS where almost all items have a context menu. That makes it much more likely a user will learn to right-click and discover the actions. (If you port your iOS App to the Mac using Catalyst the context menus are automatically converted).
It seems like a tall order but Apple were pushing context menus hard in the iOS design session at WWDC 2019:
Try to add contextual menus to every object in your App.
Getting Started
To enable context menus you create a UIContextMenuInteraction, specifying the delegate, and add it to a view. So for example, in viewDidLoad:
let interaction = UIContextMenuInteraction(delegate: self)
imageView.addInteraction(interaction)
The UIContextMenuInteractionDelegate has a single required method:
extension MyViewController: UIContextMenuInteractionDelegate {
  func contextMenuInteraction(_ interaction: UIContextMenuInteraction,
  configurationForMenuAtLocation location: CGPoint)
  -> UIContextMenuConfiguration? {
    return nil
  }
}
You can use the location to determine where the interaction occurred. You either return a UIContextMenuConfiguration or nil to cancel the interaction without showing the menu.
Creating A Menu Configuration
The initializer for a menu configuration takes an identifier, preview provider and an action provider:
let configuration = UIContextMenuConfiguration(
  identifier: "MyIdentifier" as NSCopying,
  previewProvider: {
    // Return a view controller for preview or nil
    return nil
  },
  actionProvider: { suggestedActions in
    // Return a UIMenu or nil
    return nil
})
Notes:
- All of the parameters are optional. By default, the system displays a default preview with no menu.
- You build a
UIMenuwith actions (UIAction), commands (UICommand) or other submenus (UIMenu). - A
UIActionperforms its action in a closure. - A
UICommandperforms its action in a selector available on the responder chain. - When creating an action provider you can choose to include any of the
suggestedActionsin your menu. These are actions the system has collected from the responder chain.
An example of actions that include an optional image:
let favorite = UIAction(title: "Favorite",
  image: UIImage(systemName: "heart.fill")) { action in
  // Perform action
}

let share = UIAction(title: "Share",
  image: UIImage(systemName: "square.and.arrow.up.fill")) { action in
  // Perform action
}
Set the appropriate attribute for destructive actions:
let delete = UIAction(title: "Delete",
  image: UIImage(systemName: "trash.fill"),
  attributes: [.destructive]) { action in
  // Perform action
}
Actions can also be .disabled or .hidden. Each menu has a title and an array of children containing the actions, commands and submenus for the menu:
let menu = UIMenu(title: "Actions", children: [favorite, share, delete])
The complete example of the delegate method implementing an action provider with three actions:
func contextMenuInteraction(_ interaction: UIContextMenuInteraction,
  configurationForMenuAtLocation location: CGPoint)
  -> UIContextMenuConfiguration? {

  let favorite = UIAction(title: "Favorite",
    image: UIImage(systemName: "heart.fill")) { _ in
    // Perform action
  }

  let share = UIAction(title: "Share",
    image: UIImage(systemName: "square.and.arrow.up.fill")) { action in
    // Perform action
  }

  let delete = UIAction(title: "Delete",
    image: UIImage(systemName: "trash.fill"),
    attributes: [.destructive]) { action in
     // Perform action
   }

   return UIContextMenuConfiguration(identifier: nil,
     previewProvider: nil) { _ in
     UIMenu(title: "Actions", children: [favorite, share, delete])
   }
}
The appearance with the default preview controller:
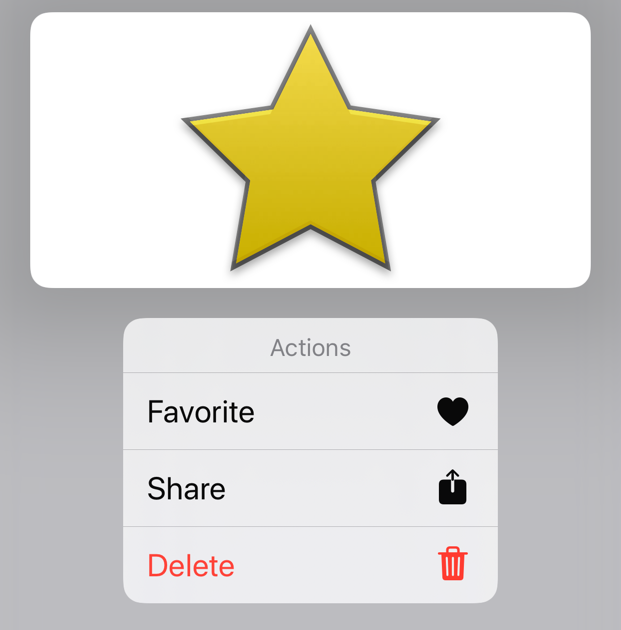
Table and Collection Views
Apple has made things easier if you want to present a context menu when the user taps and holds on a table view or collection view cell. Implement the new delegate method, returning the menu configuration, and you’re done:
override func tableView(_ tableView: UITableView,
  contextMenuConfigurationForRowAt indexPath: IndexPath,
  point: CGPoint) -> UIContextMenuConfiguration? {

  let favorite = UIAction(title: "Favorite") { ... }
  let share = UIAction(title: "Share") { ... }
  let delete = UIAction(title: "Delete") { ... }

  return UIContextMenuConfiguration(identifier: nil,
    previewProvider: nil) { _ in
    UIMenu(title: "Actions", children: [favorite, share, delete])
  }
}
The default preview shows the cell:

In Summary
My experience with the API has been somewhat mixed. The API has changed since the WWDC sessions and there’s no sample code to help. I also see a lot of Auto Layout warnings dumped to the console when the menu is presented which does not inspire confidence (FB7526086).
On the plus side, context menus do not rely on any special hardware support. Unlike Peek and Pop they work on all devices running iOS 13 including the iPad.