Apple added PDF vector images to the Xcode asset catalog in Xcode 6. It is a convenient way to build the image assets at 1x, 2x and 3x resolution without the pain of manually creating each file. What it did not do was give you truly scaleable vector images. Stretching an image above its base size left you with some ugly, fuzzy results.
That changes with Xcode 9 with the possibility to keep the vector data and scale images at runtime. It also adds some accessibility improvements which work well alongside dynamic type.
Fuzzy Images
If you want a recap on adding PDF vector images to the asset catalog I wrote about creating scaled images with PDF vectors a while back. You add a 1x resolution PDF image to the asset catalog, choose single scale and Xcode supplies the 2x and 3x images at build time.
The problem with using PDF images up to now is that Xcode creates the scaled images at build time. There was no support for using scaleable images at runtime. For example, I have a 100x100 pixel image of a star that looks fine when it keeps its normal content size:

If I add constraints to stretch the image view to fill the view it looks ugly. Here is that same image, using an Aspect Fit content mode, scaled a little over three times to fill the width of an iPhone 7 Plus:

The result is a blurry and jagged image that looks even worse on an iPad.
Preserve Vector Data
Xcode 9 changes this situation by allowing you to choose to treat the image as a vector at runtime. This means the image can smoothly scale to arbitrary sizes. The only change you need to make is to tick Preserve Vector Data for the PDF image in the asset catalog:

The image now looks sharp even when scaled to fill the screen of an iPhone 7 Plus:

Notes:
- If you are using Interface Builder the scaled image will still look blurry in the preview but it is fine at runtime in the simulator and on a device.
- This only works for iOS 11. Xcode does not warn you when you enable Preserve Vector Data and target iOS 10 or earlier but the vector data is not used when scaling so you end up with blurry images for those pre-iOS 11 targets.
Accessibility
There are two extra accessibility features that I want to mention that are easy to support if you use vector images.
Adjusting Image Sizes For Accessibility
In iOS 11, Apple added the UIAccessibilityContentSizeCategoryImageAdjusting protocol. Both UIButton and UIImageView adopts the protocol which adds a single boolean property adjustsImageSizeForAccessibilityContentSizeCategory. If you set this to true the image size increases when you use any of the larger accessibility text sizes (the normal content text sizes have no effect).
To add support:
-
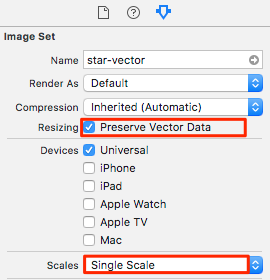
Add a PDF image to the asset catalog and be sure to tick Preserve Vector Data as before:
-
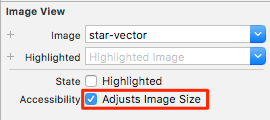
When adding the image view or button to the Storyboard make sure to tick Adjusts Image Size:
-
If adding the image view in code:
imageView.adjustsImageSizeForAccessibilityContentSizeCategory = true
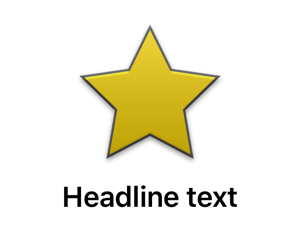
Here is an example using the 100 point star-vector PDF from before in a view with a text label using the .headline text style at the default content size category:
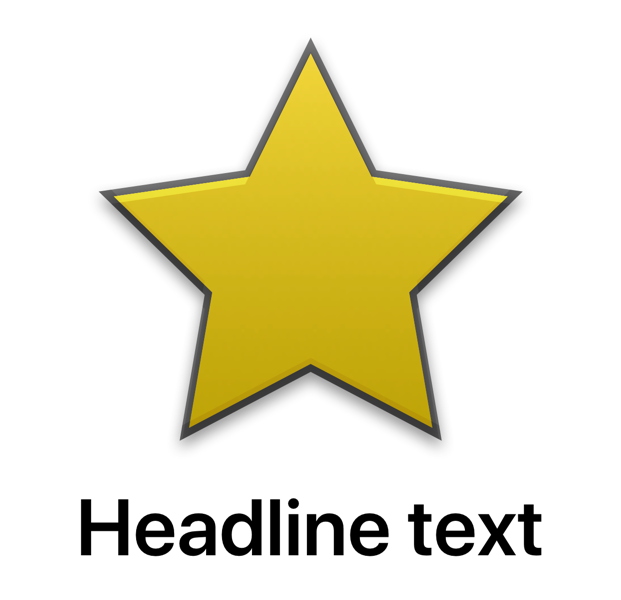
Here is the same view with the content size category increased to the largest accessibility size (.accessibilityExtraExtraExtraLarge). The size of the image varies with the accessibility size. At the largest size it has reached 300x300 points but still looks smooth:
If you do not use a PDF vector image or you forget to tick Preserve Vector Data the image view scales the original image data which can be noticeable at larger sizes. Also don’t forget to test your layout still works with the now much larger image sizes.
Bar Item Images
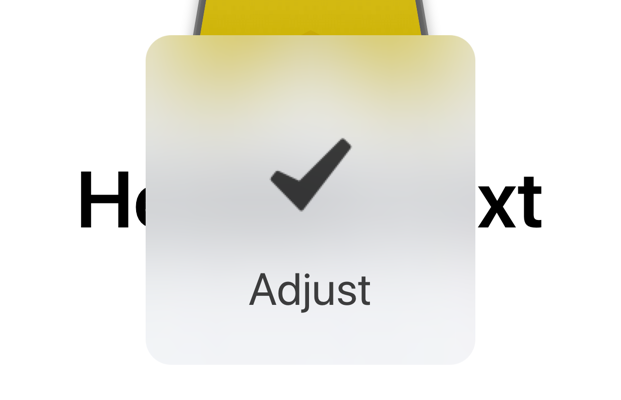
Apple added another accessibility improvement in iOS 11 for the icons used in bar items such as the tab bar and toolbar. For example, if I am using a tab bar controller with some tab bar items:

If you touch and hold over the icon when using one of the larger accessibility text sizes iOS 11 shows a larger version of the icon in an overlay.
To add support:
-
For each bar item image add a 75x75 point image to the asset catalog. Using a PDF vector image makes this easy but if you prefer you can also add the individual images (1x: 75x75 pixels, 2x: 150x150 pixels, 3x: 225x225 pixels).
-
Add the large content size image to the bar item. Interface Builder labels the property with Accessibility:

If adding in code set the
largeContentSizeImageproperty to the image.barItem.largeContentSizeImage = image
Remember that the large image is only shown when using one of the extra large accessibility content text sizes.
Get The Code
Not much in the way of code as the asset catalog does most of the work but you can find a working example here in my GitHub repository: