Here’s my guide to get you started building widgets with WidgetKit.
Widgets in iOS 14
Apple introduced widgets in iOS 14 at WWDC 2020. They allow you to show a small piece of your app’s content on the home screen. WidgetKit limits widgets to three fixed sizes that cannot scroll, and are non-interactive. You must also build the content view with SwiftUI. I recommend the Design great widgets session from WWDC 2020 to get an idea how best to use widgets with your app.
Note that the requirement to use SwiftUI only applies to the widget view. You can add widget extensions to apps built with UIKit. If you’ve been sitting on the sidelines waiting for an opportunity to try SwiftUI this is your chance.
I’m going to skip over the non-widget related details. I’m also going to keep this simple by sticking to a static, non-configurable widget to get started:
Create The Extension
-
Add a new Widget Extension target to your app (
File>New>Target):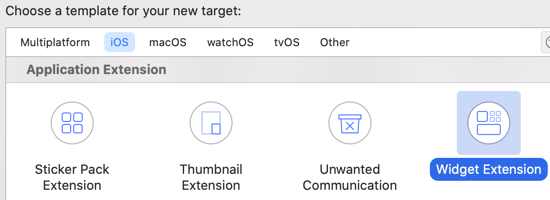
-
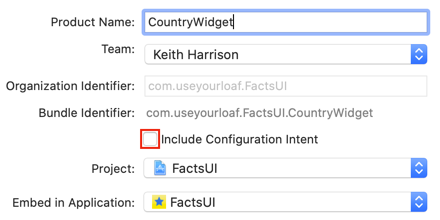
Name the extension. If you want the widget to be user configurable check the “Include Configuration Intent” checkbox. Leave it unchecked for a static Widget configuration.
-
Xcode creates a target and adds a scheme to build and run the widget. The template includes a Swift file for the main widget code, an asset catalog and the usual Info.plist file:
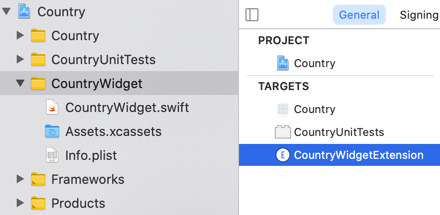
If you created a configurable widget you’ll also have an intent definition file.
Notes:
- If you’re not sure, create a static configuration. You can always add an intent definition file later.
- There’s nothing to stop you adding more widget extensions but if you want several widgets in your app use a Widget bundle (see below).
Main Components of a Widget
A widget has three key components:
- A configuration can be static or intent based but always has a unique identifier (kind), a timeline provider and content closure. A configurable widget also provides an intent definition. Use modifiers on the configuration to set the display name, description, supported widget sizes and background network handlers.
- A timeline provider which supplies timestamped entries when WidgetKit displays the widget.
- A content closure that returns a SwiftUI view to display the timeline entries.
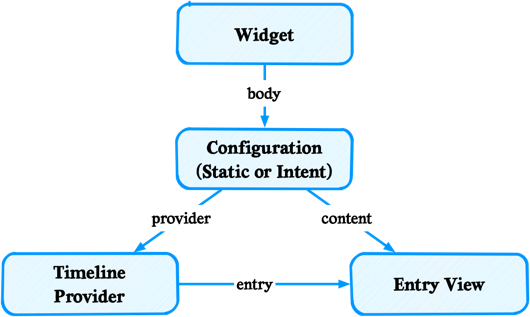
You define the configuration and content of a widget by creating a struct that conforms to WidgetKit. Mark the struct with the @main attribute to make it the widget entry point:
// CountryWidget.swift
import SwiftUI
import WidgetKit

@main
struct CountryWidget: Widget {
  var body: some WidgetConfiguration {
    StaticConfiguration(kind: "CountryWidget",
                    provider: CountryProvider()) { entry in
      CountryWidgetEntryView(entry: entry)
    }
    .configurationDisplayName("Country of the day")
    .description("Show a new country every day)
    .supportedFamilies([.systemSmall,.systemMedium,.systemLarge])
  }
}
The body of the widget provides either a static or intent based configuration. Let’s start with a static configuration.
Static Configuration
A static configuration has no user configurable options so takes three arguments:
StaticConfiguration(kind:, provider:, content:)
- kind: A unique string identifier for the widget.
- provider: A timeline provider object that supplies an array of timeline entries to WidgetKit to display.
- content: A closure that takes a timeline entry and returns a SwiftUI view to display the widget.
The configuration has several optional modifiers:
Display Name
The name shown in the widget gallery:
.configurationDisplayName("Country of the day")
Description
A longer description shown in the preview when adding a widget:
.description("Show a new country every day)
Supported Families
The sizes that a widget supports (systemSmall, systemMedium, systemLarge). Add this modifier to restrict the widget to certain sizes:
// Large size only
.supportedFamilies([.systemLarge])
Background Network Handler
A handler for background URLSession network requests:
.onBackgroundURLSessionEvents { (identifier, completion) in
  // handle event
}
Timeline Entry
A timeline entry is an object conforming to the TimelineEntry protocol. Together with any data you need to display the widget you must set a date and time for when the entry is valid. You can optionally include a relevance property:
var date: Date { get }
var relevance: TimelineEntryRelevance? { get }
WidgetKit uses the relevance to decide if it should rotate your widget to the top when displayed in a smart stack. This is useful if your timeline has time sensitive information. The relevance has an arbitrary score you assign and a duration for how long after an entry’s date WidgetKit considers rotating the widget to the top. A score of zero indicates the entry is not relevant and WidgetKit will not rotate the widget. A duration of zero (the default) removes the time limit.
A timeline entry for my country widget with the required date timestamp and the Country model data:
struct CountryEntry: TimelineEntry {
    let date: Date
    let country: Country
}
Timeline Provider
The TimelineProvider protocol has three methods WidgetKit can call to ask your widget’s timeline provider for timeline entries:
struct CountryProvider : TimelineProvider {
  func placeholder(in context: Context) -> CountryEntry
  func getSnapshot(in context: Context, completion: @escaping (CountryEntry) -> Void)
  func getTimeline(in context: Context, completion: @escaping (Timeline<CountryEntry>) -> Void)
}
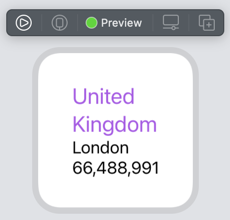
Placeholder
WidgetKit uses a placeholder when it first displays your widget. It gets the placeholder entry by calling the placeholder(in:) method of your timeline provider. This is a synchronous call for WidgetKit so you need to return a timeline entry quickly. WidgetKit applies a redaction modifier to the view so it’s fine to use sample data:
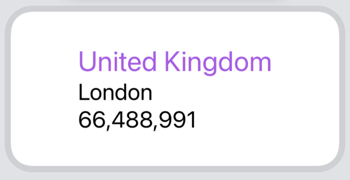
static let sampleData = Country(name: "United Kingdom", capital: "London")

func placeholder(in context: Context) -> CountryEntry {
  return CountryEntry(date: Date(), country: CountryProvider.sampleData)
}
The placeholder applies the redacted(reason: .placeholder) modifier to each view:
Notes:
-
If you have a view that you don’t want redacted in the placeholder apply the
unredacted()modifier to it. -
WidgetKit also uses the placeholder when displaying the widget on a locked iPad screen when you enable file data protection.
Snapshot
WidgetKit asks for a snapshot timeline entry in transient situations such as previewing in the widget gallery. You return a single timeline entry representing the current time and state. In the case of a preview snapshot you need to return quickly so use sample data if necessary:
func getSnapshot(in context: Context,
  completion: @escaping (CountryEntry) -> Void) {
  let country: Country
  if context.isPreview {
    country = CountryProvider.sampleData
  } else {
    country = loadCountries().first ?? CountryProvider.sampleData
  }
  let entry = CountryEntry(date: Date(), country: country)
  completion(entry)
}
Notes:
- Check
context.isPreviewto see if this is a preview snapshot. - Call the completion handler with the timeline entry.
Timeline
WidgetKit calls getTimeline(in:completion:) to get timeline entries for the current and, optionally, future times to update the widget. You call the completion handler with the array of timeline entries and the required refresh policy.
It’s up to you how you get the data for the timeline. You can have your app share data with a widget or have your widget perform a network request.
The refresh policy tells WidgetKit when it should request a new timeline from your provider:
- atEnd: after the date of the entry in the timeline.
- after(Date): after a future date
- never: WidgetKit will never request a new timeline from the widget. The app must inform WidgetKit when to request a new timeline.
In my country widget I randomly load 5 countries with dates set one day apart. The refresh policy asks WidgetKit to reload the timeline after using the last entry (.atEnd):
func getTimeline(in context: Context,
    completion: @escaping (Timeline<CountryEntry>) -> Void) {
  var entries: [CountryEntry] = []
  let countries = loadCountries().randomSample(count: 5)
  let currentDate = Date()
  var dayOffset = 0

  for country in countries {
    let entryDate = Calendar.current.date(byAdding: .day,
      value: dayOffset, to: currentDate)!
    let entry = CountryEntry(date: entryDate, country: country)
    entries.append(entry)
    dayOffset += 1
  }

  let timeline = Timeline(entries: entries, policy: .atEnd)
  completion(timeline)
}
SwiftUI View
You display the content of a widget with a SwiftUI view (you return the view in the content closure of the widget configuration):
struct CountryWidgetEntryView : View {
  var entry: CountryEntry
  var body: some View {
    CountryView(country: entry.country)
  }
}
You can only use a subset of the SwiftUI views:
- You cannot use any interactive controls or scrolling views (this includes things like MapKitView).
- You cannot use any UIKit views wrapped with
UIViewRepresentable.
The fixed size of a widget together with the inability to scroll content can be a challenge. Make sure you preview your widgets at all supported sizes to make sure you’re not truncating content.
You can get the widget size from the environment if you want to adjust the view layout for the different sizes:
struct CountryWidgetEntryView : View {
  var entry: CountryEntry
  @Environment(\.widgetFamily) var family
  var body: some View {
    switch family {
    case .systemSmall:
      CountrySmallView(country: entry.country)
    default:
      CountryView(country: entry.country)
    }
  }
}
Widget Previews
You create an Xcode widget preview in much the same way you preview any SwiftUI view using a PreviewProvider. To get the correct widget size pass a WidgetPreviewContext with the desired widget family to the previewContext:
struct CountryWidgetPreviews: PreviewProvider {
  static var previews: some View {
    CountryView(country: Country.uk)
    .previewContext(WidgetPreviewContext(family: .systemSmall))
  }
}
Widget Bundles
If you want more than one Widget in your app, use a Widget bundle:
@main
struct AtlasBundle: WidgetBundle {
  var body: some Widget {
    CountryWidget()
    CurrencyWidget()
  }
}
Notes:
- Move the @main attribute from the individual widget defintion to the widget bundle.
- The WidgetBundleBuilder limits you to five widgets but you can workaround that, if you need to, by nesting widget bundles.
User Interaction
When a user taps your widget, the system launches your app. You can pass a URL to the app by adding the widgetURL view modifier to a view:
CountryView(country: country)
.widgetURL(country.url)
Notes:
- You should only add the widgetURL once in your view hierarchy.
- For medium and large widgets you can add extra
Linkcontrols to views. - In your app you handle the URL using either
onOpenURL(perform:)for SwiftUI orapplication(_:open:options:)if you have a UIKit app delegate.
Requesting A Reload
You can have your app tell WidgetKit to request a new timeline using WidgetCenter:
// Reload single widget
WidgetCenter.shared.reloadTimelines(ofKind: "CountryWidget")

// Request reload for all widgets
WidgetCenter.shared.reloadAllTimelines()
Read More
Related posts you might find useful:
The Apple WWDC 2020 sessions are useful for an overview of the capabilities but the code snippets are often out of date: