Have you tried to use Xcode to write UI tests or automate your screenshots with fastlane? The documentation for iOS UI Testing leaves much room for improvement. The class documentation doesn’t help unless you already know what to do. Here’s my reference guide to get you started:
Last updated: May 19, 2021
Setup UI Tests
-
Create the UI Test target when you create the Xcode project or add it later with
File > New > Target...: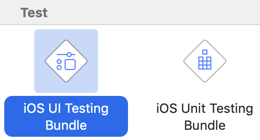
Note: You can write UI tests in Swift even if you’re testing an application written in Objective-C.
-
Use the Test action in the scheme editor (
Product > Scheme > Edit Scheme...) to control which tests are enabled: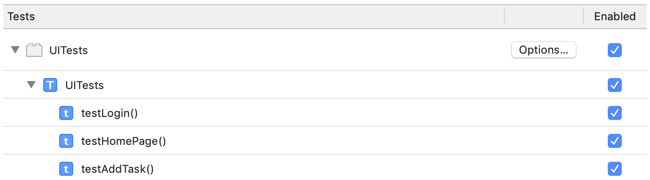
Use the
Optionsbutton to run tests in parallel (faster) and randomize order to uncover any dependencies between tests: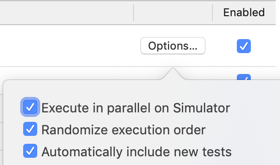
New tests are enabled by default.
-
Setup and launch application:
// UITests.swift
import XCTest

class UITests: XCTestCase {

  let app = XCUIApplication()

  override func setUp() {
    continueAfterFailure = false
    app.launch()
  }

  override func tearDown() { ... }

  func testSomething() { ... }
}
Writing UI Tests
- Setup App
- Query user interface and perform action(s)
- Assert expected state
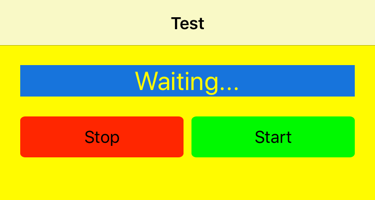
func testStart() {
  let startButton = app.buttons["startButton"]
  let stateLabel = app.staticTexts["stateLabel"]
  startButton.tap()
  XCTAssertEqual(stateLabel.label, "Running")
}
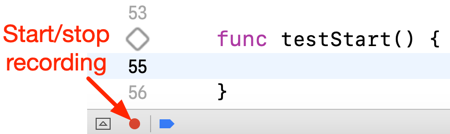
Xcode recording
- Place cursor in UI test method and use the record button to start/stop
- Create new or add to an existing test
- Can be useful when learning but I find it slow and unreliable
Print Element subtree
If your writing your tests manually (without recording) try printing the the element subtree for the application to see what you can query for (element types, identifier and label):
print(app.debugDescription)

Element subtree:
  Application, 0x600003a4cf70, pid: 25509, label: 'MyApp'
    Window (Main), 0x600003a4d1e0, {{0.0, 0.0}, {375.0, 667.0}}
      Other, 0x600003a4d2b0, {{0.0, 0.0}, {375.0, 667.0}}
        NavigationBar, 0x600003a4d380, {{0.0, 20.0}, {375.0, 44.0}}, identifier: 'Test'
          Other, 0x600003a4d450, {{170.5, 32.0}, {34.0, 20.5}}, label: 'Test'
        Other, 0x600003a4d520, {{0.0, 0.0}, {375.0, 667.0}}
          Other, 0x600003a4d5f0, {{0.0, 0.0}, {375.0, 667.0}}
            Other, 0x600003a4d6c0, {{0.0, 0.0}, {375.0, 667.0}}, identifier: 'rootView'
              Other, 0x600003a4d790, {{20.0, 84.0}, {335.0, 92.5}}
                StaticText, 0x600003a4d860, {{20.0, 84.0}, {335.0, 31.5}}, identifier: 'stateLabel', label: 'Waiting...'
                Other, 0x600003a4d930, {{20.0, 135.5}, {335.0, 41.0}}
                  Button, 0x600003a4da00, {{20.0, 135.5}, {163.5, 41.0}}, identifier: 'stopButton', label: 'Stop'
                  Button, 0x600003a4dad0, {{191.5, 135.5}, {163.5, 41.0}}, identifier: 'startButton', label: 'Start'
Accessibility Identifier
Set the accessibility identifier on an element you want to query rather than relying on a text label or title which might be localized:
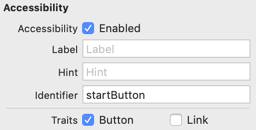
let startButton = app.buttons["startButton"]
Note: Element must be enabled for accessibility identifier to be visible to UI test.
System Alerts
To dismiss system alerts that might otherwise interrupt UI tests, add to setUp():
addUIInterruptionMonitor(withDescription: "System Dialog") { (alert) -> Bool in
   // Tap "Allow" button
   alert.buttons["Allow"].tap()
   return true
 }
 // Need to interact with App
 app.tap()
See Handling System Alerts In UI Tests for further details on handling different types of alerts.
XCUIApplication
XCUIApplication is a proxy for your App (the App runs in a separate process):
-
Use to launch, activate or terminate App. Only one instance can run at a time.
-
Set launch arguments and launch environment.
-
Root of all queries for elements.
let app = XCUIApplication()
app.launchArguments += ["-enableTestMode","1"]
app.launchEnvironment["DEBUG_LEVEL"] = "5"
app.launch()
Use launch(), activate(), or terminate to change the state of the App being tested:
-
Synchronous methods, App state has changed on return or test fails.
-
launch()launches App, terminating any existing instance. -
activate()launches App if not running else brings a running instance to the foreground. -
Simulate home button press to send App to the background.
// Send to background and wait for state change XCUIDevice.shared.press(.home) let background = app.wait(for: .runningBackground, timeout: 5) XCTAssertTrue(background) // Launch or bring to foreground - synchronous app.activate() XCTAssertTrue(app.state == .runningForeground) // Kill the App app.terminate() -
Useful to keep a reference to App instance but be careful. A common mistake when using Fastlane snapshot is to configure one App instance but launch another:
let app = XCUIApplication()
setupSnapshot(app)

// Forgot to change template, launches a new instance
XCUIApplication().launch() // oops

// Launch the configured App instance
app.launch() // OK
XCUIDevice
-
Simulate user interacting with a device
// Get current device let device = XCUIDevice.shared -
Set device orientation (useful to add to setUp for screenshots):
// Rotate iPhone to portrait, iPad to landscape if UIDevice.current.userInterfaceIdiom == .phone { device.orientation = .portrait } else { device.orientation = .landscapeRight } -
Press buttons:
// Press Home button
device.press(.home)

#if !targetEnvironment(simulator)
  // Not available in the simulator
  device.press(.volumeUp)
#endif
Note: The volumeUp and volumeDown buttons are not available when testing in the simulator.
-
Send text to Siri:
let siri = device.siriService
siri.activate(voiceRecognitionText: "Play recording")
XCUIElementQuery
Querying the application proxy for elements:
-
Application instance is at the root of the element tree
-
Query returns a collection of elements
-
Query by identifier (label, title, accessibility identifier), element type or with a predicate.
// See XCUIElement.ElementType for full list .button .cell // table or collection view cells .collectionView .image .navigationBar .scrollView .staticText // text labels .switch .tabBar .table .textField -
Query for descendant element:
// Find all buttons let buttonQuery = app.descendants(matching: .button) XCTAssertTrue(buttonQuery.count == 2) // Find all text labels let allLabels = app.descendants(matching: .staticText) -
Descendant queries are so common that there is a convenience API for each of the element types:
// app.descendants(matching: .button) let allButtons = app.buttons let allLabels = app.staticTexts let allTables = app.tables let allCells = app.cells // app.tables.cells -
When you only want a direct (child) descendant:
// Find nav bar button let addButton = app.navigationBars.children(matching: .button) -
To query for elements containing a type with identifier:
let cellQuery = app.cells.containing(.staticText, identifier: "urgentItem") -
Querying With Predicates (matching or containing):
let cellQuery = cells.matching(NSPredicate(format: "label BEGINSWITH %@", title))
XCUIElement
You interact with and test properties of an XCUIElement:
-
The element is the result of a query that matches one unique instance.
-
A number of methods will return a single element from a query.
-
Use
Elementwhen a query should only return one element (fails if there are multiple elements). -
Use
firstMatchwhen you only care about finding the first element from many. -
Getting an element from a query:
// Query for all buttons let buttonQuery = app.descendants(matching: .button) // Get element with subscript matching identifier let stopButton = buttonQuery["stopButton"] // Get element by index let stopButton = buttonQuery.element(boundBy: 0) // When query must only return a single unique element // - will fail if matches multiple elements let textField = app.textFields.element // When you want only the first match // - speeds up test by stopping query when match is found let firstButton = buttonQuery.firstMatch -
Check for element to exist:
let startButton = app.buttons["startButton"] XCTAssertTrue(startButton.exists) -
Wait for element to appear (test fails if timeout expires before element exists):
let exists = startButton.waitForExistence(timeout: 3.0) XCTAssertTrue(exists,"Missing start button") -
Check if element is onscreen and is tappable:
if startButton.isHittable { // Do something with button } -
Taps and long press:
startButton.tap() startButton.press(forDuration: 3) scrollView.doubleTap() scrollView.twoFingerTap() scrollView.tap(withNumberOfTaps: 1, numberOfTouches: 4) -
Dragging views:
let view1 = app.otherElements["view1"] let view2 = app.otherElements["view2"] view1.press(forDuration: 1, thenDragTo: view2) -
Swipe gestures:
scrollView.swipeUp() scrollView.swipeRight() -
Pinch and rotate
scrollView.pinch(withScale: 2, velocity: 1) scrollView.rotate(.pi/2, withVelocity: 2) -
Type text into a text field (must have focus):
let textField = app.textFields.firstMatch textField.tap() textField.typeText("Hello") -
Move slider
let slider = app.sliders.firstMatch
slider.adjust(toNormalizedSliderPosition: 0.5)
XCUIElementAttributes
Properties of an XCUIElement that you can query or test:
-
Identity and type
XCTAssertTrue(stopButton.identifier == "stopButton") XCTAssertTrue(stopButton.label == "Stop") XCTAssertTrue(stopButton.elementType == .button) -
Element state
if textField.hasFocus { ... } // tvOS only if stopButton.isEnabled { ... } if cell.isSelected { ... } -
View Frame and Size Class
textField.frame // CGRect
if myView.horizontalSizeClass == .compact { ... }
XCUICoordinate
Create a coordinate location on screen relative to a reference element (must exist):
let rootView = app.otherElements["rootView"]
let target = rootView.coordinate(withNormalizedOffset: CGVector(dx: 10, dy: 10))
Tap, double tap or press at coordinate location:
target.tap()
target.doubleTap()
target.press(forDuration: 3)
Create a destination offset from existing coordinate and then drag to it:
// Drag down 100 points
let endPoint = target.withOffset(CGVector(dx: 0, dy: 100))
target.press(forDuration: 3, thenDragTo: endPoint)
Learn More
Some other recent posts on UI Testing: