[Also see this post on self sizing cells introduced in iOS 8 that makes this easier.]
I have posted a few times on handling dynamic type including the need to increase the height of table view rows as the font size grows. However the assumption was that all cells in the table view had the same height. In this post I am going to do a detailed walk through of setting up a table view cell with auto layout that has a variable row height.
Before going any further I should give credit to this great article by Amy Worrall on using auto layout to calculate table cell height. The light-bulb moment was the trick of keeping a prototype cell to layout a cell with the content and obtain the correct size from within the tableView:heightForRowAtIndexPath: method.
Huckleberry
As source data from my table view I have taken the first fifteen chapters of “The Adventures of Huckleberry Finn” from Project Gutenberg and imported it into a plist file (one sentence per item). This gives close to 2000 lines of text of varying length. The aim is to show each sentence in a single table view cell with a label showing the line number.
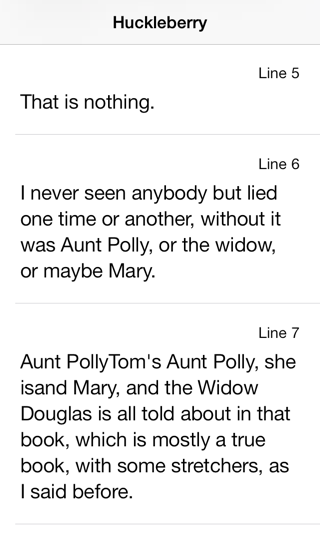
The row height of each cell is set for the required number of lines of text. The effect is more obvious using the extra large accessibility text settings:

Getting Started
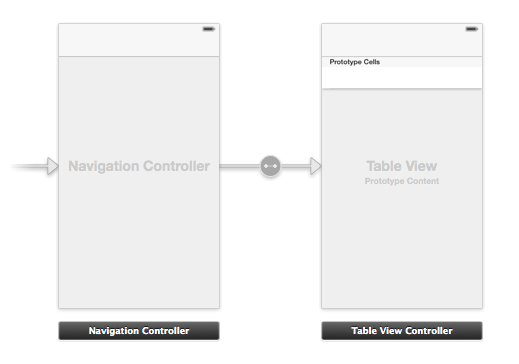
The starting point is the Xcode single view application template modified to have a table view controller embedded in a navigation controller as follows:
The Prototype Cell
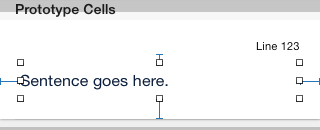
The table view has a single custom prototype cell holding two UILabels. The first label shows the line number, the second the text. The font of the first label is the Caption 1 style and is right justified. The second label is a Body style font with the number of lines property set to zero since it will have a variable number of lines. The basic setup is shown below (I increased the row height to 100 to make some space):

Auto Layout of the Prototype Cell
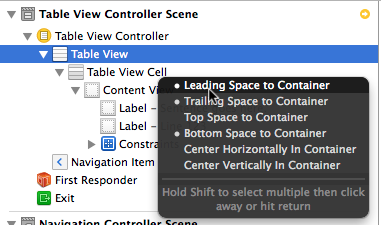
Add auto layout constraints for the sentence label to set the leading, trailing and bottom space between the label and the containing Content View. If you are not familiar with using auto layout in Interface Builder there a number of way of adding constraints (I am using Xcode 5.0.2 as I write this post). You can control drag between the label and the content view in the storyboard or in the document outline and shift-select the leading, trailing and botton space options.
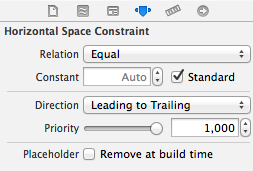
Depending on how you positioned the labels you may need to adjust the constraints to make them use the standard default spacing. You can do that by clicking on the constraint and then setting the value in the inspector:
Add a further constraint between the two labels to set the vertical spacing to the standard spacing. Repeat the process for the line number label adding leading, trailing and top space constraints between the label and the content view. Interface Builder will complain that the two labels have a vertically ambiguous layout. You can see this problem in the document outline of the storyboard if you click on the tiny red disclosure icon:
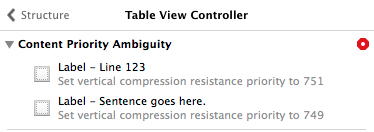
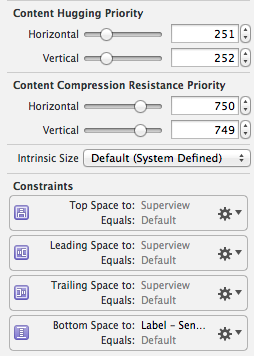
Auto layout does not know that we will be adjusting the size of the content view to ensure that both labels fit. It therefore expects a hint over which label should expand or compress first to fit the space. To remove the warning lower the vertical compression resistance and increased the vertical hugging priority of the line number label so that it wants to stay at its intrinsic size.
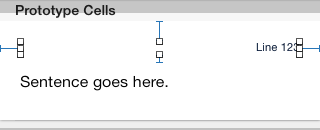
If you have all of the constraints in place they should look something like this:
Create the Class for the Custom Cell
Add a new Objective-C class to the project for the custom table view cell. The class only creates IBOutlet properties for the two labels:
// UYLTextCell.h
#import <UIKit/UIKit.h>
@interface UYLTextCell : UITableViewCell
@property (nonatomic, weak) IBOutlet UILabel *numberLabel;
@property (nonatomic, weak) IBOutlet UILabel *lineLabel;
@end

// UYLTextCell.m
#import "UYLTextCell.h"
@implementation UYLTextCell
@end
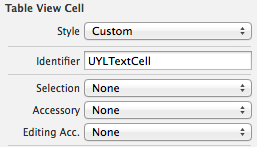
Set the class of the cell in the storyboard and connect the two outlet properties to their UILabels in the storyboard. Also set the reuse identifier of the table view cell:
Configure the Table View Data Source
Create a private property in the table view controller to hold our source data:
@interface UYLTableViewController ()
@property (nonatomic, strong) NSArray *sourceData;
@end
The source text is in a plist file named SourceData.plist that is read into memory in the getter of the sourceData property:
- (NSArray *)sourceData {
  if (!_sourceData) {
    NSString *filePath = [[NSBundle mainBundle]
    pathForResource:@"SourceData" ofType:@"plist"];
    _sourceData = [NSArray arrayWithContentsOfFile:filePath];
  }
  return _sourceData;
}
The table view controller must implement the two mandatory UITableViewDataSource methods. The first returns the number of rows in a section which it obtains from the size of the sourceData array:
- (NSInteger)tableView:(UITableView *)tableView numberOfRowsInSection:(NSInteger)section {
  return [self.sourceData count];
}
The second mandatory method returns the table view cell for a specified location:
- (UITableViewCell *)tableView:(UITableView *)tableView
    cellForRowAtIndexPath:(NSIndexPath *)indexPath {
  UITableViewCell *cell = [tableView
    dequeueReusableCellWithIdentifier:UYLCellIdentifier
    forIndexPath:indexPath];
  [self configureCell:cell forRowAtIndexPath:indexPath];
  return cell;
}
The UYLCellIdentifier is a static NSString defined to match the value set in the storyboard:
static NSString *UYLCellIdentifier = @"UYLTextCell";
The configureCell method takes care of setting up the cell contents. You will see why it is a good idea to keep that code in a separate method shortly.
- (void)configureCell:(UITableViewCell *)cell
  forRowAtIndexPath:(NSIndexPath *)indexPath {
  if ([cell isKindOfClass:[UYLTextCell class]])
  {
    UYLTextCell *textCell = (UYLTextCell *)cell;
    textCell.numberLabel.text = [NSString stringWithFormat:@"Line %ld",
      (long)indexPath.row+1];
    textCell.numberLabel.font = [UIFont
      preferredFontForTextStyle:UIFontTextStyleCaption1];
    textCell.lineLabel.text = [self.sourceData
      objectAtIndex:indexPath.row];
    textCell.lineLabel.font = [UIFont
      preferredFontForTextStyle:UIFontTextStyleBody];
  }
}
Note that we set the preferred font for the two labels each time we configure the cell in case the user has changed the text size.
Handling Dynamic Text Changes
The table view should be reloaded any time the user changes their text size preference. We do that by adding the view controller as an observer of UIContentSizeCategoryDidChangeNotification in viewDidLoad (and removing it in dealloc).
- (void)viewDidLoad {
  [super viewDidLoad];
  [[NSNotificationCenter defaultCenter] addObserver:self
           selector:@selector(didChangePreferredContentSize:)
               name:UIContentSizeCategoryDidChangeNotification
             object:nil];
}

- (void)dealloc {
  [[NSNotificationCenter defaultCenter] removeObserver:self
           name:UIContentSizeCategoryDidChangeNotification
         object:nil];
}

- (void)didChangePreferredContentSize:(NSNotification *)notification {
  [self.tableView reloadData];
}
Calculating the Cell Height
The row height for a cell needs to be calculated in tableView:heightForRowAtIndexPath:. However when this method is called we have not yet configured the contents of the cell which makes it tricky to determine its height. As mentioned previously the solution is to keep a dummy prototype cell available that is never displayed but used to layout a cell and determine the required height. Add a property to hold a UYLTextCell that will serve as the prototype cell:
@interface UYLTableViewController ()
...
@property (nonatomic, strong) UYLTextCell *prototypeCell;
@end
The prototype cell is created in the getter method of the property by asking the table view to dequeue a new cell:
- (UYLTextCell *)prototypeCell {
  if (!_prototypeCell) {
    _prototypeCell = [self.tableView
     dequeueReusableCellWithIdentifier:UYLCellIdentifier];
  }
  return _prototypeCell;
}
The full implementation of the delegate method to calculate the row height is shown below:
- (CGFloat)tableView:(UITableView *)tableView
    heightForRowAtIndexPath:(NSIndexPath *)indexPath {
  [self configureCell:self.prototypeCell forRowAtIndexPath:indexPath];
  [self.prototypeCell layoutIfNeeded];

  CGSize size = [self.prototypeCell.contentView
    systemLayoutSizeFittingSize:UILayoutFittingCompressedSize];
  return size.height+1;
}
Some notes to explain the important points:
- Use the configureCell method to configure the prototype cell with the contents for the current table view row. This is the same method used in tableView:cellForRowAtIndexPath: to configure a cell before it is displayed.
- Calling layoutIfNeeded on the cell forces an immediate layout of the cell.
- Call systemLayoutSizeFittingSize on the contentView of the cell to get the smallest size possible of the view that fits the constraints (UILayoutFittingCompressedSize).
- Return the height of the cell remembering to add 1 point for the cell separator.
Estimating Cell Height
At this point we have a working example with correctly sized table view cells. However there is a big performance problem any time the table is reloaded. To see the problem run the project on an actual device, background the app and in the device settings change the text size before switching back to the app. On my test device this completely blocks the user interface for a number of seconds as the height for nearly 2000 rows is recalculated. The solution is to implement the, new in iOS 7, method tableView:estimatedHeightForRowAtIndexPath:
- (CGFloat)tableView:(UITableView *)tableView
  estimatedHeightForRowAtIndexPath:(NSIndexPath *)indexPath {
  return UITableViewAutomaticDimension;
}
This method expects you to return an estimate for the height of the cell at a given location. The point of this method is to return a quick estimate so don’t spend a lot of time trying to be accurate. Producing an accurate estimate is also complicated by the need to consider the different dynamic text sizes the user could select.
A simple approach if you cannot easily estimate the size is to just return the system default value of UITableViewAutomaticDimension. If you retry the test the table view reload should no longer be noticeable.
Issue With Device Orientation Changes (Updated 17 March 2014)
As was pointed out in the comments (for which I am grateful) there was a problem with this code that caused the cell heights to be wrong when the device orientation changes to landscape. The credit for the solution goes to smileyborg who provides this GitHub project. See also this GitHub project by erf who pointed this out to me. The fix is to first ensure the width of the prototype cell is set to width of the table view when calculating the row height:
- (CGFloat)tableView:(UITableView *)tableView
  heightForRowAtIndexPath:(NSIndexPath *)indexPath {
  [self configureCell:self.prototypeCell forRowAtIndexPath:indexPath];

  self.prototypeCell.bounds = CGRectMake(0.0f, 0.0f,
    CGRectGetWidth(self.tableView.bounds),
    CGRectGetHeight(self.prototypeCell.bounds));
  ...
  ...
}
Secondly we need to implement layoutSubviews in our custom table view cell class to also set the preferred maximum width of the multiline label. The documentation for the preferredMaxLayoutWidth property provides the details:
This property affects the size of the label when layout constraints are applied to it. During layout, if the text extends beyond the width specified by this property, the additional text is flowed to one or more new lines, thereby increasing the height of the label.
// UYLTextCell.m
- (void)layoutSubviews {
  [super layoutSubviews];
  [self.contentView layoutIfNeeded];
  self.lineLabel.preferredMaxLayoutWidth =
    CGRectGetWidth(self.lineLabel.frame);
}
Wrapping Up
This was a longer post than I expected but hopefully you get the idea. You can find the sample Xcode project in my GitHub CodeExamples repository should you want to take a closer look.