I recently found myself needing to use the Swift stride method and realised I didn’t understand how it worked. Here’s my quick guide.
What’s A Strideable?
From Apple’s documentation for the Strideable protocol:
A type representing continuous, one-dimensional values that can be offset and measured.
For a type to be Strideable it must implement the advanced(by:) and distance(to:) methods.
In other words, you can get from one value to another in a collection by adding an offset (the stride) representing the distance between the two values. The stride is typically, but not restricted to, an integer or floating point type.
Creating Strides
You create a stride using one of two methods from the Swift Standard Library:
func stride<T>(from start: T,
  to end: T,
  by stride: T.Stride
) -> StrideTo<T> where T: Strideable

stride<T>(from start: T,
  through end: T,
  by stride: T.Stride
) -> StrideThrough<T> where T: Strideable
If you’re interested in looking at the source code you can find it in the Apple’s GitHub repository for the standard library.
The two methods produce either a StrideTo or StrideThrough sequence of the Strideable type running from the start value up to but maybe not including the end value at intervals of stride steps.
The main difference between the two methods is whether they include the final value. For example using the first “to” method to create a sequence of integers from 0 to 10 with a stride of 2 does not include the final 10:
let stride1 = stride(from: 0,
                     to: 10,
                     by: 2)  // StrideTo(<Int>
let s1 = stride1.map { $0 } // [0, 2, 4, 6, 8]
Compare this with the second “through” method that does include the final 10:
let stride2 = stride(from: 0,
                     through: 10,
                     by: 2) // StrideThrough<Int>
let s2 = stride2.map { $0 } // [0, 2, 4, 6, 8, 10]
Note that the final value is only included if it’s reached with an exact number of stride steps from the starting value. Repeating the examples with a stride of 3 produces the same sequence:
let stride3 = stride(from: 0, to: 10, by: 3)
let s3 = stride3.map { $0 } // [0, 3, 6, 9]

let stride4 = stride(from: 0, through: 10, by: 3)
let s4 = stride4.map { $0 } // [0, 3, 6, 9]
The sequence does not need to be of increasing value. You can use a negative stride to step down from the start value towards the end value:
let stride5 = stride(from: 10, to: 0, by: -2)
let s5 = stride5.map { $0 } // [10, 8, 6, 4, 2]
Note again that this “to” sequence does not include the final zero value. If the stride value is not compatible with the start and end values you get an empty sequence. For example, using a negative stride value when the start value is less than the end value:
let stride6 = stride(from: 0, to: 10, by: -2)
let s6 = stride6.map { $0 } // []
Note that using a stride of 1 is like using a half-open or closed range:
// Open range [0, 1, 2, 3, 4]
let stride7 = stride(from: 0, to: 5, by: 1)
let range7 = 0..<5
// Closed range [0, 1, 2, 3, 4, 5]
let stride8 = stride(from: 0, through: 5, by: 1)
let range8 = 0...5
Example Uses
I suppose the most common use of strides is to iterate over values:
for oddValue in stride(from: 1, through: 30, by: 2) {
  print(oddValue)
}
// 1,3,5,7 ... 29
A more complicated example where I needed to extract a column from a matrix that I had represented as an Array of integers:
//  0  1  2  3
//  4  5  6  7
//  8  9 10 11
let matrix = [0, 1, 2, 3, 4, 5, 6, 7, 8, 9, 10, 11]

let rows = 3
let columns = 4
For example, to extract the last column:
let column = 3
let result = stride(from: column,
                      to: rows*columns,
                      by: columns)
  .map { matrix[$0] }
// [3, 7, 11]
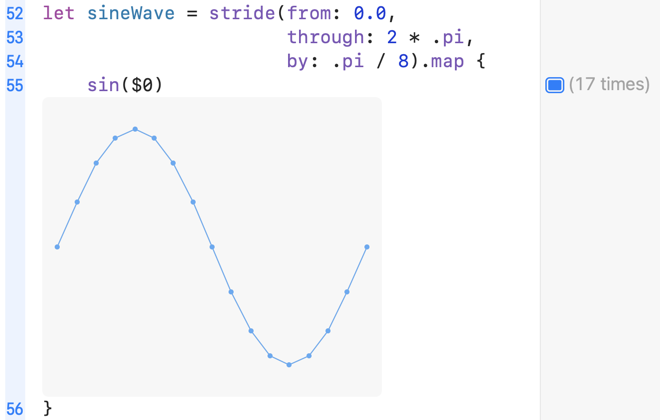
Finally, generating some nice graphs:
let sineWave = stride(from: 0.0,
                   through: 2 * .pi,
                        by: .pi / 8)
  .map { sin($0) }