Here’s my situation. I had a pre-iOS 13 App that already had a setting to allow the user to switch from the default appearance to a “dark” mode. When updating to iOS 13 I wanted to keep the “light” and “dark” modes but also have the choice to follow the device appearance setting:
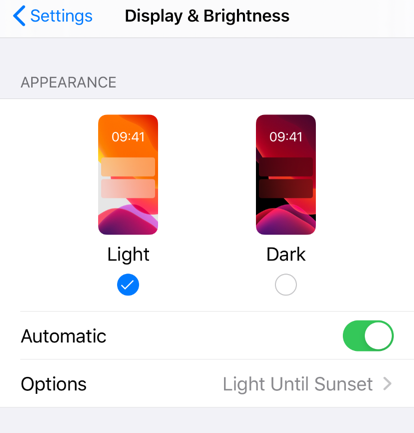
My Apps appearance settings ended up with three options:
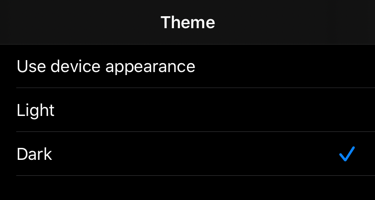
The default is to use the device appearance which could be light or dark and maybe switching automatically during the day. The user can also force the app to always use the light or dark themes if they prefer independent of the device setting.
Supporting Dark Mode
I’ll skip the details as Apple has done a good job of documenting the steps to supporting dark mode (see the links at the end of this post). In summary, the most common steps I’ve needed:
-
Replace fixed colors with adaptive/semantic colors. The pre-defined semantic colors like
labelColor,systemBackgroundColororsystemGroupedBackgroundColorand adaptive colors likesystemBlueColorautomatically adapt to dark mode. The old style fixed standard colors likeblueColordo not. -
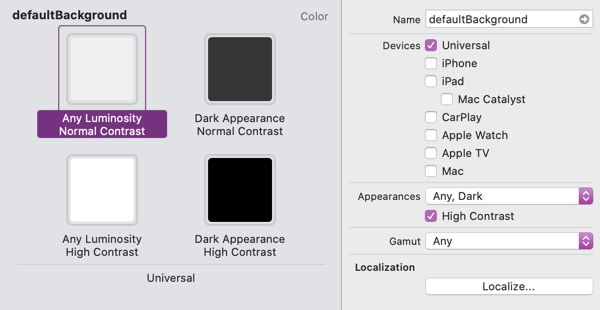
When the pre-defined adaptive/semantic colors are insufficient create custom dynamic colors in the asset catalog (include a high contrast variation when it makes sense):
-
Add asset variations for any images or icons that don’t look good in dark mode.
-
When using
UIActivityIndicatorViewreplace the fixed color styles with the (iOS 13 only)mediumorlargestyles.
With the basic support for dark mode done there are a number of options for overriding the default App appearance:
Fixed Style for Whole App
This approach is most useful when you want to opt out of dark mode completely. Add the UIUserInterfaceStyle key to the App’s Info.plist file. Using a value of Light (or Dark) forces the app to use that appearance and ignore the user’s choice in the device settings.
Override Interface Style
A more flexible approach is to override the interface style for a window, view or view controller by setting its overrideUserInterfaceStyle property:
overrideUserInterfaceStyle = .dark
The scope of the override depends on where you set it:
- For view controllers it overrides the style for the view controller’s view hierarchy and any child view controllers.
- For views it overrides the style for just that view and its subviews.
- For windows it overrides the syle for the window, its root view controller and hierarchy and any content presented in the window.
In my case the last option is the one that I want.
Note: Use traitCollection.userInterfaceStyle if you want to get the current style.
An Example
To give a practical example I have a small sample App that uses a theme with three options matching the settings we saw earlier:
enum Theme: Int {
  case device
  case light
  case dark
}
These choices map onto the system user interface styles:
extension Theme {
  var userInterfaceStyle: UIUserInterfaceStyle {
    switch self {
      case .device:
        return .unspecified
      case .light:
        return .light
      case .dark:
        return .dark
    }
  }
}
I load and save the user’s choice of theme using UserDefaults:
extension UserDefaults {
  var theme: Theme {
    get {
      register(defaults: [#function: Theme.device.rawValue])
      return Theme(rawValue: integer(forKey: #function)) ?? .device
    }
    set {
      set(newValue.rawValue, forKey: #function)
    }
  }
}
Note: #function returns the name of the enclosing property as a String (“theme” in this case) which is a handy way to get a key.
My theme settings view controller takes care of overriding the style for the window when the user changes the theme. This immediately updates the appearance style for the whole (single-window) App:
private func configureStyle(for theme: Theme) {
  view.window?.overrideUserInterfaceStyle = theme.userInterfaceStyle
}
Note: If you support multiple windows on the iPad you’d need to do this for all window scenes.
I also make sure to override the style when launching the App, retrieving the user’s choice from the user defaults. That could be in the App Delegate didFinishLaunching method or the scene delegate willConnectTo method if you’re using one:
let defaults = UserDefaults.standard
window?.overrideUserInterfaceStyle = defaults.theme.userInterfaceStyle
Get the Code
I’ve skipped some details. See the source code in my GitHub repository for the full sample project: