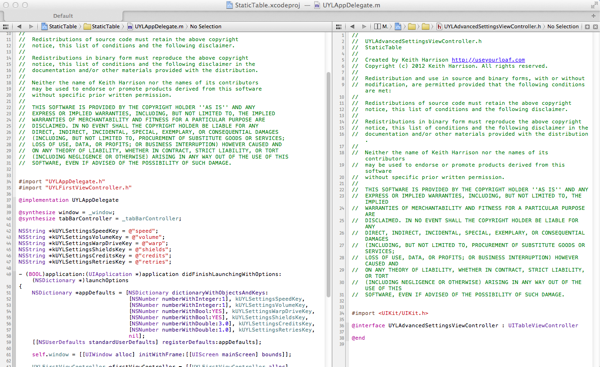
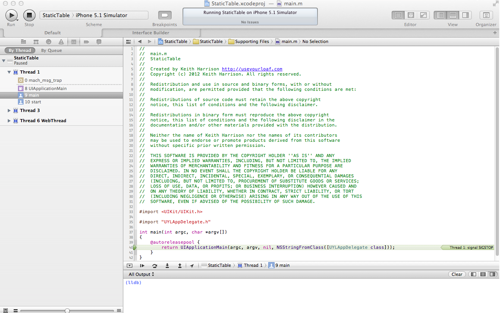
For a long time after Xcode 4 was released I felt that I was always fighting the user interface. I never seemed to have the right window configuration for the task at hand. I was constantly bouncing between showing or hiding various panes such as the navigator or the utilities. This is not really surprising if you stop and consider how configurable the Xcode window is:
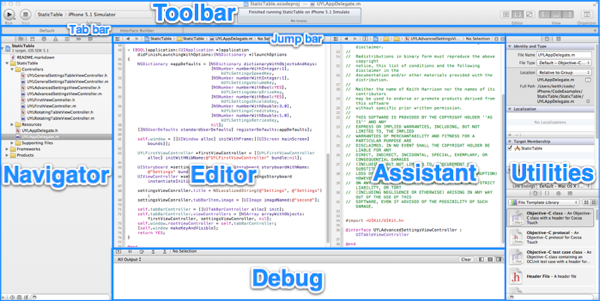
Almost all of the elements that I have highlighted above can be shown, hidden or configured in some way. If you are trying to manage that manually it pretty much guarantees that it will be setup incorrectly for whatever task you are trying to perform.
Taming Xcode With Behaviors
I was vaguely aware of Xcode Behaviors when Xcode 4 launched but to be honest it was not a feature that really grabbed my attention (not even with Apple forcing the US spelling on me). The behavior settings have their own pane accessible from the Xcode settings (or directly from the Xcode -> Behaviors menu):
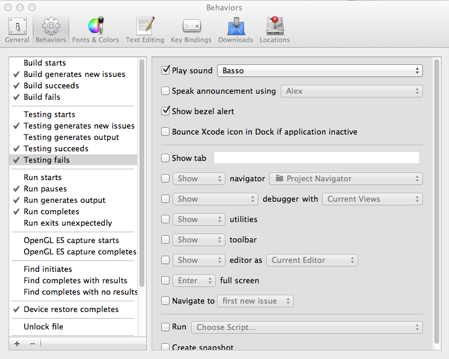
I think the reason why this is an overlooked feature is that at first glance it does not appear to do very much. It may be that you really want to stop Xcode from playing a “Basso” sound when a test fails but in general I find most of the default settings to be fine. The real power of behaviors comes when you realise that you are not limited to triggering them in response to an event (such as “Testing fails”).
If you click the “+” button at the bottom of the Behaviors preference pane you can add your own custom settings which can then be assigned a keyboard shortcut. This allows you to become much more task oriented. The basic approach is to define a custom behavior for each key task you perform (editing, debugging, NIB design, etc.). The keyboard shortcuts then provide a quick way to switch between tasks and always ensure that Xcode is configured just the way you want it.
This is best explained with some examples.
Start With Home
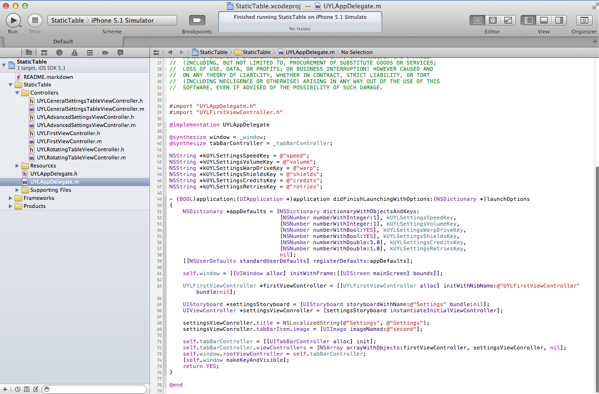
I will start with a basic project home screen which serves as a general purpose view for when I am not engaged in a specific task. This is my preferred view when I want to browse a project and has the project navigator showing on the left with the standard editor and toolbar. The inspectors in the utilities pane and the debug window are hidden. For reasons that I will explain shortly I have also labelled the tab “Default”:
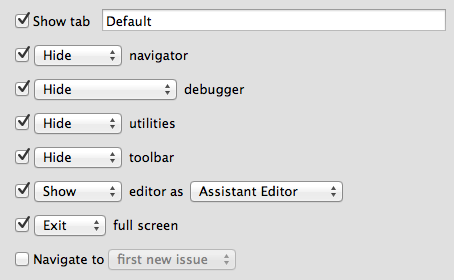
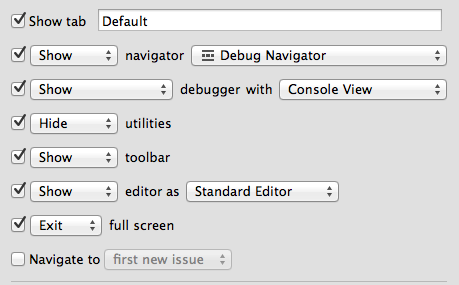
To create this configuration, add a new behavior named “Home” and configure the various settings as shown below:
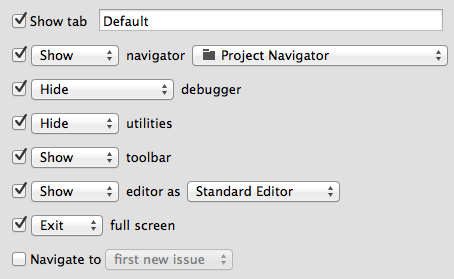
A key tip here is to explicitly decide between showing or hiding each component of the user interface. This ensures that everything will be the way you want it when you switch back and forth between various task contexts. So in this case we ensure that the project navigator, toolbar and standard editor are shown and hide everything else. I tend not to use Xcode in full screen mode since I generally work with dual monitors but just in case I always make sure to exit from full screen.
The final step is to set the keyboard shortcut for this behavior. You can do this by clicking on the command key icon next to the behavior name or if you wish from the Key Bindings pane within the Xcode settings. It can be tricky to find a set of keyboard shortcuts that are not already in use by Xcode. In this case I settled on Control-Option-H:
![]()
Now wherever I am in Xcode I know I can return to a sane window configuration with my home behavior keyboard shortcut.
Coding
The next behavior that I will show is for those situations when I just want to focus on the code. In this configuration I want most items hidden so that I just have the editor displayed. By default I like to use the assistant editor so that I can see the implementation and interface files next to each other. This gives me a window configuration as shown below:
The configuration for this behavior is shown below and I use it with the keyboard shortcut Control-Option-C:
Coding with focus
I actually find I need two slightly different behaviors for coding with and without the assistant editor. At first it is tempting to just define one and toggle between the standard and assistant editors. The keyboard shortcuts for this are command-return and option-command-return respectively. However I have found that once you start to use behaviors it is better to define a new behavior any time you find yourself regularly tweaking the user interface.
The problem with manually changing the layout is that it does not stick as you switch back and forth and before you know it you are back to fighting with Xcode. So my general rule is to never change the window layout manually but always create behaviors. I therfore have another behavior similar to the “Code” behavior named “Focus” with the keyboard shortcut Control-Option-Command-C. I will not show the configuration this time as it is the same as the previous one with the exception that it specifies the “Standard Editor”. This allows me to switch to either coding configuration at any point without having to think.
Storyboarding
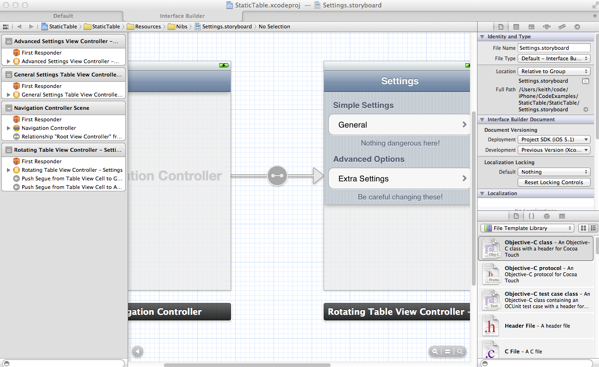
The next most obvious task in Xcode is NIB editing. I have called this behavior “Storyboarding” as it sticks in my mind better but it refers to any use of Interface Builder. For this configuration I get everything out of the way except the standard editor and utilities since you generally need the inspector with Interface Builder.
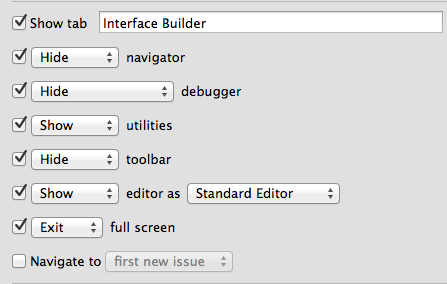
Since the Interface Builder is not shown until you select a NIB or storyboard file I find it useful to create a second tab named “Interface Builder” and keep it with a NIB or Storyboard selected. Switching to and from the Storyboard behavior then switches between the “Default” and “Interface Builder” tabs. The jump bar allows you to quickly switch between different NIB or Storyboard files you may have in a project once you are in the Storyboard view.
The configuration for this behavior is shown below and I use it with the keyboard shortcut Control-Option-S.
If you also like to use Interface Builder with the assistant editor so that you can drag and drop into the implementation files you may want to add another Storyboard behavior as we did with the Code setup.
Debugging
The final behavior I will show is for debugging. This has the debug navigator on the left, the console at the bottom, the toolbar and standard editor. I also like to set the debug window to just show just the console without the variables view:
You can probably guess the rest by now but for completeness the configuration is show below and the keyboard shortcut that I use is Control-Option-D.
The final configuration if you have been following along should look as below:
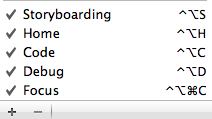
You can also see the complete list with the keyboard shortcuts from the Xcode -> Behaviors menu.
Final Comments
It has taken me a while to get into the habit of using keyboard shortcuts to switch behaviors. However once I got everything setup the way I want I feel less like I am fighting with Xcode. The behaviors that I have used in this post may not work for you since we all work differently but I hope it gives you some ideas on how to get started.