How do you show content on an external screen?
Showing content on an external screen is nothing new. The notifications that tell you someone has connected/disconnected a screen have existed since iOS 3.2. A lot has changed since then. Since iOS 13 we have scene delegates and in iOS 14, SwiftUI gained a new app lifecycle. How do we work with external screens in a modern iOS app?
Starting with UIKit
To experiment I have an app whose main user interface allows you to enter a text message. My intention is then to show the text message as a large text banner on the external screen. I keep the text message as a published property of a message store observable object:
// MessageStore.swift
final class MessageStore: ObservableObject {
  @Published var message: String?
}
I create the store in the app delegate and pass it to the root view controller in the scene delegate:
// AppDelegate.swift
@main
class AppDelegate: UIResponder, UIApplicationDelegate {
  let store = MessageStore()
}
// SceneDelegate.swift
final class SceneDelegate: UIResponder, UIWindowSceneDelegate {
  var window: UIWindow?

  func scene(_ scene: UIScene, willConnectTo session: UISceneSession,
    options connectionOptions: UIScene.ConnectionOptions) {
    guard let appDelegate = UIApplication.shared.delegate as? AppDelegate,
          let rootViewController = window?.rootViewController as? MessageViewController else {
      return
    }
    rootViewController.store = appDelegate.store
  }
}
I’ve created the user interface for the root MessageViewController in a storyboard which I’ll skip here. The view controller creates a subscription to the message property published by the store and uses it to update a text view:
final class MessageViewController: UIViewController {
  @IBOutlet private var textView: UITextView!

  var store: MessageStore?
  private var cancellables = Set<AnyCancellable>()

  override func viewDidLoad() {
    super.viewDidLoad()
    store?.$message
      .assign(to: \.text, on: textView)
      .store(in: &cancellables)
  }
}
The text view delegate method tells us when the user changes the text so we can update the store:
extension MessageViewController: UITextViewDelegate {
  func textViewDidChange(_ textView: UITextView) {
    store?.message = textView.text
  }
}
Here’s how the user interface looks:
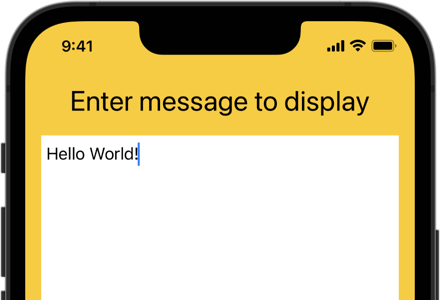
Our challenge is to show the text message on the external screen.
Using Scene Delegates
The default Xcode template for a new UIKit project provides both an AppDelegate and SceneDelegate. The default scene configuration in Info.plist sets the class of the scene delegate and the name of the storyboard used to load the main user interface:

Notes
-
The presence of the “Application Scene Manifest” in
Info.plistopts your app into supporting scenes. The scene delegate, not the app delegate, now owns the window. -
In the UIKit app template, “Enable Multiple Windows” defaults to
NO. You should change this toYESif you want to support multiple windows on the iPad. It’s not required to support a window on an external screen. -
You’re not forced to use storyboards with scene delegates. If you prefer to build your layout in code, remove the storyboard name key from
Info.plistand create the window and root view controller in thescene(_:willConnectTo:options:)delegate method:guard let scene = scene as? UIWindowScene else { return } window = UIWindow(windowScene: scene) window?.rootViewController = MyViewController() window?.makeKeyAndVisible() -
I recommend making changes to the
Info.plistusing the Info tab of the target settings rather than in theInfo.plistthat appears in the project navigator sidebar (see Xcode 13 Missing Info.plist). I still see problems with the two locations not keeping in sync when changing settings (FB9397345) which can be confusing.
Adding An External Screen
We need a new scene configuration to show our user interface for the external screen. All scene sessions have a configuration (UISceneConfiguration) that includes a scene session role (UISceneSession.Role). There are four possible roles for a scene session:
windowApplication- an interactive window on the device’s main screen.windowExternalDisplay- a non-interactive window on an externally connected screen.carTemplateApplication- interactive content on a CarPlay enabled screen.CPTemplateApplicationDashboardSceneSessionRoleApplication- navigation content on a CarPlay dashboard.
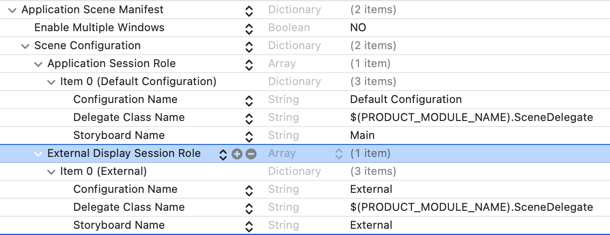
The windowApplication role is what we have in our default scene configuration. It’s shown as an “Application Session Role” in Info.plist. We need a new session configuration using the windowExternalDisplay role. In the Info.plist add a new item under “Scene Configuration” and choose “External Display Session Role”:
I named the configuration “External”. I’m using a separate storyboard for the user interface. I could use a different scene delegate class but as we’ll see shortly there’s no need in this case.
My “External” storyboard builds the user interface for the external screen. It has a single view controller (BannerViewController) that has a single label to show the text message. Don’t forget to set the initial view controller:

The banner view controller is like the earlier message view controller, except that it’s not interactive. A subscription to the message property published by the store keeps the label updated:
final class BannerViewController: UIViewController {
  @IBOutlet private var textLabel: UILabel!

  var store: MessageStore?
  private var cancellables = Set<AnyCancellable>()

  override func viewDidLoad() {
    super.viewDidLoad()
    store?.$message
      .receive(on: RunLoop.main)
      .assign(to: \.text, on: textLabel)
      .store(in: &cancellables)
  }
}
We need to change our scene delegate to pass the store object into the banner view controller. If you look back at the earlier code, I’m retrieving the view controller from the rootViewController property of the window. For the default scene that’s a MessageViewController. For the external scene it’s a BannerViewController.
We could check the session role before configuring each view controller:
if session.role == .windowExternalDisplay { ... }
Since all we do is pass the store into the root view controller I ended up creating a small protocol:
protocol StoreController: UIViewController {
  var store: MessageStore? { get set }
}
I then make both view controllers conform to this protocol:
extension MessageViewController: StoreController {}
extension BannerViewController: StoreController {}
We can then tweak our scene delegate code to work for any view controller that adopts the StoreController protocol:
func scene(_ scene: UIScene, willConnectTo session: UISceneSession,
  options connectionOptions: UIScene.ConnectionOptions) {
  guard let appDelegate = UIApplication.shared.delegate as? AppDelegate,
  let rootViewController = window?.rootViewController as? StoreController else {
    return
  }
  rootViewController.store = appDelegate.store
}
Testing External Screens
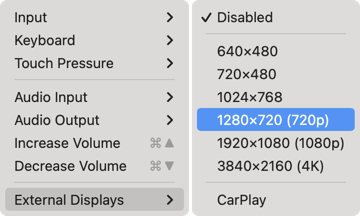
I’m using Apple Digital AV Adapters to plug my iOS devices into an HDMI display. If that’s not available you can configure the simulator to show an external display. In the I/O menu, use the External Displays menu to choose the size of external display you want to simulate:
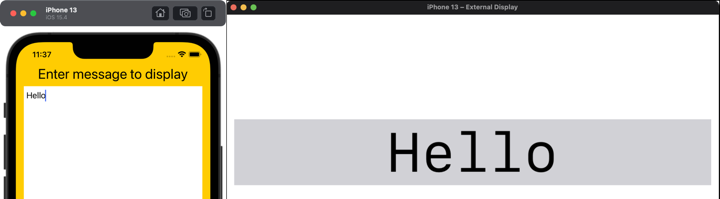
I don’t find this to be reliable, clicking on the external display window will often cause the simulator to restart (FB9993865). Either way, you should see the banner view on the external display:
What About SwiftUI?
Apple added a new app life cycle to SwiftUI in iOS 14. What they didn’t add is any direct support for creating a scene for an external screen. That means we need to fallback to UIKit app and scene delegates. I’ll look at how that works next time.