Xcode has supported Git for version control since version 4.0 but I generally prefer to perform my version control from the command-line. The only version control operation that I do sometimes perform with Xcode is visualising differences between file versions. Xcode does a pretty nice job of showing the two versions of a file side by side and highlighting the additions/deletions in a way that is a lot clearer than a command-line diff.
The other version control operation that I suspect could sometimes benefit from some visual tools is the management of branches and in particular the merging of branches. Since Xcode has the ability to manage Git branches I thought I would take a look and share my experiences in this post.
Creating a Branch
For the purposes of this post I am going to use my CodeExamples repository and create a new branch to experiment with converting one of the example projects to ARC. The Xcode features for managing branches are (mostly) contained in the Repositories section of the Xcode Organizer.
To create a new Git branch from the Xcode organizer you need to make sure that the Branches folder is selected in the left-hand Navigator pane. You should then see the Add Branch and Remove Branch buttons in the command bar at the bottom:

When you select the Add Branch button you get a dialog box allowing you to name the branch and also to specify from which branch this new branch should be based. Since at this point we only have the master branch we will use that and name the new branch “ARC-Conversion”:

For comparison to create this new branch from the command-line using the branch command:
$ git branch ARC-Conversion
One thing to be aware of if you are using the command-line is that creating the branch will not also switch you to the new branch.
Switching branches
When we created the branch using Xcode we selected the checkbox to switch us to the new branch. The current branch is always displayed in the top right-hand corner of the Organizer window when the project directory is selected in the Navigator pane on the Organizer.
![]()
To verify the current branch from the terminal use the branch command to list all of the branches. The current branch is indicated by the leading “*”:
$ git branch
* ARC-Conversion
  master
If you want to switch between branches from within Xcode you can do that from the Organizer using the appropriately named “Switch Branch” icon in the bottom right corner (again ensure you have the project directory selected in the left-hand pane and not the Branches or Remotes folders):

This drops down a dialog box which allows you to select from the available branches. The command-line equivalent using the checkout command to switch to the master branch would be as follows:
$ git checkout master
To switch back to our feature development branch:
$ git checkout ARC-Conversion
One thing you need to be aware of if you are performing git version control from the command line with the project open in Xcode is that it does not always immediately spot when you have changed something. I find with the Organizer that you need to switch between some different views before it spots that the current branch has changed.
Committing Changes
For the purposes of this example I am going to generate some changes by converting this project to ARC. I will not cover that process and the results here as that is a topic for a separate post, for now it is sufficient that we have some changes to our project that we need to commit. The files that have been changed are visible in the Xcode Navigator pane (marked with “M” for modified):

You can also of course always check what has changed from the command-line (note that we are on the ARC-Conversion branch):
$ git status
# On branch ARC-Conversion
# Changes not staged for commit:
#   (use "git add <file>..." to update what will be committed)
#   (use "git checkout -- <file>..." to discard changes in working directory)
#
#       modified:   Stepper.xcodeproj/project.pbxproj
#       modified:   Stepper/UYLAppDelegate.m
#       modified:   Stepper/UYLViewController.h
#       modified:   Stepper/UYLViewController.m
#no changes added to commit (use "git add" and/or "git commit -a")
To commit these changes to our new branch you can either use the Commit button in the Organizer or from the Xcode application menu use File > Source Control > Commit or if you can remember the keyboard shortcut simply type Option-Command-C.
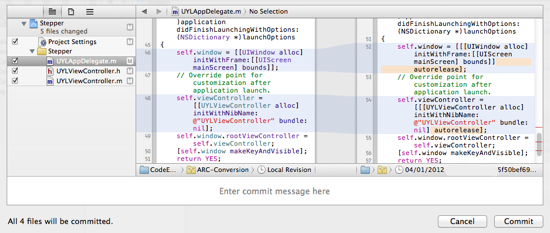
The commit window gives you a very nice overview of the files that will be included in this commit so that you can review the changes. If you really want to you can deselect some of the files from the commit, but all you really need to do is enter a commit message (always a good idea) and hit the commit button.
The command-line equivalent would be something like this:
$ git commit -a -m "Converted to ARC"
[ARC-Conversion 7ec268a] Converted to ARC
 4 files changed, 6 insertions(+), 15 deletions(-)
Merging Changes Back to Master
Once you have completed development of the new feature (and of course tested everything) it needs to get merged back into the master branch. To do that you first need to switch back to the Master branch (using Xcode or from the command-line).
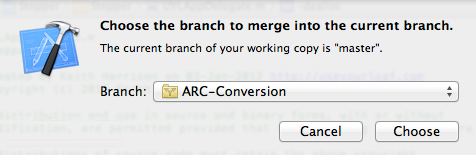
At this point things get a little bit confusing with Xcode as to merge the changes you need to switch back to the Xcode project window. There does not seem to be any way to perform the merge from the Xcode Organizer window. With the project window selected you can access the File > Source Control > Merge menu option. I find this a little annoying that the branching and merging commands cannot all be performed from the Organizer. Anyway once you find the Merge command you should see a dialog asking you to confirm which branch you want to merge back into the current (master) branch. Since we only have one branch in this example we just need to choose the ARC-Conversion branch:
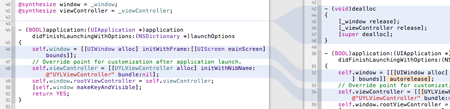
The Merge window looks very similar to the Commit window in that it allows you to view a diff of the changes but also importantly to select which branch to keep in the event that you have a conflict. In a real world situation it is possible that the master branch has also changed whilst we have been working on our great new feature. This may mean you need to keep the changes from one of the branches or maybe merge the two sets of changes manually.
The Xcode Merge window shows you each change along with an indicator showing which change is being preserved. In the screenshot below the master branch is on the left and the ARC-Conversion branch is on the right.

The small indicator icon in the middle indicates that the change from the ARC-Conversion branch has been merged into the master branch version of the file. The icons at the bottom of the window allow you to change this and if required discard the change from our feature branch. Of course, you can also manually edit the master file at this point to resolve any conflicts.
![]()
To merge the branch manually in the situation where the master branch has changes in a file:
$ git merge ARC-ConversionAuto-merging Stepper/Stepper/UYLViewController.m
CONFLICT (content): Merge conflict in Stepper/Stepper/UYLViewController.m
Automatic merge failed; fix conflicts and then commit the result.
In this case we need to manually fix the conflict in the UYLViewController.m file and then tell git that we have resolved the conflict by adding the file back to the changes to be committed. We can then perform the commit to finish the merge:
$ git add Stepper/Stepper/UYLViewController.m$ git commit
  -m "Merge of ARC-Conversion branch"
Deleting the Branch
Now that all of the changes have been merged backed into the master branch we can clean up by deleting the feature branch. From the Xcode Repositories Organizer view this is as simple as selecting the branch and then using the Remove Branch icon.
Xcode will complain if you try to delete a branch that it thinks has not been merged. In playing with this feature I found that Xcode would get confused if I needed to manually resolve some conflicts and performed the final merge and commit from the command-line. To get Xcode to delete a branch without complaining it was necessary to perform an additional merge from within Xcode - which of course did nothing as all of the changes had already been merged.
Alternatively to delete the branch from the command-line:
$ git branch -d ARC-Conversion
Summary
In playing with Xcode to perform branches and merges I have to say I really wanted to like the feature. I have always liked the way that Xcode visually displays code diffs and the ability to extend that capability to resolving conflicts during merges seems promising. I am assuming that a few of the minor glitches and bugs will get cleaned up but even so I think I will stick to the command-line for branching and merging. The command-line is always going to be faster once you get the commands stuck in your head and it just feels safer not to have Xcode acting as an intermediary. The visual tools are a nice bonus option to have though.