Apple added the App Intents framework in iOS 16 giving us a way to programmatically make an app’s content and actions available to the Shortcuts app, Siri, Widgets, and Spotlight. Here’s my quick guide to get started.
App Intents
I don’t think I ever understood the old system of creating custom intents using Xcode Intent Definition files. Fortunately App Intents, a Swift-only framework introduced in iOS 16, replaces all of that.
App Intents show up in a lot of places. You use them to add support for App Shortcuts to Siri, the App Shortcuts App, the iPhone Action button, Spotlight and also in iOS 17 to make widgets interactive. You can add support for parameters, custom UI, and make your app’s data available to Spotlight. That’s a lot when you first try to use the framework.
I recommend watching the Design App Shortcuts video from WWDC22 to get an overview of the capabilities. You can create up to ten App Shortcuts per app but Apple recommends you focus on the two to five shortcuts that cover your App’s key features.
A good starting point is to look for self contained actions that the user can run without needing to open the App.
Our First App Intent
To get started I’m working with an App that logs timestamps to a timeline. Let’s look at what it takes to create an App Shortcut that creates am empty timeline log.
The first thing we need is to create an AppIntent that represents the action we want to provide to the system. You need a title and a perform method:
struct CreateTimelineIntent: AppIntent {
  static let title = LocalizedStringResource("Create Timeline")

  @MainActor
  func perform() async throws -> some IntentResult {
    let store = DataStore.shared
    store.newLog()
    return .result()
  }
}
Notes:
-
The App Intents framework makes use of
LocalizedStringResourcefor localizable strings so the system can defer lookup to a later time. This allows things like the Siri UI which runs in a separate process to use different localizations from the app. -
By default, the perform action runs on an arbitrary queue. My DataStore class takes care of creating the new log but needs to run on the Main Actor so I’ve annotated the perform method with @MainActor.
-
The perform method returns the result of performing the action (an IntentResult). For now, I have nothing meaningful to return so I’m returning an empty .result() to indicate the intent has finished.
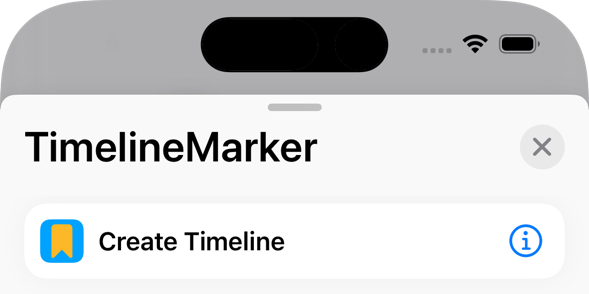
That should be enough to get the shortcut to show up in the Shortcuts app and a Spotlight search. After building and running on the Simulator, the shortcut shows up as an App action. (Add a new Shortcut then Add Action, select Apps and then click on the app to see the available shorcuts):
Note: I could not get the Shortcut to show up if I added it in a Swift Package. It only seems to work if I include it in the App bundle.
App Intent Options
There’s a lot more we can do to improve our first App Shortcut. Let’s look at some of the options:
Adding a description
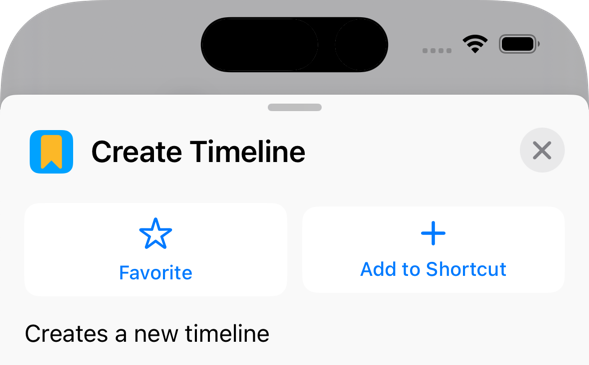
The AppIntent has an optional intent description to explain the purpose:
static let description = IntentDescription("Creates a new timeline")
The description shows up in the Info window for the App action:
Open App When Run
By default, running the shortcut launches the App in the background. To force the app to the foreground set the openAppWhenRun flag to true:
static let openAppWhenRun = true
Discoverability
By default, the Shortcut is discoverable both in the Shortcuts app and Spotlight. If you set isDiscoverable to false the user will no longer be able to find the Shortcut. This is useful if you only want the Shortcut to run from a button action in the App or Widget.
static let isDiscoverable = false
Adding A Parameter
My App Intent would be more useful if it allowed parameters. For example, I’d like to be able to name the timeline. We can do that by adding a parameter to the App Intent:
@Parameter(title: "Name",
  description: "The name of the timeline.",
  default: "Timeline")
var name: String?
My name parameter is an optional String. I’ve provided a default parameter but I can also stop the perform action and have the system prompt the user for a value:
guard let name else {
  throw $name.needsValueError("Provide a name")
}
The @Parameter wrapper creates an IntentParameter and supports a wide range of primitive types (Integers, Doubles, Booleans, Strings, URLs) and Foundation types like Dates, Files, Currencies, and Measurements. You can also support custom types using App entities and enums but that’s for another time.
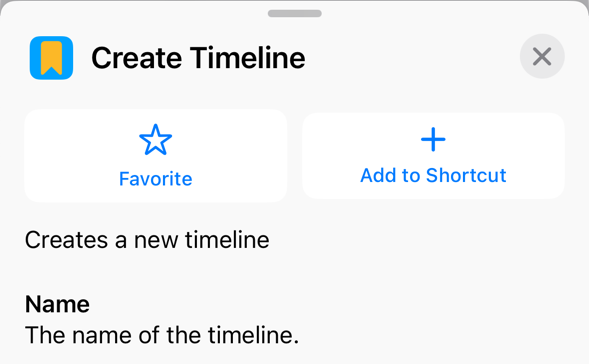
The description and default value are optional. The description shows up in the action info dialog to explain the purpose of the parameter:
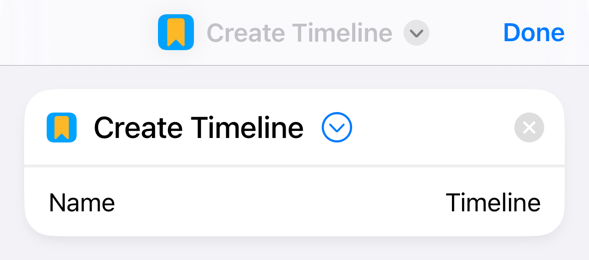
Adding the action to the Shortcut now shows the Name parameter together with the default value:
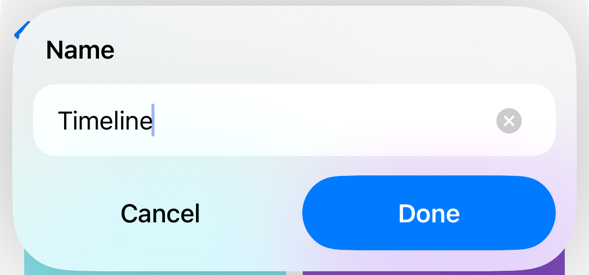
Clicking on the default value allows me to change it to some other fixed value or I can have the Shortcut prompt the user each time for the value:

Running the Shortcut now prompts the user to enter a new value for the name, accept the default, or cancel:
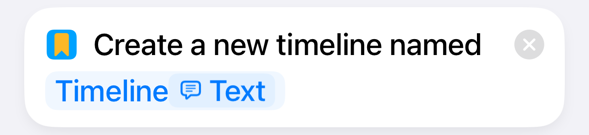
As you add more parameters to an App Intent it can be useful to summarise the result to the user:
static var parameterSummary: some ParameterSummary {
  Summary("Create a new timeline named \(\.$name)")
}
The parameterSummary provides a summary description of what the shortcut will do. Note that I’m using the wrapped value of the name parameter. The summary shows up in the Shortcuts App:
There’s a lot more we can do with parameters but I think that’s enough to get started.
Adding to Siri
Finally to make our App Intent show up in Siri we need to wrap it in an AppShortcut and list it in an AppShortcutsProvider:
struct TimelineShortcuts: AppShortcutsProvider {
static var appShortcuts: [AppShortcut] {
AppShortcut(
intent: CreateTimelineIntent(),
phrases: [
"New timeline in \(.applicationName)",
"Create timeline in \(.applicationName)",
"Start timeline in \(.applicationName)",
],
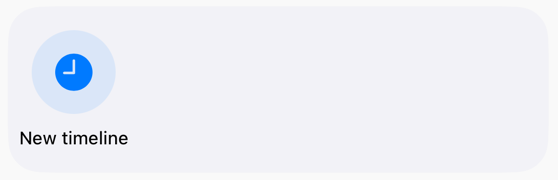
shortTitle: "New timeline",
systemImageName: "clock.fill"
)
}
static var shortcutTileColor: ShortcutTileColor = .blue
}
The AppShortcutsProvider lists all of the App’s shortcuts. Each AppShortcut annotates an AppIntent with the phrases the user can speak to Siri to run the intent.
- Apple recommends you add multiple phrases to cover the common synonyms a user might use to run the action (“new”, “create”, “start”, etc.).
- The phrase must include the App name. Use the
.applicationNameparameter to refer to the App as this includes any App synonyms you might have added for the app name. - The short title and system image name show up in a more compact list of actions in the Shortcuts app. The shortcutTileColor sets the color of the shortcut icon:
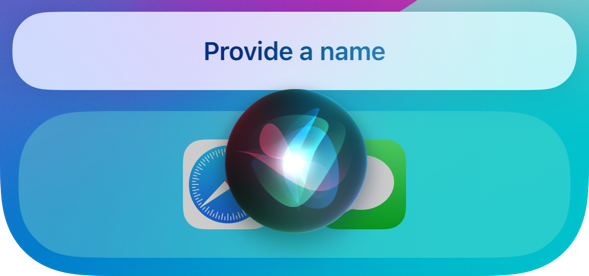
That should be enough for us to ask Siri to create a new timeline for us. Siri runs the intent and pauses to ask us for the name of the timeline:
What’s Next?
I’ve only scratched the surface of the App Intents framework. The complexity and scope can be overwhelming. I would suggest starting with one or two self-contained actions and build from there. I’ll explore more of the possibilities in future posts.