Did you spot that iOS 11 added a couple of new layout guides to UIScrollView? If you find using Auto Layout with a scroll view confusing they might help you remember how to add your constraints.
I read a great post recently by Agnes Vasarhelyi on Scrollable UIStackView which describes setting up constraints for a scroll view. It reminded me that I meant to take a look at the new layout guides Apple added to UIScrollView in iOS 11 to see if they make the setup any easier to understand.
Let’s first recap the classic way to setup your constraints with a scroll view.
Scroll Views - The Classic Setup
Here is my layout for a weather forecast view. The view has a title label, an image view and a description label. Both of the labels are using dynamic type which means the height of my view can change dramatically so it needs to scroll vertically:
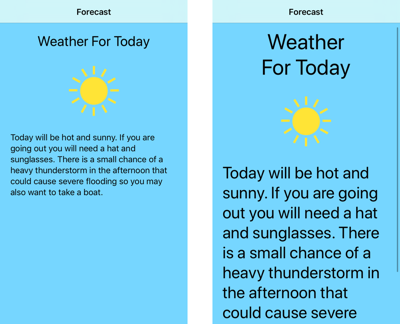
It is often easier to use a containing content view when working with scroll views. This could be a stack view or in my case a custom UIView subclass to contain my two labels and the image view:
class ForecastView : UIView {
  let titleLabel: UILabel
  let imageView: UIImageView
  let summaryLabel: UILabel
}
I will skip the details of the internal layout of the content view and focus on the setup of the scroll view. In my view controller I create an instance of my content view and add it as a subview of the scroll view:
class ForecastViewController: UIViewController {
  private let forecastView: ForecastView = {
    let view = ForecastView()
    view.translatesAutoresizingMaskIntoConstraints = false
    view.backgroundColor = UIColor(named: "SkyBlue")
    return view
  }()

  private lazy var scrollView: UIScrollView = {
    let scrollView = UIScrollView()
    scrollView.translatesAutoresizingMaskIntoConstraints = false
    scrollView.addSubview(forecastView)
    return scrollView
  }()
Then from viewDidLoad I add the scroll view to the root view:
view.addSubview(scrollView)
We can now start building our constraints. We need two groups of constraints. The first group fixes the scroll view frame to its superview. The second group constrains our content subview to the scroll view setting the content area.
The first group of four constraints pin the frame of my scroll view to its superview:
NSLayoutConstraint.activate([
  scrollView.leadingAnchor.constraint(equalTo: view.leadingAnchor),
  scrollView.topAnchor.constraint(equalTo: view.topAnchor),
  scrollView.trailingAnchor.constraint(equalTo: view.trailingAnchor),
  scrollView.bottomAnchor.constraint(equalTo: view.bottomAnchor),
This next step is where I find the scroll view API confusing. We pin the content subview to the scroll view but in this case the scroll view anchors are acting to fix the content area of the scroll view:
  scrollView.leadingAnchor.constraint(equalTo: forecastView.leadingAnchor),
  scrollView.topAnchor.constraint(equalTo: forecastView.topAnchor),
  scrollView.trailingAnchor.constraint(equalTo: forecastView.trailingAnchor),
  scrollView.bottomAnchor.constraint(equalTo: forecastView.bottomAnchor),
Finally we constrain the width of our content subview. This fixes the width of the content area to the scroll view frame preventing horizontal scrolling:
  forecastView.widthAnchor.constraint(equalTo: scrollView.widthAnchor)
])
The confusion comes from the dual nature of the scroll view layout anchors. When constrained to the super view they are acting as the frame of the scroll view. When constrained to our content subview they act to set the content area of the scroll view.
Scroll View Layout Guides (iOS 11)
The UIScrollView class has two new layout guide properties in iOS 11:
var frameLayoutGuide: UILayoutGuide { get }
As the names suggest the frame layout guide matches the scroll view frame. We can use it when creating constraints from the scroll view to its superview or when we want to fix (float) a subview of the scroll view over the content.
var contentLayoutGuide: UILayoutGuide { get }
The content layout guide matches the content area of the scroll view so we can use it when constraining our content to the scroll view.
The guides don’t add any new functionality but they do (I think) make it easier to follow what is going on.
Scroll View Setup With Layout Guides
So let’s see how our scroll view setup changes if we use the new layout guides:
let frameGuide = scrollView.frameLayoutGuide
let contentGuide = scrollView.contentLayoutGuide
The first group of constraints fix the frame of the scroll view to the superview using the frame layout guide:
NSLayoutConstraint.activate([
  frameGuide.leadingAnchor.constraint(equalTo: view.leadingAnchor),
  frameGuide.topAnchor.constraint(equalTo: view.topAnchor),
  frameGuide.trailingAnchor.constraint(equalTo: view.trailingAnchor),
  frameGuide.bottomAnchor.constraint(equalTo: view.bottomAnchor),
The next four constraints fix the content area. This time we can use the content guide of the scroll view which makes it clearer (to me at least) what is happening.
  contentGuide.leadingAnchor.constraint(equalTo: forecastView.leadingAnchor),
  contentGuide.topAnchor.constraint(equalTo: forecastView.topAnchor),
  contentGuide.trailingAnchor.constraint(equalTo: forecastView.trailingAnchor),
  contentGuide.bottomAnchor.constraint(equalTo: forecastView.bottomAnchor),
Finally we fix the width of the content area by creating a constraint between the width of the content guide and the frame guide:
  contentGuide.widthAnchor.constraint(equalTo: frameGuide.widthAnchor)
])
Using the new guides takes the same number of constraints so it is not any less work. But I think it is easier to understand. In other good news, Xcode 11 also finally added support for the frame and content layout guides to Interface Builder. See Scroll View Layouts with Interface Builder for details.
Floating Content
You sometimes want a subview of the scroll view to have a fixed position in the scroll view frame so it appears to float over the scrollable content. You might do this by constraining the subview to some superview of the scroll view but that can be tricky. The frame layout guide makes this easy.
For example, to fix a button in the center of the scroll view frame:
infoButton.centerXAnchor.constraint(equalTo: frameGuide.centerXAnchor),
infoButton.centerYAnchor.constraint(equalTo: frameGuide.centerYAnchor)
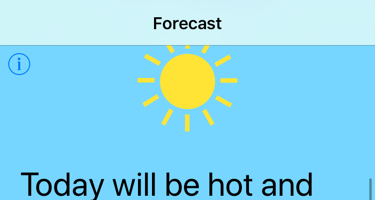
We need to be careful though as my scroll view frame extends above and below the safe area. I want to fix my button up in the top left corner so in this case the layout margin guide of the scroll view works better (margins are relative to the safe area by default in iOS 11):
infoButton.leadingAnchor.constraint(equalTo: scrollView.layoutMarginsGuide.leadingAnchor),
infoButton.topAnchor.constraint(equalTo: scrollView.layoutMarginsGuide.topAnchor)
In summary, the two new layout guides are nothing magical but they do make using a scroll view with Auto Layout easier to understand once you can drop support for iOS 10.
Want To Learn More?
If you are struggling to build layouts that work across the growing range of iOS devices, you should get my book - Modern Auto Layout.
Get The Code
You can find the example Xcode project for this post in my GitHub repository.
Further Reading
The session from WWDC 2017 where they (briefly) mention the new layout guides:
I have not covered it here but you should be aware of the keyboard when using this type of layout: