If you’re creating your images from the asset catalog you support dark mode by adding light and dark variations of the image. How about when you’re creating the images at runtime? How about when you’re using SwiftUI?
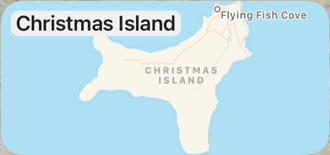
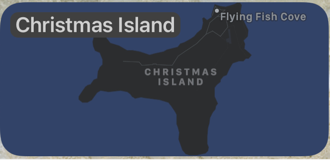
I want to make the map screenshots used in my map widget respond to dark mode. How hard could it be? I can generate screenshot images of the map at runtime for both light and dark mode but is there a way to combine these two images into a single image that behaves like the asset catalog backed images?
The answer is yes as long as you’re using UIKit. The answer with SwiftUI seems to be not yet. First let’s recap how you work with image assets.
Image Assets
Apple introduced image assets (UIImageAsset) with trait collections back in iOS 8 so there’s nothing new here. It gives us a way to register a specific image for use with a matching trait collection.
In iOS 8, that was useful for registering images for different display scales (1x, 2x, 3x) or horizontal and vertical size classes. In iOS 13 it became useful for registering images for light and dark user interface styles.
You may not be familiar with UIImageAsset because typically it’s easier to use an asset catalog:
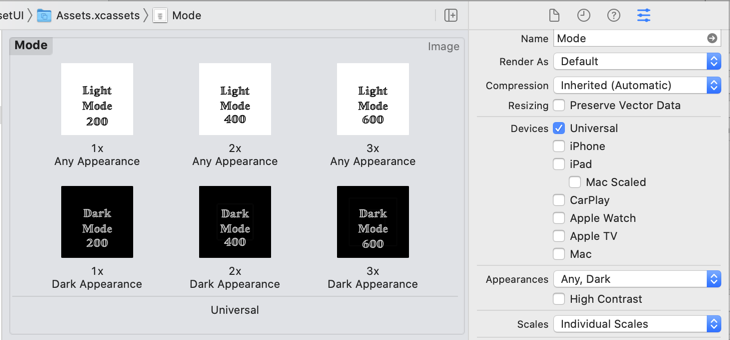
With UIKit, you use Interface Builder or programmatically create an image from the asset catalog and add it to an image view (UIImageView):
import UIKit
let modeImage = UIImage(named: "Mode")
let imageView = UIImageView(image: modeImage)
If you’re using SwiftUI the Image view does the same (but only for images loaded from the asset catalog - see below):
import SwiftUI

struct ContentView: View {
  var body: some View {
    Image("Mode")
  }
}
Either way takes care or loading the image that most closely matches the trait environment and updating the image when the trait collection changes.
Matching Images
If you want an image that matches a specific set of trait collections:
let darkTrait = UITraitCollection(userInterfaceStyle: .dark)
let scale2 = UITraitCollection(displayScale: 2.0)
let darkScale2 = UITraitCollection(traitsFrom: [darkTrait, scale2])

// Dark @2x Image (or closest match)
let dark2 = UIImage(named: "Dark", in: nil,
           compatibleWith: darkScale2)
Notes:
- If an exact match is not found this will return the closest available match.
- If you don’t specify a trait the values from the current environment are used.
Registering Images At Runtime
What about when you need to create the images at runtime and cannot rely on the asset catalog. The imageAsset property of UIImage gives us access to the underlying image assets and allows us to register new image variations for specific trait collections:
// var image: UIImage
if let asset = image.imageAsset {  // UIImageAsset

  // Retrieve a specifc image
  let darkImage = asset.image(with: .init(userInterfaceStyle: .dark))

  // Register a dark image for 1x, 2x, 3x display scales
  let darkTrait = UITraitCollection(userInterfaceStyle: .dark)
  let scale1 = UITraitCollection(displayScale: 1.0)
  let scale2 = UITraitCollection(displayScale: 2.0)
  let scale3 = UITraitCollection(displayScale: 3.0)

  asset.register(dark1x, with UITraitCollection(traitsFrom: [darkScale, scale1])
  asset.register(dark2x, with UITraitCollection(traitsFrom: [darkScale, scale2])
  asset.register(dark3x, with UITraitCollection(traitsFrom: [darkScale, scale3])

  // Unregister a image
  asset.unregister(imageWith: UITraitCollection(traitsFrom: [darkScale, scale3]))
}
Notes:
- The
imageAssetproperty will benilfor images not created with an image asset (for example drawn with Core Image). - When you register an image you must always include the
displayScaletrait. - If you register two images for the same set of traits the image registered last will replace the previously registered image.
If you’re using the resulting image with a UIImageView the closest matching image variation is shown when the trait collection of the view changes.
What About SwiftUI?
Things are a little more complicated with SwiftUI. To come back to my widget example. I wanted the map image shown by the widget to adapt at runtime for light and dark modes. I started by generating both a light and dark mode snapshot of the map in my getTimeline method:
let lightSnapshotter = MKMapSnapshotter(size: context.displaySize,
  region: country.region, style: .light)
let darkSnapshotter = MKMapSnapshotter(size: context.displaySize,
  region: country.region, style: .dark)

lightSnapshotter.start { (snapshot, error) in
  if let image = snapshot?.image {
    darkSnapshotter.start { (snapshot, error) in
      if let snapshot = snapshot {
        // Create timeline entry
        let timeline = ...
        completion(timeline)
      }
    }
  }
}
My initial hope was that I could create a “dynamic” UIImage by registering the dark image as an asset variation of the light image:
image.imageAsset?.register(snapshot.image,
                  with: snapshot.traitCollection)
I can then use the image to populate my timeline entry:
var nextUpdate = Date()
let entry = MapEntry(date: nextUpdate, country: country, image: image)
nextUpdate = Calendar.current.date(byAdding: .hour, value: 1, to: nextUpdate)!
let timeline = Timeline(entries: [entry], policy: .after(nextUpdate))
completion(timeline)
When my widget is displayed it takes the UIImage from the timeline entry and shows it using an Image view:
struct MapWidgetEntryView : View {
  var entry: MapEntry
  var body: some View {
    Image(uiImage: entry.image)
      .widgetURL(entry.country.url)
  }
}
Unfortunately creating an Image from a UIImage does not result in a view that adapts at runtime. I’m assuming that’s something the SwiftUI team will fix at some point but it doesn’t work with iOS 14. As a workaround I’ve fallen back to providing the separate light and dark images in my timeline entry:
let entry = MapEntry(date: nextUpdate, country: country,
  lightImage: Image(uiImage: lightImage),
  darkImage: Image(uiImage: darkImage))
I created a custom AdaptiveImage view to take care of conditionally showing the light or dark image depending on the color scheme of the environment:
import SwiftUI

public struct AdaptiveImage: View {
  public let lightImage: Image
  public let darkImage: Image
  @Environment(\.colorScheme) var colorScheme

  public init(lightImage: Image, darkImage: Image) {
    self.lightImage = lightImage
    self.darkImage = darkImage
  }

  public var body: some View {
    if colorScheme == .light {
      lightImage
        .resizable()
        .scaledToFit()
    } else {
      darkImage
        .resizable()
        .scaledToFit()
    }
  }
}
My map widget view using the adaptive image view:
struct MapWidgetEntryView : View {
  var entry: MapEntry
  var body: some View {
    ZStack(alignment: .topLeading) {
      AdaptiveImage(lightImage: lightImage, darkImage: darkImage)
      MapName(text: country.name)
        .offset(x: 10, y: 10)
    }
    .widgetURL(entry.country.url)
  }
}
More complicated than I had hoped but we got there in the end.