It is easy to forget but Auto Layout does not use the view frame when positioning views. It uses the view alignment rectangle. Most of the time you do not need to worry about alignment rectangles as they match the view frame. It gets more interesting when you have a view that includes a drop shadow or glow effect or some other non-content addition such as a badge which can throw the default alignment off.
This post looks at how to define custom alignment rectangles to tell Auto Layout how to align such views.
Last updated: Jan 17, 2020
When The Default Is Not Enough
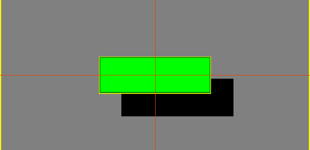
Take a look at this image view which has an exaggerated 30 point drop shadow to make it easier to see the problem:
I have superimposed red lines to show the horizontal and vertical center lines of the view. The view has constraints to center it in the super view but the view content which is just the green box is clearly not centered. What is going on and how do we fix it?
Debugging Alignment Rectangles
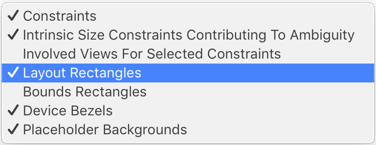
Since Xcode 10.2 the Interface Builder canvas correctly shows any custom alignment rectangle we set. Make sure you have turned on layout rectangles in the Xcode menu (Editor > Canvas > Layout Rectangles):
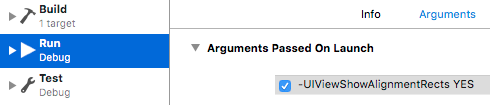
You can also turn on the UIView debug mode to show the alignment rectangles at run time. In the Xcode scheme editor (⌘<), add the launch argument UIViewShowAlignmentRects with a value of YES and don’t forget the leading -:
-UIViewShowAlignmentRects YES
The alignment rectangle for the image view is now highlighted in yellow when we run. Note how it matches the view frame including the drop shadow:

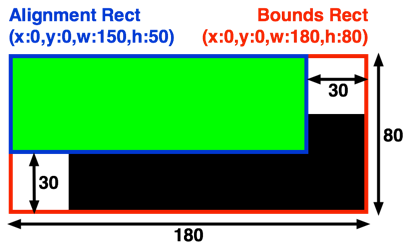
You can see that Auto Layout is centering the yellow alignment rectangle in the view. It does not know we want the green box which is our content centered. To ignore the drop shadow we need a new alignment rect that’s inset from the image frame on the bottom and right by 30 points:
Asset Catalog Makes It Easy
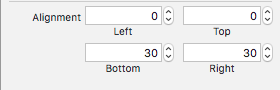
If you’re storing the image in the Xcode Asset Catalog you can directly change its alignment rectangle. Use the attributes inspector to add 30 points of inset to the bottom and right:
If I was using individually scaled images (1x, 2x, 3x) I would need to specify the insets for each image taking into account the different image sizes. So I would need to add 30 pixels for the 1x, 60 pixels for 2x and 90 for the 3x.
Unfortunately as I write this there is a bug that is still not fixed in Xcode 8. It seems that the asset catalog ignores the insets if the left and bottom insets are zero. I have filed a bug report with Apple (#27904825) if you want to duplicate it.
Alignment Rectangles In Code
If you’re not using images stored in the asset catalog you can change the alignment rectangle in code. By default when you create an image it has an alignment rectangle that matches its frame. In other words it has top, left, bottom and right insets of zero. Creating an image with a different alignment rectangle is a two step process:
- Create the original image as normal
- Use the original image to create a new image with alignment rectangle insets.
Let’s extend UIImageView with a convenience initializer that allows us to include the insets:
extension UIImageView {
  convenience init?(named name: String, top: CGFloat, left: CGFloat, bottom: CGFloat, right: CGFloat) {
    guard let image = UIImage(named: name) else {
        return nil
    }
    let insets = UIEdgeInsets(top: top, left: left, bottom: bottom, right: right)
    let insetImage = image.withAlignmentRectInsets(insets)
    self.init(image: insetImage)
  }
}
In our view controller we can then create our image view and add it to the view hierarchy:
override func viewDidLoad() {
  super.viewDidLoad()
  setupCrazyShadow()
}

private func setupCrazyShadow() {
 guard let imageView = UIImageView(named: "CrazyShadow", top: 0, left: 0, bottom: 30, right: 30) else {
      fatalError("Cannot create image, check asset catalog")
  }

  view.addSubview(imageView)
  imageView.translatesAutoresizingMaskIntoConstraints = false
  imageView.centerXAnchor.constraint(equalTo: view.centerXAnchor).isActive = true
  imageView.centerYAnchor.constraint(equalTo: view.centerYAnchor).isActive = true
}
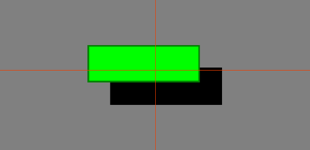
If we try again we can see that the green image is now centered in the view. Note how the yellow alignment rectangle now matches the green image: