I have been enjoying Matt Gemmell’s writing about going iPad only. A few weeks back he tweeted a request to iOS devs to support keyboard shortcuts. I vaguely remembered Apple adding the feature a few years back but I will confess I had no idea how to do it.
The good news is that it is not so difficult. A quick search of the Apple docs led me to UIKeyCommand introduced with iOS 7 and improved with iOS 9. So here is my guide to the basics you need to add hardware keyboard shortcuts.
Last updated: Jun 12, 2020
The Challenge
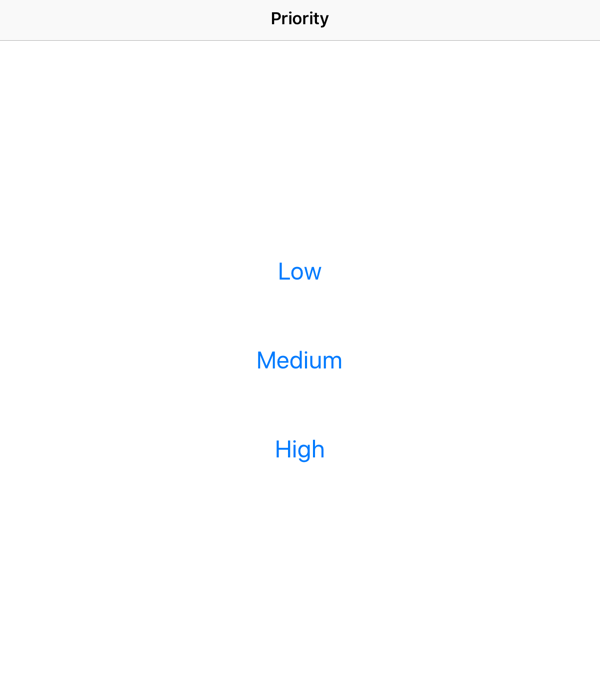
For the purposes of this post here is my simple App. In the first view you choose one of three priorities:
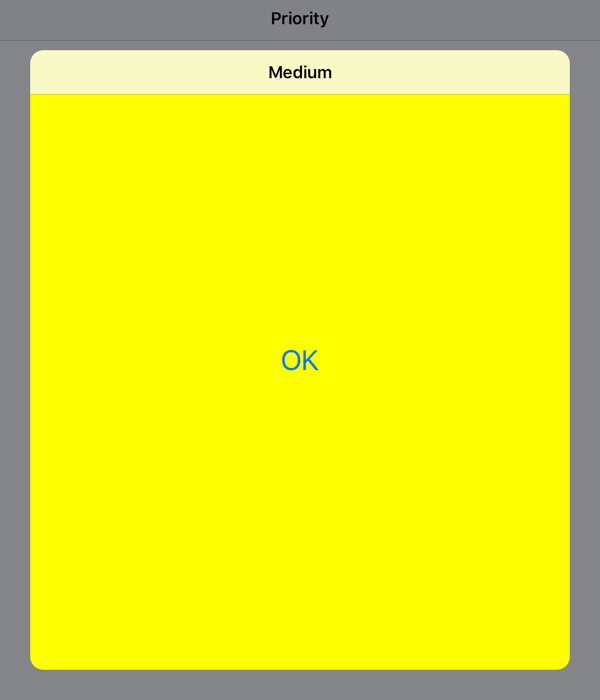
Tapping any button shows a modal view which is coloured depending on the chosen priority (yellow for medium). There is a single OK button to dismiss the view and return to the first screen:
Navigating real-world apps is more complicated but this is good enough to explain the basics of the API. So let’s see how we can add keyboard shortcuts to navigate our user interface.
UIKeyCommand - Quick Guide
Apple added the API for keyboard shortcut commands way back in iOS 7. Any object that inherits from UIResponder has a property named keyCommands that you can override to return an array of UIKeyCommand objects.
Starting with iOS 9 you initialise a UIKeyCommand with four parameters:
UIKeyCommand(input: String,
             modifierFlags: UIKeyModifierFlags,
             action: Selector,
             discoverabilityTitle: String)
-
input is the
Stringused for the shortcut. There are pre-definedUIKeyCommandclass constants for the arrow keys and the escape key:inputUpArrow- Up arrow keyinputDownArrow- Down arrow keyinputLeftArrow- Left arrow keyinputRightArrow- Right arrow keyinputEscape- Escape key
-
modifierFlags is a combination of
UIKeyModifierFlagsthat the user must press with the input to match the shortcut:.alphaShift- Caps Lock key (⇪).shift- Shift key (⇧).control- Control key (⌃).alternate- Option key (⌥).command- Command key (⌘).numericPad- Key must be on numeric keypad.
-
action is the selector of the method called for the shortcut. Include a parameter if you want the
UIKeyCommandtriggering the action. -
discoverabilityTitle is a
Stringshown in an overlay when the user holds the command key (see below). You will probably want to localize this. Apple added this in iOS 9, if you support iOS 7 or iOS 8 use the three parameter version:UIKeyCommand(input: String, modifierFlags: UIKeyModifierFlags, action: Selector)
Adding Key Commands
So let’s add commands to our initial view controller so that we can use ⌘-1, ⌘-2 and ⌘-3 as shortcuts for tapping the three buttons. We need to override keyCommands and return our three commands:
private enum InputKey: String {
    case low = "1"
    case medium = "2"
    case high = "3"
}

override var keyCommands: [UIKeyCommand]? {
  return [
  UIKeyCommand(input: InputKey.low.rawValue,
    modifierFlags: .command,
    action: #selector(OptionViewController.performCommand(sender:)),
    discoverabilityTitle: NSLocalizedString("LowPriority", comment: "Low priority")),

  UIKeyCommand(input: InputKey.medium.rawValue,
    modifierFlags: .command,
    action: #selector(OptionViewController.performCommand(sender:)),
    discoverabilityTitle: NSLocalizedString("MediumPriority", comment: "Medium priority")),

  UIKeyCommand(input: InputKey.high.rawValue,
    modifierFlags: .command,
    action: #selector(OptionViewController.performCommand(sender:)),
    discoverabilityTitle: NSLocalizedString("HighPriority", comment: "High priority"))
  ]
}
In a more complex app we might return different commands depending on the application state. Only include the commands that are relevant and active in the current context.
The common action method receives the UIKeyCommand as the sender which we can use to trigger the segue in the same way as if the user had tapped the button.
func performCommand(sender: UIKeyCommand) {
  guard let key = InputKey(rawValue: sender.input) else {
    return
  }
  switch key {
  case .low: performSegue(withIdentifier: .low, sender: self)
  case .medium: performSegue(withIdentifier: .medium, sender: self)
  case .high: performSegue(withIdentifier: .high, sender: self)
  }
}
You can check the example code for the full details but if you are doing this with Objective-C create a getter for the keyCommands property that returns an NSArray of UIKeyCommand objects:
static NSString *inputKeyLow = @"1";

- (NSArray<UIKeyCommand *> *)keyCommands {
  return @[
    [UIKeyCommand keyCommandWithInput:inputKeyLow
       modifierFlags:UIKeyModifierCommand
       action:@selector(performCommand:)
       discoverabilityTitle:NSLocalizedString(@"LowPriority", @"Low priority")],
    // code skipped...
  ];
}
Starting with iOS 9 the UIViewController class also has the addKeyCommand and removeKeyCommand methods to allow you to add and remove key commands without overriding the keyCommands property. For example, to create and add the shortcut for the low priority button:
let lowCommand = UIKeyCommand(input: InputKey.low.rawValue,
    modifierFlags: .command,
    action: #selector(OptionViewController.performCommand(sender:)),
    discoverabilityTitle: NSLocalizedString("LowPriority", comment: "Low priority"))
addKeyCommand(lowCommand)
Handling the Detail View
We can do something similar for the detail view controller using the escape key to dismiss the modal view. Assuming we have a function named dismissAction that is usually called when the user taps the OK button. We can add a shortcut key command for the escape key to call the same action. Note that this time we are not using any modifier flags so we pass the empty set []:
class DetailViewController: UIViewController {

  // ... other code ...

  override var keyCommands: [UIKeyCommand]? {
    return [
      UIKeyCommand(input: UIKeyCommand.inputEscape,
        modifierFlags: [],
        action: #selector(DetailViewController.dismissAction),
        discoverabilityTitle: NSLocalizedString("CloseWindow",
        comment: "Close window"))
    ]
  }
}
That’s all there is to it. You can test on a device or in the simulator. Choose any of the priorities using ⌘-1, ⌘-2 or ⌘-3 and close the modal window with the escape key.
Discoverability For Free
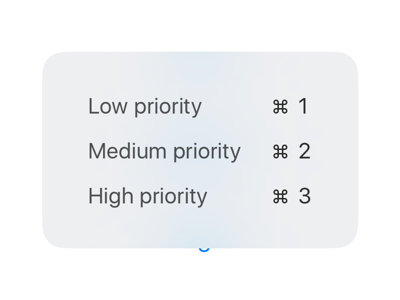
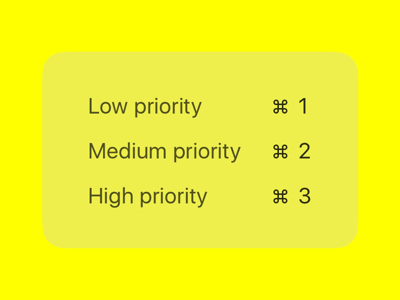
I mentioned that the API for key commands has existed since iOS 7, but things got better in iOS 9. As long as you are using the newer API (as above) to specify the discoverabilityTitle you get a helpful overlay showing the available shortcuts when you hold down the ⌘ key on the keyboard. Here is what it looks like on the first view controller:
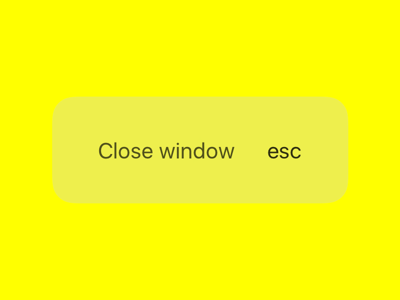
Here is what you see for the detail view controller:
Managing the Responder Chain
There is just one more minor consideration. When responding to key commands the system walks up the responder chain looking for an object that implements the action. Consider the situation where our initial view controller contains a text field. When the user taps or tabs into the text field it automatically becomes the first responder.
If we trigger a segue to the modal detail view controller at this point we have a problem. The newly presented view controller does not automatically become the first responder so its key commands are ignored.
You can try this by adding a text field to the initial view. With focus on the text field, use one of the buttons to present the detail view controller. The escape key shortcut then does not work and if you hold down the ⌘ key you will see the wrong shortcuts:
The fix is to allow our detail view controller to become the first responder by overriding the canBecomeFirstResponder property for the view controller. This property returns false by default:
override var canBecomeFirstResponder: Bool {
  return true
}
If you are having problems with key commands not showing up check your responder chain.
Sample Code
You can find the full working examples from this post in both Swift and Objective-C in the KeyCommand Xcode project in my GitHub Code Examples repository.
Further Reading
The section in the WWDC 2016 session where Apple talks about keyboard shortcuts: