Open a Swift 3 project in Xcode 9 and it will warn you that you can upgrade to Swift 4. If you accept the invite you end up with another warning that Swift 4 mode deprecates the Swift 3 @objc inference rules. What is this scary sounding warning and how do you make it go away?
What Is @objc Inference?
I’ll confess that @objc inference was not something I spent a lot of time thinking about before Swift 4 changed the rules. You can add @objc to Swift properties or methods to make them accessibile from Objective-C code. To make life easier the compiler also has some rules for when it will infer the @objc for you.
The Swift 3 compiler is generous about adding @objc even when you may not need it. This convenience comes at a cost of larger binaries as each of those methods gets some extra code to map between the Swift and Objective-C calling conventions.
The Swift 4 compiler takes a more conservative approach and only infers @objc in limited cases. For example, when overriding an @objc method or implementing an @objc protocol. So you don’t need to worry about marking all your UITableViewDataSource methods with @objc. You also don’t need to add @objc with @IBAction, @IBOutlet, @IBInspectable or @NSManaged.
This makes the rules simpler to understand but means you have some work to do when upgrading to Swift 4.
Upgrading To Swift 4
When you open a Swift 3 project in Xcode 9 it greets you with a build warning - “Conversion to Swift 4 is available”:
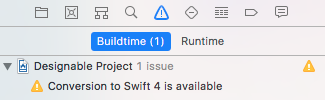
It is annoying to have a build warning but you are not forced to upgrade to Swift 4. Xcode 9 supports both Swift 3.2 and Swift 4 through a build setting so you can migrate one target at a time.
Assuming you want to upgrade to Swift 4, clicking the build warning starts the Xcode migrator so you can choose which targets to upgrade. You have two choices for the migration:
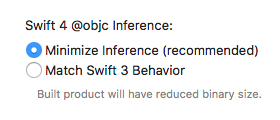
- Minimize Inference: This is the recommended approach. The migrator will only add
@objcto your code in the obvious places such as methods that are the target for a#selector. This should give you a smaller binary but you have some extra manual work to do to finish the migration (see below). - Match Swift 3 Behavior: This approach adds
@objcto your code anywhere the Swift 3 compiler would have inferred it. It is a safe choice but by sprinkling@objcthroughout your code you will not see the smaller binary size.
If you take the recommended approach Xcode will remind you that you have some extra work to do. This is also the only time you get a link to the migration guide. You can also find this guide in the Xcode help if you look under the “Work in Xcode” section:
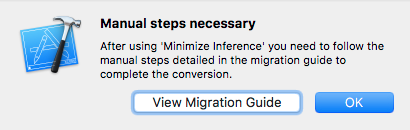
Once Xcode has done its best it leaves you with this worrying warning message:

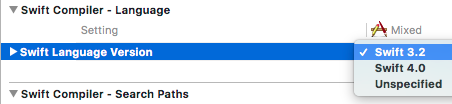
If you check the build settings you will see that the Swift 3 rules for @objc inference are still in effect:

This is helpful as you will get build time and run time warnings any time your code is missing an @objc that the Swift 3 rules would have inferred. So now is a good time to run your tests and check the logs.
Manual Fixing @objc Inference
If you are working with a pure Swift project the migrator seems to do a pretty good job of adding @objc where you need it. For example, when you use a method with a #selector:
button.addTarget(self, action: #selector(doAction(sender:)),
                          for: .touchUpInside)
Since it is UIKit code that calls the doAction method it must be accessible to the Objective-C runtime. Luckily the migrator adds the @objc for you:
@objc func doAction(sender: UIButton) {
  // Do action here
}
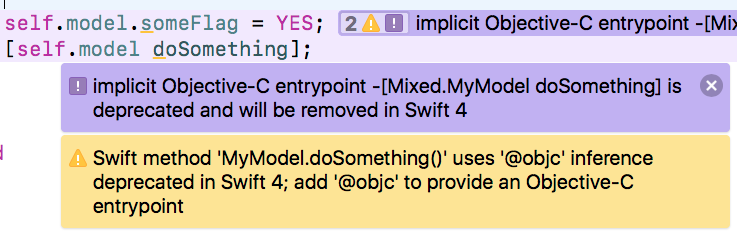
If you are working with a mixed Swift and Objective-C project you are likely to have more work to do. For example, suppose I had this Swift class:
public class MyModel: NSObject {
  var someFlag = false
  func doSomething() {
    print("doing something")
  }
}
Under the old Swift 3 rules properties and methods of NSObject subclasses were accessibile from Objective-C (unless they were private).
self.model.someFlag = YES;
[self.model doSomething];
In Swift 4 mode this is no longer the case and you should see build and run time warnings prompting you to add @objc:
I can fix the warnings by adding @objc to both the property and method declaration:
public class MyModel: NSObject {
  @objc var someFlag = false
  @objc func doSomething() {
    print("doing something")
  }
}
If you are sure that you want to expose all properties and methods of a class to the Objective-C runtime you can use the @objcMembers annotation:
@objcMembers
public class MyModel: NSObject {
  var someFlag = false         // @objc
  func doSomething() {         // @objc
    print("doing something")
  }
}
Using @objcMembers also applies @objc by default to any extensions of the class. It can be convenient to collect methods that should be accessibile from Objective-C in an @objc extension. So another way to write the above would be:
public class MyModel: NSObject {
  @objc var someFlag = false
}

@objc extension MyModel {
  func doSomething() {
    print("doing something")
  }
}
Note: I cannot move someFlag to the extension as they cannot contain stored properties.
You can also use @nonobjc to override a default @objc. For example in an @objc extension:
@objc extension MyModel {
  func doSomething() {
    print("doing something")
  }
  @nonobjc func doNothing() { // Not accessibile from objc
    // ...
  }
}
Completing The Migration
Once you are sure you have fixed everything you should disable the Swift 3 @objc inference rules in the build settings for each target:
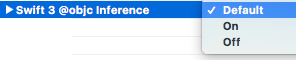
With the setting switched to Default the warning should go away and you can get back to work.