An example of how to add a simple settings bundle to an application to allow the user to set some application defaults. In this example we will add a switch to allow the user to lock the device rotation.
Adding a Rotation Lock
The ability of an application to rotate to match the orientation of the device you are holding is a great feature and Apple encourages App developers to support all possible orientations. However there are some situations such as when you are using the device lying down when the rotation can be annoying. The iPad is the first, but probably not the last, device that Apple has introduced that allows the user to lock the orientation.
Adding a software based rotation lock to an existing App for pre-iPad devices is not that difficult. You can basically break the problem down into two steps:
- Allowing the user to specify their preference as to whether rotation is allowed in an app.
- Enabling/disabling rotation in the view controllers
Setting the User Preference
There are two basic ways to allow a user to specify a user preference. The simplest way is to use NSUserDefaults to store the preferences in the standard iPhone Settings Application. Alternatively we can add a settings screen directly to the App and store the settings in a plist file within our own application bundle. To keep this example simple we will take the first option.
To get started we need to add a Settings Bundle to our Xcode project. Right-click on the top level folder in your project and select Add->New File from the menu. Select the Settings Bundle template found under Resources to add it to your bundle leaving the default name of Settings.bundle.
Expand the Settings.bundle to display the Root.plist file which by default will contain an Array named PreferenceSpecifiers containing four dictionary items. To make it easier to edit this file you can inform Xcode that it is an iPhone settings bundle. Select the Root.plist file, click on the Root entry in the detail view to ensure it is selected and then from the Xcode view menu select Property List Type -> iPhone Settings plist.
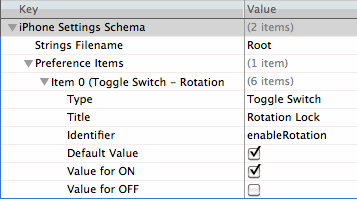
Delete the four items and add a new item that will allow us to enable/disable the rotation lock. The details of what we need to add are as follows:
Type (String): Toggle Switch - this specifies the PSToggleSwitchSpecifier which is a simple toggle switch than can be turned ON/OFF by the user.
Title (String): Rotation Lock - this is the name of the setting we want to display to the user.
Identifier (String): enableRotation - this is the key we will use to retrieve this setting in the application
Default Value (Boolean): YES - a default value for the key if not found in the preferences database (but see discussion below)
Value for ON: (Boolean): YES - the value the key should take when the switch is in the ON position. Make sure you set the type of this value to Boolean (right click on TrueValue and select Value Type -> Boolean).
Value for OFF: (Boolean): NO - the value the key should take when the switch is in the OFF position. Make sure you set the type of this value to Boolean.
If you did that correctly you should end up with something looking like this (make sure you set the types correctly especially for the Boolean fields).
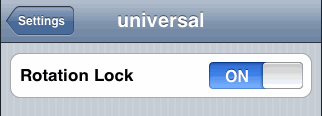
If you save, build and then run the project in the simulator you should already see the entry for the application in the settings application as follows:

The icon displayed will be a scaled down version of the Icon.png file by default. If you want something different add an icon sized at 29 x 29 pixels named Icon-Settings.png to your application.
Even defaults need defaults…
One thing that is poorly explained in the Apple documentation is the use of the DefaultValue field. You would think that this sets the value that your application will see when your App runs for the first time. Unfortunately this is not the case. The default value is used to set the initial position of the toggle switch in the settings application. This is what the user will see when they open the settings application and look at the settings for the application:
However, it is important to understand that until the user actually changes the value of the setting nothing is actually set. If you check for the setting in your application it will actually return nil unless you set a default value. To do that add the following to the applicationDidFinishLaunching (or didFinishLaunchingWithOptions) method:
// Set the application defaults
NSUserDefaults *defaults = [NSUserDefaults standardUserDefaults];
NSDictionary *appDefaults = [NSDictionary dictionaryWithObject:@"YES"
                                          forKey:@"enableRotation"];
[defaults registerDefaults:appDefaults];
[defaults synchronize];
Now if the user has not yet set a value it will default to YES. To check the value anywhere in the application takes just a couple of lines of code:
// Get user preference
NSUserDefaults *defaults = [NSUserDefaults standardUserDefaults];
BOOL enabled = [defaults boolForKey:@"enableRotation"];
Putting it all together
So now that we have the user preferences setup we can check the value in any of our view controllers to determine whether to permit rotation or not:
- (BOOL)shouldAutorotateToInterfaceOrientation:(UIInterfaceOrientation)interfaceOrientation {
  // Get user preference
  NSUserDefaults *defaults = [NSUserDefaults standardUserDefaults];
  BOOL enabled = [defaults boolForKey:@"enableRotation"];

  if (enabled) {
    return YES;
  } else {
    return (interfaceOrientation == UIInterfaceOrientationPortrait);
  }
}```