As part of the theme of iOS 8 to make interfaces adaptive there are some major changes to the presentation of view controllers. The new UIPresentationController does a lot of the hard work of animating view controller transitions and adapting to device size changes such as rotation. It also brings some big changes to some old UIKit favourites such as alert views, action sheets, popovers and search bar controllers. This post will be a gentle introduction to this new world by looking at the changes to alert views and action sheets.
UIAlertView - Alerting the Old Way
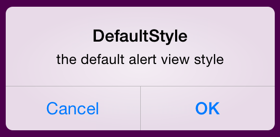
The last time I wrote about alert views was back in 2011 to describe the UIAlertView changes in iOS 5. The release of iOS 5 brought alert view styles but not much else has changed since then. The code snippet below is all it takes to setup and present an alert view with cancel and OK buttons:
UIAlertView *alertView = [[UIAlertView alloc]
                           initWithTitle:@"DefaultStyle"
                           message:@"the default alert view style"
                           delegate:self
                           cancelButtonTitle:@"Cancel"
                           otherButtonTitles:@"OK", nil];

[alertView show];
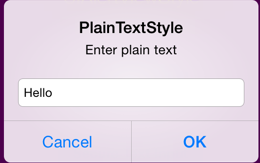
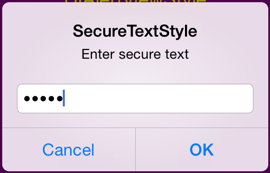
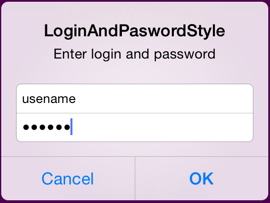
The introduction of alert view styles in iOS 5 added a limited ability to create custom alerts by setting the alertViewStyle property. This extended the plain default button-only style to allow plain text input, secure text input or even a login and password input alert:
The UIAlertViewDelegate protocol has callback methods for the button actions and also a method (alertViewShouldEnableOtherButton:) called when a text field changes to allow buttons to be dynamically enabled/disabled.
UIAlertController - Adaptive Alerting
In the new adaptive world of iOS 8 the UIAlertController is a functionally identical, block-based replacement for both UIAlertView and UIActionSheet. Switching between an alert or action sheet is done by setting the preferred style when creating the controller.
A Simple Alert
It is interesting to compare the code required to setup a new style alert to the old UIAlertView. The creation of the basic UIAlertController is very similar to creating an UIAlertView (the alertTitle and alertMessage are both NSString):
UIAlertController *alertController = [UIAlertController
                              alertControllerWithTitle:alertTitle
                              message:alertMessage
                              preferredStyle:UIAlertControllerStyleAlert];
There is no delegate, nor do we initially specify the buttons. Note the third parameter which chooses between the alert and action sheet styles.
You add action buttons by creating an instance of UIAlertAction which you then add to the controller. The UIAlertAction consists of a title string, style and a block to execute when the user selects the action. The three possible choices for the UIAlertActionStyle cover default, cancel and destructive actions. To reproduce the classic cancel/ok action sheet we just need to create and add the two alert actions:
UIAlertAction *cancelAction = [UIAlertAction
            actionWithTitle:NSLocalizedString(@"Cancel", @"Cancel action")
                      style:UIAlertActionStyleCancel
                    handler:^(UIAlertAction *action)
                    {
                      NSLog(@"Cancel action");
                    }];

UIAlertAction *okAction = [UIAlertAction
            actionWithTitle:NSLocalizedString(@"OK", @"OK action")
                      style:UIAlertActionStyleDefault
                    handler:^(UIAlertAction *action)
                    {
                      NSLog(@"OK action");
                    }];

[alertController addAction:cancelAction];
[alertController addAction:okAction];
Finally we can present the alert view controller as with any other view controller:
[self presentViewController:alertController animated:YES completion:nil];
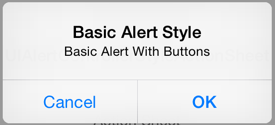
The display order for the buttons depends on the order they are added to the alert controller. If you follow the iOS Human Interface Guidelines you should make the default action the right button and the cancel button the left button for a two button alert. You can only have one cancel action, if you add a second you will get a runtime exception:
*** Terminating app due to uncaught exception ‘NSInternalInconsistencyException’, reason: ‘UIAlertController can only have one action with a style of UIAlertActionStyleCancel’
Destructive actions
Here is a quick example of the third alert action style for destructive actions. The code is the same as before except that we add a “reset” button instead of the “ok” button:
UIAlertAction *resetAction = [UIAlertAction
             actionWithTitle:NSLocalizedString(@"Reset", @"Reset action")
                       style:UIAlertActionStyleDestructive
                     handler:^(UIAlertAction *action)
                     {
                       NSLog(@"Reset action");
                     }];

[alertController addAction:resetAction];
[alertController addAction:cancelAction];

[self presentViewController:alertController animated:YES completion:nil];
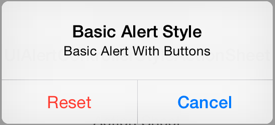
Note that this time the destructive action is added first to make it appear on the left.
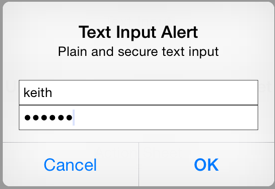
Text Input Alerts
The greater flexibility of the UIAlertController means that you no longer need to be constrained by the built-in styles for plain text, secure text or login and password input alert views. We can add an arbitrary number of UITextField objects to the alert and use all of the standard UITextField configuration options. When you add the text field to the alert controller you specify a block that is used to configure the text field.
For example, to recreate the old login and password style alert we can add two text fields and configure them with the appropriate placeholder text and set the password field to use secure text entry:
UIAlertController *alertController = [UIAlertController
                    alertControllerWithTitle:alertTitle
                                     message:alertMessage
                              preferredStyle:UIAlertControllerStyleAlert];

[alertController addTextFieldWithConfigurationHandler:
 ^(UITextField *textField) {
   textField.placeholder = NSLocalizedString(@"LoginPlaceholder", @"Login");
}];

[alertController addTextFieldWithConfigurationHandler:
 ^(UITextField *textField) {
   textField.placeholder = NSLocalizedString(@"PasswordPlaceholder", @"Password");
   textField.secureTextEntry = YES;
}];
The values of the text field can be retrieved in the OK action handler:
UIAlertAction *okAction = [UIAlertAction
  actionWithTitle:NSLocalizedString(@"OK", @"OK action")
  style:UIAlertActionStyleDefault
  handler:^(UIAlertAction *action)
  {
    UITextField *login = alertController.textFields.firstObject;
    UITextField *password = alertController.textFields.lastObject;
    ...
  }];
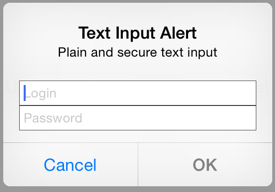
Things get a little more complicated if we want to reproduce the behaviour of the old UIAlertView delegate method alertViewShouldEnableOtherButton:. Assume we only want to enable the OK button if the user has entered at least 3 characters in the login field. There is no equivalent delegate method for UIAlertController so we need to detect changes ourselves by adding a target action to the text field for the UIControlEventEditingChanged event:
[Update 26-Apr-2015: Modified approach based on suggestion from comments to use a target-action instead of observing notifications]
[alertController addTextFieldWithConfigurationHandler:
 ^(UITextField *textField) {
  textField.placeholder = NSLocalizedString(@"LoginPlaceholder", @"Login");
  [textField addTarget:self
                action:@selector(alertTextFieldDidChange:)
      forControlEvents:UIControlEventEditingChanged];
}];
Before presenting the alert controller we can disable the OK action:
okAction.enabled = NO;
Then in the action method we can check the login text field for content before changing the state back to enabled:
- (void)alertTextFieldDidChange:(UITextField *)sender {
  UIAlertController *alertController = (UIAlertController *)self.presentedViewController;
  if (alertController) {
    UITextField *login = alertController.textFields.firstObject;
    UIAlertAction *okAction = alertController.actions.lastObject;
    okAction.enabled = login.text.length > 2;
  }
}
The alert view is now presented with the OK button disabled unless there are at least three characters in the login text field:
Action Sheet
The action sheet is used when you need to present the user with a set of choices. Unlike the alert view which is always presented as a modal view the presentation of the action sheet depends on the device size. On an iPhone (compact width) the action sheet rises from the bottom of the screen. On an iPad (regular width) an action sheet is always shown in a popover.
The creation of an action sheet is almost identical to an alert, the only difference being the style:
UIAlertController *alertController = [UIAlertController
   alertControllerWithTitle:alertTitle
                    message:alertMessage
             preferredStyle:UIAlertControllerStyleActionSheet];
You add actions the same way as you do for alerts so I will abbreviate the code to add three actions:
UIAlertAction *cancelAction = ...;  // UIAlertActionStyleCancel
UIAlertAction *deleteAction = ...;  // UIAlertActionStyleDestructive
UIAlertAction *archiveAction = ...; // UIAlertActionStyleDefault

[alertController addAction:cancelAction];
[alertController addAction:deleteAction];
[alertController addAction:archiveAction];
You cannot add text fields to action sheets, if you try it you will get a runtime exception:
*** Terminating app due to uncaught exception ‘NSInternalInconsistencyException’, reason: ‘Text fields can only be added to an alert controller of style UIAlertControllerStyleAlert’
If we do nothing more and present this on an iPhone/compact width device it works as expected:
[self presentViewController:alertController animated:YES completion:nil];
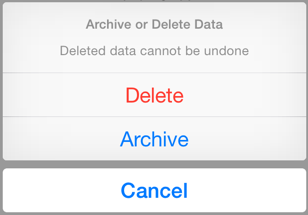
The cancel button, if present, is always shown as the bottom of the view regardless of the order it was added to the alert controller. The other actions are shown top to bottom in the order they were added. The iOS Human Interface Guidelines recommend that any destructive action is shown first.
There is a problem with this code when used on an iPad or regular width device it creates a runtime exception:
Terminating app due to uncaught exception ‘NSGenericException’, reason: ‘UIPopoverPresentationController (<_UIAlertControllerActionSheetRegularPresentationController: 0x7fc619588110>) should have a non-nil sourceView or barButtonItem set before the presentation occurs.’
At the time of writing the Apple UICatalog sample code crashes for the same reason when run on an iPad.
As I mentioned before for regular width presentations the action sheet is displayed in a popover. A popover always requires an anchor point which can be a source view or a bar button item. In this case I am using a standard UIButton to trigger the action sheet so I will use it as the anchor point.
A big difference in iOS 8 is that we no longer need to write code to test for the interface idiom. The UIAlertController takes care of adapting to the display environment so we can simply ask it for a popover controller. On an iPhone/compact width device this returns nil. The extra code we need to configure the popover is below:
UIPopoverPresentationController *popover = alertController.popoverPresentationController;
if (popover) {
  popover.sourceView = sender;
  popover.sourceRect = sender.bounds;
  popover.permittedArrowDirections = UIPopoverArrowDirectionAny;
}
The UIPopoverPresentationController class is also new in iOS 8 and replaces UIPopoverController and for our purposes is functionally equivalent. The action sheet now displays as a popover anchored to the source button:
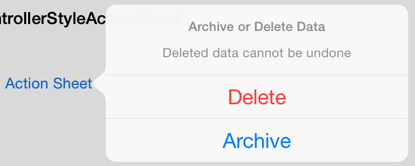
Note that the UIAlertController is also smart enough to remove the cancel button when using a popover. A user cancels a popover by touching outside of the popover so it is not required.
Dismissing Alert Controllers
Typically the alert controller is dismissed automatically when the user selects an action. It can also be dismissed programmatically, if required, like any other view controller. One common reason can be to remove the alert or action sheet when the app moves to the background. Assuming we are listening for the UIApplicationDidEnterBackgroundNotification notification we can dismiss any presented view controller in the observer (see the example code for the setup of the observer in viewDidLoad):
- (void)didEnterBackground:(NSNotification *)notification {
  [self.presentedViewController dismissViewControllerAnimated:NO
   completion:nil];
}
In Summary
A long post but hopefully it will be another three years before I need to write about alert and action sheets again. The old UIAlertView and UIActionSheet classes still work fine in iOS 8 so if you need to target iOS 7 there is no rush to migrate immediately. The AlertController sample Xcode project for this post can be found in my GitHub CodeExamples repository.