In this post I want to revisit the WorldFacts core data app that I previously used to illustrate creating dynamic table views with storyboards and add a search bar. The concept of a search bar is easy but in practise things can often get complicated if you are using custom cells especially if you are using a storyboard to create the table view.
The Search Display Controller
A search bar (UISearchBar) is a common iOS user interface element which accepts text from the user that can then be used to search or filter the data displayed to the user. It is not required but an easy way to implement and manage a search bar is to use a search display controller (UISearchDisplayController). The search display controller takes care of creating a table view that superimposes the search results over the original view.
The search display controller is initialised with a search bar and the view controller that is displaying the original content. The original view controller is typically a table view controller displaying a list of data that we want to search. Typically this original table view controller will also perform a number of delegate roles for the search bar, search display controller and search results table view.
Adding A Search Bar To An Existing App.
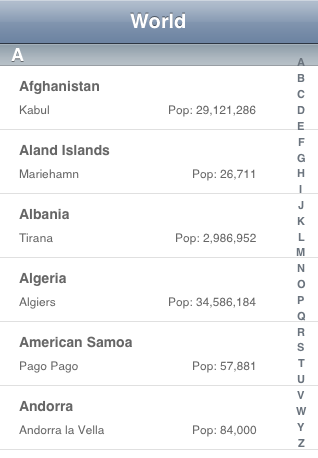
For the purposes of this post I am going to add a search bar to an existing table view based app. I created the WorldFacts app as an example on how to create dynamic prototype table view cells with storyboards. It displays a list of countries with some associated data such as the country and population using a table view controller class named UYLCountryTableViewController implemented with a storyboard:
To get started I will modify the UYLCountryTableViewController class to declare that it conforms to the UISearchDisplayDelegate and UISearchBarDelegate protocols.
@interface UYLCountryTableViewController () <NSFetchedResultsControllerDelegate, UISearchDisplayDelegate, UISearchBarDelegate>
I have done this in the private class extension inside the UYLCountryTableViewController.m file rather than in the public interface declaration since I consider it an internal implementation detail. The public interface for the class is unchanged:
@interface UYLCountryTableViewController : UITableViewController
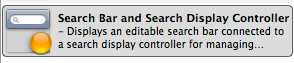
The easiest way to add the search display controller and search bar is to use Interface Builder. With the storyboard containing the table view open you need to find the combined Search Bar and Search Display Controller objects in the object library:
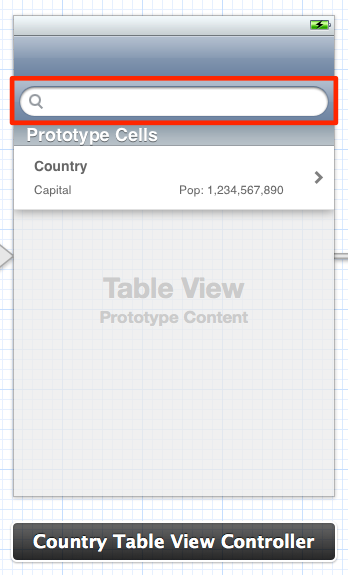
Drag the objects onto the table view positioning the search bar above the prototype cells as shown below (I have highlighted the search bar in red):
The outline view (see below) makes it clearer to see where the two objects end up with the search bar ending up in the table view:

Interface builder takes care of connecting up all of the outlets from both the search bar and search display controller using the table view controller as the delegate.
Configuring The Search Bar
Before moving on to the implementation of the actual search code I want to look at some of the options we have to configure the search bar.
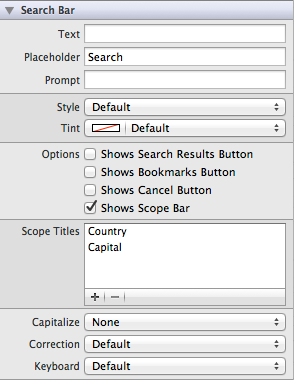
I will not go into every option as most of them are fairly obvious. I have set the Placeholder text that is displayed when the text field is empty. The more interesting option that I want to include is the use of a scope bar. This is an additional segmented control which can be used to control the scope of the search. In this case I have enabled the scope bar and entered two scopes into Interface Builder with the intention of allowing the user to search by country name or capital.
Note that the search bar itself does not implement any of the actual search behaviour. It is really just a set of views and controls that we can interact with using the search bar and search display controller delegates. Also note that the Placeholder text and scope titles would normally need to be localized in a real app. The final appearance of the search bar in Interface Builder is shown below with the scope bar visible below the search bar:

With iOS 5 the search bar appearance can also be more extensively customised either individually or as a class using the appearance proxy (see this previous post on using appearance proxy to style apps).
Implementing The Search
To implement the actual search of our country data we first need somewhere to store the search results. I have added an NSArray to the UYLCountryTableViewController for that purpose:
@property (strong, nonatomic) NSArray *filteredList;
The data is stored in core data so we will need to construct a fetch request to actual perform the search. To avoid having to create the fetch request each time we will add a property to cache the object that we lazily create in the getter:
@property (strong, nonatomic) NSFetchRequest *searchFetchRequest;
The getter method then either returns the existing fetch request or creates it:
- (NSFetchRequest *)searchFetchRequest {
  if (_searchFetchRequest != nil) {
    return _searchFetchRequest;
  }

  _searchFetchRequest = [[NSFetchRequest alloc] init];
  NSEntityDescription *entity = [NSEntityDescription entityForName:@"Country" inManagedObjectContext:self.managedObjectContext];
  [_searchFetchRequest setEntity:entity];

  NSSortDescriptor *sortDescriptor = [[NSSortDescriptor alloc] initWithKey:@"name" ascending:YES];
  NSArray *sortDescriptors = [NSArray arrayWithObjects:sortDescriptor, nil];
  [_searchFetchRequest setSortDescriptors:sortDescriptors];

  return _searchFetchRequest;
}
The fetch request is configured to fetch Country managed objects sorted by country name. The actual search text and scope will be handled by adding an NSPredicate to this more generic fetch request when we actually perform the search. The search method takes the search text and an integer to indicate the search scope (country or capital):
- (void)searchForText:(NSString *)searchText scope:(UYLWorldFactsSearchScope)scopeOption {
  if (self.managedObjectContext) {
    NSString *predicateFormat = @"%K BEGINSWITH[cd] %@";
    NSString *searchAttribute = @"name";

    if (scopeOption == searchScopeCapital) {
        searchAttribute = @"capital";
    }

    NSPredicate *predicate = [NSPredicate predicateWithFormat:predicateFormat, searchAttribute, searchText];
    [self.searchFetchRequest setPredicate:predicate];

    NSError *error = nil;
    self.filteredList = [self.managedObjectContext executeFetchRequest:self.searchFetchRequest error:&error];
  }
}
The scoreOption parameter is an enumerated type with values matching the scope bar titles defined as follows:
typedef enum {
  searchScopeCountry = 0,
  searchScopeCapital = 1
} UYLWorldFactsSearchScope;
The key to performing the search is in constructing an NSPredicate which limits the objects the fetch request will return. The predicate is constructed using the format string “%K BEGINSWITH[cd] %@”.
- The %K parameter allows us to specify a dynamic property name that will be substituted at runtime with the name of the core data managed object attribute we are searching. Based on the search scope we set this to either “name” or “capital”.
- The %@ parameter specifies the value we are searching for and is substituted at runtime with the actual search text from the search bar.
- The search comparison BEGINSWITH[cd] specifies a case and diacritic-insensitive search that begins with our search term.
Finally we can release the cached fetch request in the event that we receive a memory warning:
- (void)didReceiveMemoryWarning {
  self.searchFetchRequest = nil;
  [super didReceiveMemoryWarning];
}
Implementing The UISearchDisplayDelegate methods
To actually trigger the search we need to implement two methods of the UISearchDisplayDelegate protocol to detect when both the search text and search scope has changed. The first method will deal with changes to the search text:
- (BOOL)searchDisplayController:(UISearchDisplayController *)controller shouldReloadTableForSearchString:(NSString *)searchString
{
  UYLWorldFactsSearchScope scopeKey = controller.searchBar.selectedScopeButtonIndex;
  [self searchForText:searchString scope:scopeKey];
  return YES;
}
This method is called with the search string that the user has entered. We can retrieve the search bar scope from the search display controller and then call the searchForText:scope: method we saw previously. This method returns YES to indicate that the search results table view should be reloaded to show our new search results.
The second method we need deals with changes to the search scope:
- (BOOL)searchDisplayController:(UISearchDisplayController *)controller shouldReloadTableForSearchScope:(NSInteger)searchOption {
  NSString *searchString = controller.searchBar.text;
  [self searchForText:searchString scope:searchOption];
  return YES;
}
This time we are passed the scope in the searchOption parameter but need to retrieve the search term from the search bar. As before we return YES to cause the results table to be reloaded.
Modifying The UITableViewDataSource
Now that we have some search results we need to modify our table view controller to handle the display. The key to remember is that we are now dealing with two distinct table views:
- The
UYLCountryTableViewControllerclass has a table view accessed atself.tableViewthat is used to display the original, unfiltered country data. - The
UISearchDisplayControllerintroduces a second table view accessed atself.searchDisplayController.searchResultsTableViewthat is used to show the country data search results.
Each of the UITableViewDataSource methods that we have implemented in our table view controller needs to be modified to check which table view we are operating on when returning results. Since each of the methods has the tableView as a parameter it is trivial to compare with self.tableView to determine which result we need to return. The modified methods will end up with code that looks something like this:
if (tableView == self.tableView) {
  // Original table view
}
else {
  // search results table view
}
I will avoid going into details on the code for the original table view which makes use of a fetched results controller. Instead I will focus on the modifications we make to return the search results.
numberOfSectionsInTableView:
The search results will be displayed in a single section so we just need to return “1” when we are not dealing with the original table view:
- (NSInteger)numberOfSectionsInTableView:(UITableView *)tableView {
  if (tableView == self.tableView) {
    return [[self.fetchedResultsController sections] count];
  } else {
    return 1;
  }
}
tableView:numberOfRowsInSection:
The number of rows in the search results table view is simply the count of the number of objects we have in the filtered list:
- (NSInteger)tableView:(UITableView *)tableView numberOfRowsInSection:(NSInteger)section {
  if (tableView == self.tableView) {
    id <NSFetchedResultsSectionInfo> sectionInfo = [[self.fetchedResultsController sections] objectAtIndex:section];
    return [sectionInfo numberOfObjects];
  } else {
    return [self.filteredList count];
  }
}
tableView:cellForRowAtIndexPath:
The implementation of this method is interesting as it contains a small pitfall. Our original code to dequeue a reusable table view cell is as follows:
UITableViewCell *cell = [tableView dequeueReusableCellWithIdentifier:UYLCountryCellIdentifier];
This will either create a new cell based on the prototype we defined in the storyboard or reuse an existing cell if available. If you are not familiar with this you may want to refer back to the original post on prototype table view cells where I discussed this in more detail. Unfortunately this code will break when we introduce the search results table view cell:
*** Assertion failure in -[UISearchResultsTableView _createPreparedCellForGlobalRow:withIndexPath:], /SourceCache/UIKit_Sim/UIKit-1914.84/UITableView.m:6061
*** Terminating app due to uncaught exception 'NSInternalInconsistencyException', reason: 'UITableView dataSource must return a cell from tableView:cellForRowAtIndexPath:'
The problem is that the search results table view is created by the search display controller and does not know about the prototype table view cell we registered in the storyboard for the UYLCountryTableViewController class. This means that when we ask the search results table view to create a cell with identifier UYLCountryCellIdentifier it returns nil.
The Apple documentation and sample code for storyboards, table views and search bars do not provide any clear guidance on how to deal with this situation. We could go back to defining the table view cell in a separate NIB file and load it manually but that seems to defeat the point of using storyboards. The best workaround I have found so far is to always use the original table view (self.tableView) to instantiate the table view cell:
UITableViewCell *cell = [self.tableView dequeueReusableCellWithIdentifier:UYLCountryCellIdentifier];
This seems a little unusual but as far as I can tell it is perfectly safe and achieves the desired result. A bug report is on its way to Apple to see if they can clarify this situation and I will update this post if I get a response.
Once we have the cell we get the Country object from either the fetched results controller or the filtered list depending on which table view we are handling:
Country *country = nil;
if (tableView == self.tableView) {
  country = [self.fetchedResultsController objectAtIndexPath:indexPath];
} else {
  country = [self.filteredList objectAtIndex:indexPath.row];
}
Section Index Titles
The three remaining UITableViewDataSource methods deal with the section index and titles. I will avoid showing each method as they are very similar and you can refer to the example code if required. In each case we disable the section index and titles when we are dealing with the search results table:
- tableView:titleForHeaderInSection: returns nil for the search results.
- sectionIndexTitlesForTableView: returns nil for the search results.
- tableView:sectionForSectionIndexTitle:atIndex: returns 0 for the search results.
Fixing the row height
There is one remaining problem with the search results table view that we need to address. The original table view defined in the storyboard for the UYLCountryTableViewController class uses a non-default cell row height:
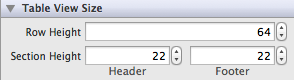
The search results table view is created by the search display controller with a default row height which needs to be changed if we want our cells to display correctly. Luckily the UISearchDisplayDelegate protocol gives us an easy way to override the row height when the table is first loaded:
- (void)searchDisplayController:(UISearchDisplayController *)controller didLoadSearchResultsTableView:(UITableView *)tableView {
  tableView.rowHeight = 64;
}
Segue To Detailed View Controller
In our original table view controller we used a storyboard defined segue to transition from the table view to the detailed country view. The prepareForSegue:sender: method allows us to retrieve the Country object we need to pass to the detailed view controller. Since we are using the same prototype cell we can take advantage of the same segue when the user selects a row in the search results table view. We just need to detect when the search display controller is active and retrieve the Country object from our filtered list rather than from the fetched results controller:
- (void)prepareForSegue:(UIStoryboardSegue *)segue sender:(id)sender {
  if ([segue.identifier isEqualToString:UYLSegueShowCountry]) {
    Country *country = nil;
    if (self.searchDisplayController.isActive) {
      NSIndexPath *indexPath = [self.searchDisplayController.searchResultsTableView indexPathForCell:sender];
      country = [self.filteredList objectAtIndex:indexPath.row];
    } else{
      NSIndexPath *indexPath = [self.tableView indexPathForCell:sender];
      country = [self.fetchedResultsController objectAtIndexPath:indexPath];
    }
    UYLCountryViewController *viewController = segue.destinationViewController;
    viewController.country = country;
  }
}
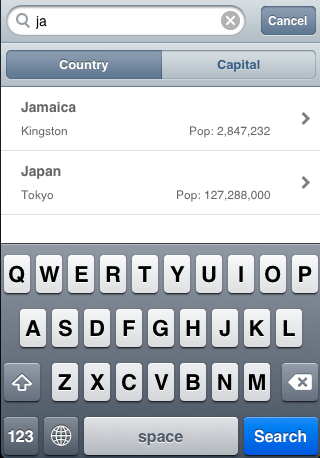
Adding A Search Icon To The Index
At this point we have a functioning search bar for the country table view controller which allows us to search by country name or capital and transition to the detailed country view:
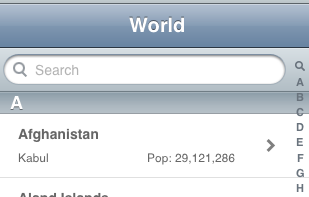
To finish up I am going to modify the section index title displayed on the right hand side to include a search icon that will scroll the table view to the top. This involves another modification to our UITableViewDataSource methods to adjust the section index titles. We need to insert the search icon (UITableViewIndexSearch) at the beginning of the array of index titles generated by the fetched results controller:
- (NSArray *)sectionIndexTitlesForTableView:(UITableView *)tableView {
  if (tableView == self.tableView) {
    NSMutableArray *index = [NSMutableArray arrayWithObject:UITableViewIndexSearch];
    NSArray *initials = [self.fetchedResultsController sectionIndexTitles];
    [index addObjectsFromArray:initials];
    return index;
  } else {
    return nil;
  }
}
When the table view controller requests the section that corresponds to the search icon in the index we return not found and force the table view to scroll to the top. The index for the other sections is now offset by one so we need to adjust when asking the fetched results controller for the section:
- (NSInteger)tableView:(UITableView *)tableView sectionForSectionIndexTitle:(NSString *)title atIndex:(NSInteger)index {
  if (tableView == self.tableView) {
    if (index > 0) {
      return [self.fetchedResultsController sectionForSectionIndexTitle:title atIndex:index-1];
    } else {
      self.tableView.contentOffset = CGPointZero;
      return NSNotFound;
    }
  } else {
    return 0;
  }
}
The final appearance of the index with the search icon is shown as below:
Wrapping Up
That was a long post for what I had originally planned as a simple topic but hopefully by building the features slowly you were able to follow along. I am not entirely happy with the way that the search display controller interacts with the results table view when using a storyboard. The workaround I presented in this post seems to do the trick but some clearer guidance from Apple would be helpful. As usual you can find the example WorldFacts Xcode project used for this post in my GitHub CodeExamples repository if you want to have a closer look.