A while back I had the idea that I should create my own implementation of the Time-based One-time Password (TOTP) algorithm used by applications such as Google Authenticator. The TOTP algorithm relies on a shared secret key that has previously been exchanged between the server and client. A convenient way to exchange the key is to have the server display a QR code that can be read using the camera on a mobile device. So as a first step I decided to take a look at reading QR codes.
AVCaptureSession
The release of iOS 7 added support in AVFoundation for the detection of a range of machine readable codes including QR codes. Any device that supports iOS 7 is capable of real-time detection of both 1-D bar codes (UPC-E, EAN-8, EAN-13, Code 39, Code 93, Code 128) and 2-D codes (PDF417, QR and Aztec) using either the front or back cameras. The camera can capture up to four codes at the same time. See Session 610 What’s New in Camera Capture from WWDC 2013 for the details.
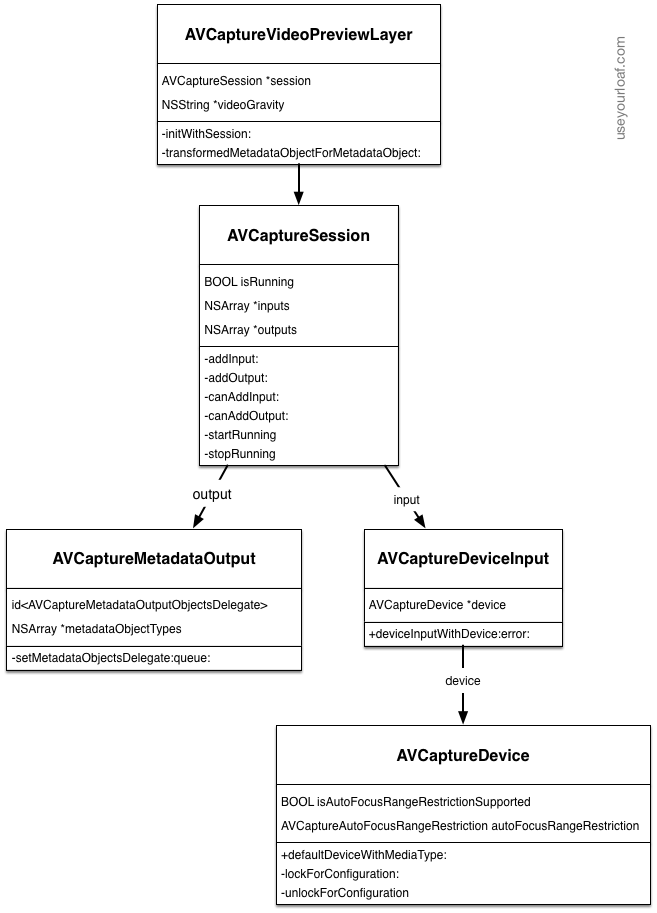
The basic setup to capture machine readable codes requires an AVCaptureSession object which manages the flow between input and output capture devices. The key classes, properties and methods we need to capture QR codes are shown below. None of these classes are actually new in iOS 7. It has, for example, been possible since iOS 6 to use a similar setup to do face detection.
Notes:
- AVCaptureSession Coordinates data flow from capture inputs (subclasses of AVCaptureInput) and outputs (subclasses of AVCaptureOutput). It includes methods to stop and start the capture session.
- AVCaptureDeviceInput A subclass of AVCaptureInput that can act as the input to a capture session. Initialised with an instance of an AVCaptureDevice.
- AVCaptureDevice Represents the physical capture device such as the camera. Used to configure the underlying hardware such as setting the autofocus mode of the camera. To change the properties of a device you need to first lock it for configuration, make the change and then release the lock.
- AVCaptureMetadataOutput A subclass of AVCaptureOutput that handles the output of a capture session. The captured objects are passed to a delegate that implements the AVCaptureMetadataOutputObjectsDelegate protocol. The delegates methods are executed on a specified dispatch queue. You filter the objects of interest by specifying the required metadataObjectTypes (e.g. AVMetadataFaceObject).
- AVCaptureVideoPreviewLayer A subclass of CALayer that displays the output of the camera as it is being captured.
Creating a QR Reader application
To experiment with reading QR codes I created an example app that has a very simple user interface as shown in the storyboard below. This is the iPhone storyboard but the iPad version is very similar (see the example code for details):
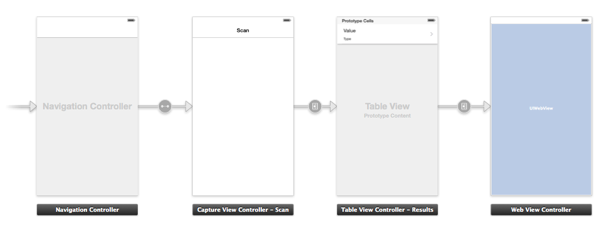
A capture view controller (UYLCaptureViewController) presents the AVCaptureVideoPreviewLayer, manages the AVCaptureSession and implements the AVCaptureMetadataOutputObjectsDelegate method to handle the detected QR codes. To understand which objects are being detected we will overlay an additional CALayer to outline the detected objects. A tap on the view will segue to a table view controller to show the value of the QR code. Finally if the QR code represent a URL we allow a further segue to a web view to display the URL.
Setting up the capture Session
To get started we need to implement the UYLCaptureViewController and add some properties to store the captured objects:
// UYLCaptureViewController.h
@interface UYLCaptureViewController : UIViewController
@end

// UYLCaptureViewController.m
#import <AVFoundation/AVFoundation.h>
#import "UYLCaptureViewController.h"

@interface UYLCaptureViewController () <AVCaptureMetadataOutputObjectsDelegate>

@property (nonatomic, strong) AVCaptureVideoPreviewLayer *previewLayer;
@property (nonatomic, strong) CALayer *targetLayer;
@property (nonatomic, strong) AVCaptureSession *captureSession;
@property (nonatomic, strong) NSMutableArray *codeObjects;
@end
Note that we declare that the view controller implements the AVCaptureMetadataOutputObjectsDelegate protocol. We will look at implementing the delegate method in a while. The codeObjects array will act as the store for the AVMetadataObjects we detect. I will explain the two layer properties in a while.
We will build the AVCaptureSession via lazy instantiation in the getter method of the captureSession property. The first step is to create the capture device for the camera. The easiest way to get the device representing the back-facing camera is to ask for the default video device (AVMediaTypeVideo).
- (AVCaptureSession *)captureSession {
  if (!_captureSession) {
    NSError *error = nil;
    AVCaptureDevice *device = [AVCaptureDevice
      defaultDeviceWithMediaType:AVMediaTypeVideo];
To speed up the autofocus for QR codes that will typically be up close to the device we can also restrict the range of the focus (AVCaptureAutoFocusRangeRestrictionNear). After checking that the device supports auto focus range restriction we need to lock the device for configuration, set the focus restriction and then unlock the device.
    if (device.isAutoFocusRangeRestrictionSupported) {
      if ([device lockForConfiguration:&error]) {
        [device setAutoFocusRangeRestriction:AVCaptureAutoFocusRangeRestrictionNear];
        [device unlockForConfiguration];
      }
    }
If we manage to create the input device we can then add it to the AVCaptureSession. The pattern for adding input or output devices to the session is pretty much the same and involves first testing that the device can be added to the session:
    AVCaptureDeviceInput *deviceInput = [AVCaptureDeviceInput
      deviceInputWithDevice:device error:&error];
    if (deviceInput) {
      _captureSession = [[AVCaptureSession alloc] init];
      if ([_captureSession canAddInput:deviceInput]) {
          [_captureSession addInput:deviceInput];
      }
    }
We follow a similar approach for creating and adding the output capture device:
    AVCaptureMetadataOutput *metadataOutput = [[AVCaptureMetadataOutput alloc] init];
    if ([_captureSession canAddOutput:metadataOutput]) {
      [_captureSession addOutput:metadataOutput];
      [metadataOutput setMetadataObjectsDelegate:self
       queue:dispatch_get_main_queue()];
      [metadataOutput setMetadataObjectTypes:@[AVMetadataObjectTypeQRCode]];
    }
Note that we set the view controller to be the delegate and specify the main queue to execute the delegate method. You could create and use a different dispatch queue if you know the main queue is busy with other tasks. We also need to filter the output to only detect those object types we are interested in. In this case since we only want QR codes we specify AVMetadataObjectTypeQRCode but you could list more types if you need them.
Core Animation layers
We need two Core Animation layers that will be added as sublayers to our view. The first layer is the AVCaptureVideoPreviewLayer which shows the output of the camera during the capture so that the user can see what is being captured. Note that the frame of the layer is set to the bounds of the view.
    self.previewLayer = [[AVCaptureVideoPreviewLayer alloc] initWithSession:_captureSession];
    self.previewLayer.videoGravity = AVLayerVideoGravityResizeAspectFill;
    self.previewLayer.frame = self.view.bounds;
    [self.view.layer addSublayer:self.previewLayer];
The second layer will be used to highlight the detected objects and is a simple CALayer which overlays the view layer:
    self.targetLayer = [CALayer layer];
    self.targetLayer.frame = self.view.bounds;
    [self.view.layer addSublayer:self.targetLayer];
Finally with the capture session fully initialised we can return the object for our getter:
  }
  return _captureSession;
}
Starting and stopping the capture session
With the session setup taken care of it is easy to add a couple of utility methods to start and stop the capture:
- (void)startRunning {
  self.codeObjects = nil;
  [self.captureSession startRunning];
}

- (void)stopRunning {
  [self.captureSession stopRunning];
  self.captureSession = nil;
}
Any previously detected objects are discarded when a new session starts. I also found it was best to destroy the capture session each time it is stopped as it would not always restart. The session is initially started from viewDidAppear and stopped from viewWillDisappear:
- (void)viewDidAppear:(BOOL)animated {
  [super viewDidAppear:animated];
  [self startRunning];
}

- (void)viewWillDisappear:(BOOL)animated {
  [super viewWillDisappear:animated];
  [self stopRunning];
}
For brevity I will not show the code here but I also stop and start the session when the application moves between the foreground and background. This just involved listening for the UIApplicationDidEnterBackgroundNotification and UIApplicationWillEnterForegroundNotification notifications. Check the example code for the details.
AVCaptureMetadataOutputObjectsDelegate
The delegate method captureOutput:didOutputMetadataObjects:fromConnection: is called whenever objects of the type we specified are detected. This method is called frequently during the capture session so Apple recommends that you limit what you do to avoid dropping objects.
- (void)captureOutput:(AVCaptureOutput *)captureOutput
       didOutputMetadataObjects:(NSArray *)metadataObjects
       fromConnection:(AVCaptureConnection *)connection {
  self.codeObjects = nil;
  for (AVMetadataObject *metadataObject in metadataObjects) {
    AVMetadataObject *transformedObject = [self.previewLayer
    transformedMetadataObjectForMetadataObject:metadataObject];
    [self.codeObjects addObject:transformedObject];
  }

  [self clearTargetLayer];
  [self showDetectedObjects];
}
Each time the delegate method is called any previously detected objects are discarded and then we iterate through the newly detected objects. The AVMetadataObject is an abstract class for the different types of metadata that can be captured. Since we specified AVMetadataObjectTypeQRCode when setting up the session we should only receive objects of class AVMetadataMachineReadableCodeObject which has two properties of interest:
- The stringValue property contains the decoded data from the detected code.
- The corners property is an array of dictionary objects each containing the coordinates of a corner of the detected code.
We can use the corners of the detected object to draw an outline of the detected codes on the target layer we created when we setup the capture session. However to do that we first need to convert from the metadata object coordinates to the coordinate system of the preview layer. Luckily the AVCaptureVideoPreviewLayer class provides a convenience method (transformedMetadataObjectForMetadataObject:) to do just that.
Clearing the target layer.
Once we have the newly detected objects we want to draw an outline of the objects in the target layer. Before doing that we first need to remove any previously detected objects we may have drawn. We do that by stepping through each of the sublayers of the target layer and removing them:
- (void)clearTargetLayer {
  NSArray *sublayers = [[self.targetLayer sublayers] copy];
  for (CALayer *sublayer in sublayers) {
    [sublayer removeFromSuperlayer];
  }
}
Drawing the detected objects
A CAShapeLayer is a specialised subclass of CALayer that knows how to draw a path. We can use it to quickly add a layer for each detected object that shows a red outline around each of the detected objects:
- (void)showDetectedObjects {
  for (AVMetadataObject *object in self.codeObjects) {
    if ([object isKindOfClass:[AVMetadataMachineReadableCodeObject class]]) {
      CAShapeLayer *shapeLayer = [CAShapeLayer layer];
      shapeLayer.strokeColor = [UIColor redColor].CGColor;
      shapeLayer.fillColor = [UIColor clearColor].CGColor;
      shapeLayer.lineWidth = 2.0;
      shapeLayer.lineJoin = kCALineJoinRound;
      CGPathRef path = createPathForPoints([(AVMetadataMachineReadableCodeObject *)object corners]);
      shapeLayer.path = path;
      CFRelease(path);
      [self.targetLayer addSublayer:shapeLayer];
    }
  }
}
Notes:
- Each detected object should be of class AVMetadataMachineReadableCodeObject.
- A new CAShapeLayer is created for each object. The stroke color is set to red, the fill color is cleared so we just see the outline of the object. We also set the line width and rounded corners.
- The path needs to be constructed from the corner points in the detected objects (see below).
- The shape layer is added to the target later we created when we setup the capture session.
Creating a path
The creation of the path from the corners in the metadata object is a little complicated. Each corner in the object is a CGPoint (x,y) but since this is a plain old C structure it cannot be stored directly in an NSArray. Instead each point is stored as a dictionary representation of a CGPoint. The CGPointMakeWithDictionaryRepresentation function converts from the dictionary representation back to a CGPoint. To construct the path we move to the first point and then add a line to each of the subsequent points to trace out the full path. Finally the path needs to be closed. The following code is actually borrowed from the Apple sample code but it does the trick nicely:
CGMutablePathRef createPathForPoints(NSArray* points) {
  CGMutablePathRef path = CGPathCreateMutable();
  CGPoint point;
  if ([points count] > 0) {
    CGPointMakeWithDictionaryRepresentation((CFDictionaryRef)[points objectAtIndex:0], &point);
    CGPathMoveToPoint(path, nil, point.x, point.y);
    int i = 1;
    while (i < [points count]) {
      CGPointMakeWithDictionaryRepresentation((CFDictionaryRef)[points objectAtIndex:i], &point);
      CGPathAddLineToPoint(path, nil, point.x, point.y);
      i++;
    }
    CGPathCloseSubpath(path);
  }
  return path;
}
Segue to the table view
The storyboard has a tap gesture assigned to the view of the capture view controller that triggers a segue to a table view controller. The table view controller takes a copy of the code objects:
- (void)prepareForSegue:(UIStoryboardSegue *)segue sender:(id)sender {
  if ([segue.identifier isEqualToString:UYLSegueToTableView]) {
    UYLTableViewController *viewController = segue.destinationViewController;
    viewController.codeObjects = self.codeObjects;
  }
}
Since we only want to segue when we have some objects there is a check to see if the segue should be performed:
- (BOOL)shouldPerformSegueWithIdentifier:(NSString *)identifier sender:(id)sender {
  if ([identifier isEqualToString:UYLSegueToTableView]) {
    return [self.codeObjects count];
  }
  return NO;
}
Showing the details
The table view controller is pretty much boiler-plate code so I will skip the details. Refer to a previous post on creating table views with varying row heights for a more detailed walk through. The code to configure the cell with the QR code details is shown below:
- (void)configureCell:(UITableViewCell *)cell forRowAtIndexPath:(NSIndexPath *)indexPath {
  if ([cell isKindOfClass:[UYLTextCell class]]) {
    UYLTextCell *textCell = (UYLTextCell *)cell;
    AVMetadataObject *object = [self.codeObjects objectAtIndex:indexPath.row];

    textCell.valueLabel.text = @"No value";
    textCell.typeLabel.text = object.type;
    textCell.accessoryType = UITableViewCellAccessoryNone;
    textCell.valueLabel.font = [UIFont preferredFontForTextStyle:UIFontTextStyleBody];
    textCell.typeLabel.font = [UIFont preferredFontForTextStyle:UIFontTextStyleCaption1];

    if ([object.type isEqualToString:AVMetadataObjectTypeQRCode]) {
      AVMetadataMachineReadableCodeObject *codeObject = (AVMetadataMachineReadableCodeObject *)object;
      NSString *stringValue = codeObject.stringValue ? codeObject.stringValue : @"Unable to decode";
      textCell.valueLabel.text = stringValue;

      if ([self codeObjectContainsLink:codeObject]) {
        textCell.accessoryType = UITableViewCellAccessoryDisclosureIndicator;
      }
    }
  }
}
Notes:
- The main label of the cell is set to the value of the QR code (if present)
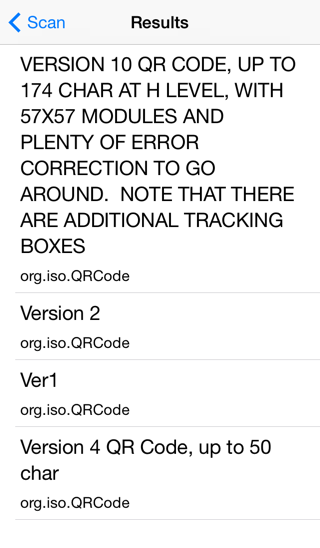
- The cell subtitle is set to the code type which in this case will always be ‘org.iso.QRCode’.
- If the cell contains a valid URL link we add a disclosure indicator. I will not show it here but for those cells with a valid URL a segue to a web view controller is permitted to display the URL. Refer to the example code for details.
Testing QR Code Capture
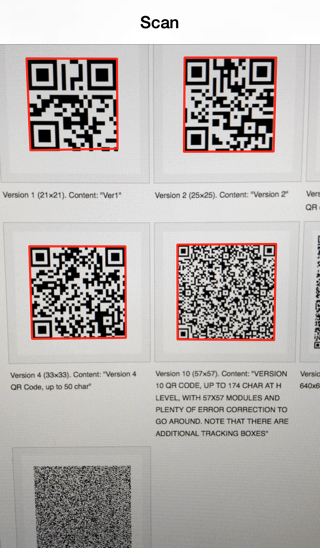
The Wikipedia page on QR codes has same good examples of various versions of QR codes which makes a good test. The screenshot below shows what happens when pointing the camera at the page. Note how only four out of the five visible codes have a red outline indicating they have been detected.
Tapping the screen shows the details for each of the QR codes:
Wrapping up
As mentioned at the start of this post you can find further details on detecting machine readable codes in session 610 from WWDC 2013. You can also find the full example code for the project that accompanies this post in my code examples repository.