When I first heard that iOS 5 had introduced the concept of a static table view that could be designed in Interface Builder I was disappointed to see that it was actually tied into storyboards. I have nothing against storyboards, they are an interesting innovation that can (potentially) save a lot of code. However if you are not yet ready to fully adopt storyboards for your user interface design you may be discouraged from exploring the new features they bring. What I want to examine in this post is how you can use a minimal implementation of storyboards to quickly create a static table view without having to completely rewrite an existing App.
Designing A Settings Table
Implementing a Settings table is an obvious use for static table views within an App. To illustrate how easy this is I am going to start from the Xcode template for a tabbed application. Note that I did not select the option to use storyboards so that the main interface is still created using the traditional Nib approach. (I am however using ARC so pay attention if you are cut and pasting code into an App not using ARC). The template gives us a tab bar controller containing two view controllers both loaded from individual Nib files. The second view controller is what we will replace with a storyboard to implement our application settings views.
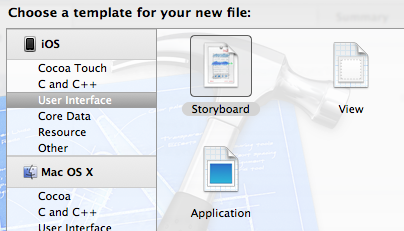
To get started I am going to create a storyboard and layout a number of table views. To keep this post short I am going to limit this to an iPhone layout but the principle applies equally for an iPad or Universal App. To add a storyboard create a new file and select the storyboard from the User Interface templates, ensure the device family is set to iPhone and name the file Settings:
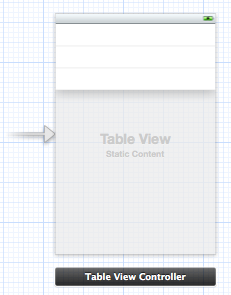
The first table view controller that I am going to add to the storyboard is going to represent a top level settings menu allowing me to group simple and advanced settings which I will access on separate views. When I have finished the table view should look like this:

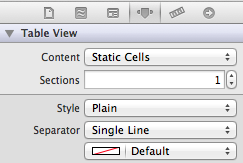
By default when you drag a table view controller into a storyboard you get a dynamic table view. You can change this by selecting Static Cells in the Attributes Inspector:
What we now have is a table view containing three empty cells that we can use to design our top level settings menu:
To get to our desired layout the main steps are as follows:
- change the table view style from
PlaintoGroupedand delete two of the rows to leave a single row (you can change the number of rows using the Inspector but to delete a row it is quicker to just click on the rows in the table and hit the delete key) - drag a label object into the table view cell, adjust the formatting as you see fit and set the text label to
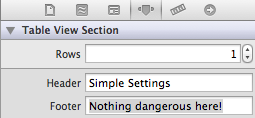
General - with the Table View Section selected in either the document navigator or in the jump bar use the Attributes Inspector to set the section header and footer (this is also where you would adjust the number of rows in the section):
To add the second section ensure the Table View is selected in the document navigator and then change the number of sections in the Attributes Inspector. When the new section is added it is copied from the first section which is a nice time saver. To complete the layout we just need to modify the header, footer and label text.
Now we have our initial settings table view we can repeat the exercise to add our detailed settings tables but before we do that we need to embed our table view controller in a navigation controller to handle moving between the various tables. That is an easy step using the Embed In > Navigation Controller option from the Xcode Editor menu. Once the Navigation Controller has been added we can also set the title in the Navigation Bar for our Settings table view controller. At this point the Storyboard should look as follows:
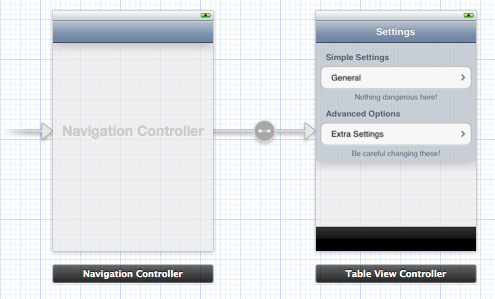
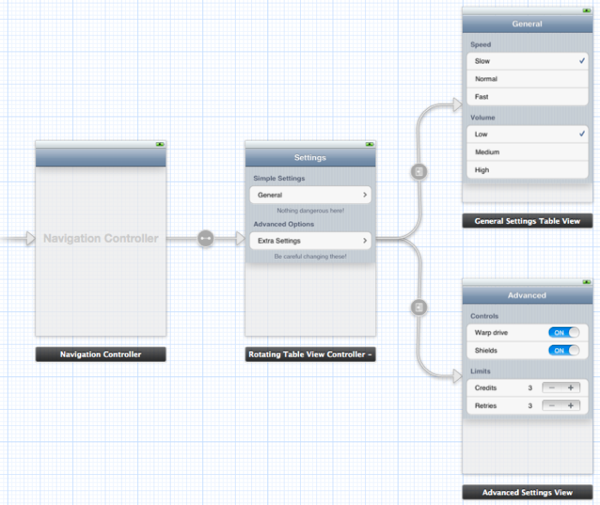
Now we can repeat the exercise for two additional table view controllers which will provide static table views for our simple and advanced settings. I will not go through this step by step but at the end of the process the Storyboard will look something like this:

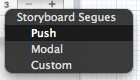
At this point we need to add the transitions from the Settings table view controller to each of the detailed settings view controllers. The Storyboard editor refers to each of the views as scenes and transitions between scenes as segues. We need two segues in this case, the first from the General table view cell to take us to the General Settings table view and the second from the Extra Settings table view cell to the Advanced Settings table view. To create the segues you need to control click on the source table view cell and then drag across to the destination table view. When you release the mouse button you are presented with a popover menu allowing you to select the Storyboard segue style. Since we are using a navigation controller we will use the push segue.
With our new view controllers now included in the navigation hierarchy we can set the title for each view by typing directly in the navigation bar of each view so that our Storyboard now looks as follows (Interface Builder will infer when it needs to add the navigation and tab bars to views):

Loading the storyboard
If we were using a storyboard for the main user interface we could specify the filename in the UIMainStoryboardFile key in the application Info.plist file and it would be loaded automatically. Since in this example we want to make a more limited use of storyboards we need to manually load and launch our storyboard file. We can do that by modifying our Application Delegate to use the storyboard when loading the view controller for the second tab bar item. The relevant code in the application:didFinishLaunchingWithOptions method is as follows:
UYLFirstViewController *firstViewController = [[UYLFirstViewController alloc]
                        initWithNibName:@"UYLFirstViewController"
                        bundle:nil];
UIStoryboard *settingsStoryboard = [UIStoryboard
                                    storyboardWithName:@"Settings"
                                    bundle:nil];
UIViewController *settingsViewConroller = [settingsStoryboard
                                        instantiateInitialViewController];

settingsViewConroller.title = NSLocalizedString(@"Settings", @"Settings");
settingsViewConroller.tabBarItem.image = [UIImage imageNamed:@"second"];

self.tabBarController = [[UITabBarControlleralloc] init];
self.tabBarController.viewControllers = [NSArray
                      arrayWithObjects:firstViewController,
                      settingsViewConroller, nil];
self.window.rootViewController = self.tabBarController;
Lines 2 and 3 are the important ones, the UIStoryboard class method storyBoardWithName:bundle: is used to load the Storyboard file. There is no need to specify the bundle when the storyboard is contained in the main application bundle. The instantiateInitialViewController method then allocates and initialises our root navigation view controller which we can then add to the tab bar view controller along with the first view controller which was created from its Nib file.
Now if we run the App in the Simulator a lot the Settings table view is already working including pushing and popping the detailed view controllers on and off the navigation controller stack. So far this looks like a real win for storyboards in that we have a lot of functionality designed in Interface Builder without having to write any boilerplate view controller code. Since our initial settings table view controller only acts as a top level menu it appears that we do not even need to implement a custom subclass for it (I say “appears” as we will see shortly that there is one issue we need to deal with that causes us to create a generic table view subclass).
Implementing Row Selection
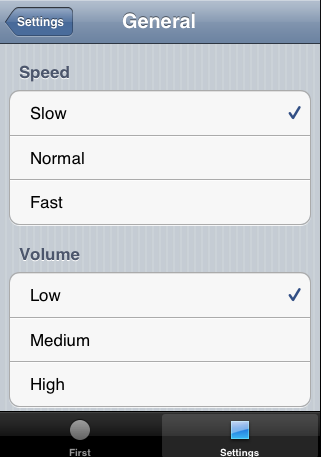
To actually make our settings screens useful we need to implement the view controllers so that we can interact with the user interface and read and write the settings. The general settings screen (shown below) is the easiest so we will start by adding a subclass of UITableViewController named UYLGeneralSettingsTableViewController.
The public interface for this class is empty:
@interface UYLGeneralSettingsTableViewController : UITableViewController
@end
We will add two properties to the private class extension to represent to two settings (speed and volume) that this view manipulates:
@interface UYLGeneralSettingsTableViewController ()

@property (nonatomic) NSUInteger speed;
@property (nonatomic) NSUInteger volume;

@end
Now we need to implement just enough of a table view controller to allow us to setup the view state when it first loads and to allow us to change the selected row in each of the two sections. Before I show the code that I added it is important to note the code that I do NOT need to implement:
- the UITableViewDataSource protocol has two required methods and a number of optional methods that are now largely redundant. Of the two normally required methods I will in this case implement tableView:cellForRowAtIndexPath: (to set the checkmark of the selected row) but it may not always be required.
- There is no need to implement the other required method tableView:numberOfRowsInSection: or numberOfSectionsInTableView: as the table dimensions of the static table were set in InterfaceBuilder.
- We do not need to implement tableView:titleForHeaderInSection: or tableView:titleForFooterInSection: as we directly set the header and footer in the Storyboard.
To initialise the view we will implement the viewDidLoad method to read our user defaults from file.
- (void)viewDidLoad
{
    [superviewDidLoad];

    NSUserDefaults *defaults = [NSUserDefaults standardUserDefaults];
    self.speed = [defaults integerForKey:kUYLSettingsSpeedKey];
    self.volume = [defaults integerForKey:kUYLSettingsVolumeKey];
}
Now to actually set the checkmark on the currently selected row we will implement the UITableViewDataSource protocol method tableView:cellForRowAtIndexPath:
- (UITableViewCell *)tableView:(UITableView *)tableView
         cellForRowAtIndexPath:(NSIndexPath *)indexPath
{
    UITableViewCell *cell = [super tableView:tableView
                             cellForRowAtIndexPath:indexPath];
    cell.accessoryType = UITableViewCellAccessoryNone;

    NSUInteger section = [indexPath section];
    NSUInteger row = [indexPath row];

    switch (section)
    {
        case SECTION_SPEED:
            if (row == self.speed)
            {
                cell.accessoryType = UITableViewCellAccessoryCheckmark;
            }
            break;

        case SECTION_VOLUME:
            if (row == self.volume)
            {
                cell.accessoryType = UITableViewCellAccessoryCheckmark;
            }
            break;
    }
    return cell;
}
Usually the first thing you do in tableView:cellForRowAtIndexPath is attempt to dequeue a cell for reuse of if not available allocate and initialise a new UITableViewCell. However that does not apply in this case as this is a static table view. All of the table view cells that we need were created in Interface Builder and are instantiated when the storyboard loads the view controller. By the way this is worth considering if you are attempting to use static table views to create a huge table view. Having to allocate all of the static table view cells when the view is first loaded may be both slow and cause you memory issues. If you find yourself creating a static table view with more than one or two screens of information you probably want to go back to using a dynamic table view.
Even though we do not need to allocate the table view cells for a static table view we can still get a reference to each cell to allow us to customise the cell. There are several ways to do this including declaring an outlet for each table view cell in Interface Builder which we will see in the advanced settings view controller. In this case though we simply need to set the cell accessory type so we can call tableView:cellForRowAtIndexPath on the super class to return us the current cell. Once we have the current cell we can set or clear the accessoryType based on the current value of the speed or volume properties.
We also need to implement the UITableViewDelegate method to handle row selection (see below). There is nothing remarkable about this method so I will not go into too much details. The method basically just updates the user defaults based on which row is selected and then requests the table view is reloaded to cause the checkmarks to be set.
- (void)tableView:(UITableView *)tableView
        didSelectRowAtIndexPath:(NSIndexPath *)indexPath
{
    NSUserDefaults *defaults = [NSUserDefaults standardUserDefaults];
    NSUInteger section = [indexPath section];
    NSUInteger row = [indexPath row];

    switch (section)
    {
        case SECTION_SPEED:
            self.speed = row;
            [defaults setInteger:row forKey:kUYLSettingsSpeedKey];
            break;
        case SECTION_VOLUME:
            self.volume = row;
            [defaults setInteger:row forKey:kUYLSettingsVolumeKey];
            break;
    }
    [self.tableView reloadData];
}
Finally we need to go back to Interface Builder and with the Identity inspector change the class of the generic UITableViewController to our custom subclass UYLGeneralSettingsTableViewController:

If you rerun the App in the Simulator the general settings screen should now be fully functional.
Connecting to Static Table View Cells
The advanced settings screen at first looks a little more complicated as we have a number of switches and stepper controls that we need to interact with. In fact whilst it takes a little bit of effort in Interface Builder wiring everything up it actually requires even less code. As before we will start by adding a subclass of UITableViewController to the project and name it UYLAdvancedSettingsViewController:
@interface UYLAdvancedSettingsViewController : UITableViewController
@end
To be able to interact with the contents of the static table view cells we need to define some outlets to allow us to set the various elements and action methods for the switch and stepper controls. A good place to do that is in a private class extension of our custom subclass:
@interface UYLAdvancedSettingsViewController ()

- (IBAction)switchToggled:(UISwitch *)sender;
- (IBAction)stepperChanged:(UIStepper *)sender;

@property (nonatomic, weak) IBOutlet UISwitch *warpSwitch;
@property (nonatomic, weak) IBOutlet UISwitch *shieldsSwitch;
@property (nonatomic, weak) IBOutlet UILabel *creditsLabel;
@property (nonatomic, weak) IBOutlet UILabel *retriesLabel;
@property (nonatomic, weak) IBOutlet UIStepper *creditsStepper;
@property (nonatomic, weak) IBOutlet UIStepper *retriesStepper;

@end
This project is compiled using ARC so we follow Apple recommendations and make all of our IBOutlet properties weak references. Now we use Interface Builder to connect the outlets to the corresponding label or control in the static table view. To do that we first need to use the Identity inspector to change the class of the view from the generic UITableViewController to our custom UYLAdvancedSettingsViewController. I will not walk you through wiring up every user interface element as it is standard Interface Builder stuff but just for reference the view hierarchy and connections are reproduced below:
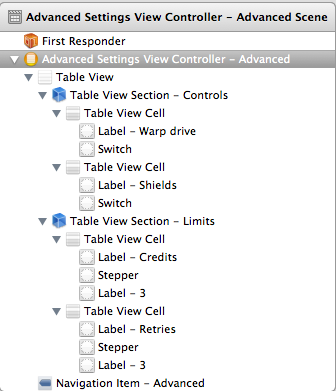
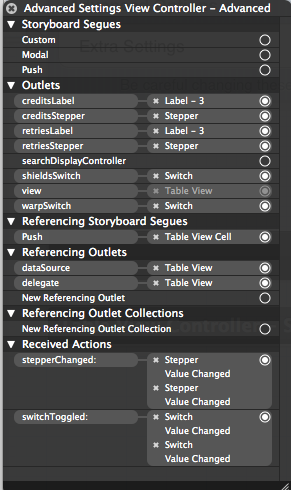
In order to determine which switch or stepper is triggering the action each one is uniquely tagged within Interface builder.

Now we have our outlets wired up it is trivial in viewDidLoad to set the initial state of the switches, steppers and labels:
- (void)viewDidLoad
{
  [superviewDidLoad];

  NSUserDefaults *defaults = [NSUserDefaults standardUserDefaults];

  self.warpSwitch.on = [defaults boolForKey:kUYLSettingsWarpDriveKey];
  self.shieldsSwitch.on = [defaults boolForKey:kUYLSettingsShieldsKey];

  self.creditsStepper.value = [defaults doubleForKey:kUYLSettingsCreditsKey];
  self.creditsLabel.text = [NSStringstringWithFormat:@"%1.0f",
                            self.creditsStepper.value];

  self.retriesStepper.value = [defaults doubleForKey:kUYLSettingsRetriesKey];
  self.retriesLabel.text = [NSStringstringWithFormat:@"%1.0f",
                            self.retriesStepper.value];
}
Note that we do not need to implement tableView:cellForRowAtIndexPath: to get a cell reference as we have direct access to each cell via the outlets. In fact we do not need to implement any UITableViewDataSource or UITableViewDelegate method. The two action methods to handle the switch and stepper actions are fairly similar so I will just show the method for the switch here:
- (IBAction)switchToggled:(UISwitch *)sender
{
    NSUserDefaults *defaults = [NSUserDefaults standardUserDefaults];

    switch (sender.tag)
    {
        case TAG_WARPSWITCH:
            [defaults setBool:sender.on forKey:kUYLSettingsWarpDriveKey];
            break;

        case TAG_SHIELDSSWITCH:
            [defaults setBool:sender.on forKey:kUYLSettingsShieldsKey];
            break;
    }
}
Handling Orientation Changes
There is one small issue I need to take care of before finishing. As currently implemented there is a problem with the way that we respond to device rotation. In fact if you build and run the App you will see that it does not respond to device orientation changes. The general rule for a tab bar controller is that all of the view controllers in each tab need to allow rotation or nothing rotates. I have not shown it but each of the view controllers we have implemented, including the view controller used for the first tab bar item, implements shouldAutorotateToInterfaceOrientation: to return YES for all orientations:
- (BOOL)shouldAutorotateToInterfaceOrientation:
        (UIInterfaceOrientation)interfaceOrientation
{
    return YES;
}
Unfortunately there is one view controller, the top level settings table view controller which messes things up for us. Since we did not need to interact with the table we never actually implemented our own custom subclass for this table view controller. That means we cannot override the orientation method so we get the default behaviour:
By default, this method returns YES for the UIInterfaceOrientationPortrait orientation only. If your view controller supports additional orientations, override this method and return YES for all orientations it supports.
To resolve this issue I have added a new UITableViewController subclass named UYLRotatingTableViewController that does nothing else but implement the shouldAutorotateToInterfaceOrientation method. Using the Identity inspector to change the class of the settings table view controller to this new subclass fixes the problem. The final storyboard is as follows:
Wrapping Up
One of the criticisms I have heard about storyboards is that unless your App is very simple they do not save you very much code. This is because you still need to handle the flow of data between view controllers. Typically this involves implementing prepareForSeque:Sender: to pass data into a new view controller and implementing a delegate protocol to pass data back to a parent or presenting view controller.
In this example we are making a very limited use of storyboards and there is no real data flow between the different static table view controllers. This means there is no need to implement prepareForSegue:sender: or to create view controller delegates so there is a considerable reduction in the amount of code required. You can make your own mind up on the value of storyboards and when they might be appropriate. Personally I like the ability to add them selectively to an App for specific parts of the interface and static table views are definitely one area where I will use them.
The now archived version of the Xcode project that accompanies this post can be found in my Github CodeExamples repository.