Apple has made it really easy to add VoiceOver support to iOS Apps. In many cases setting the accessibility label for each interface element in Interface Builder gets 90% of the job done. What I want to cover in this post is the remaining 10% that will ensure an App interacts well with VoiceOver. If you have never considered making your App accessible you should read this great post by Matt Gemmell on Accessibility for iPhone and iPad apps.
What is VoiceOver?
VoiceOver is a technology built into all iOS (and Mac) devices that provides audible aids to the user when navigating and interacting with an App. The UIAccessibility API was introduced with version 3.0 of the SDK to allow the app to provide additional information to VoiceOver. This includes such things as setting the label and optionally a hint that is read by VoiceOver when an element in the user interface is selected. In addition you set accessibility traits for each UI element indicating for example that it acts like a button or whether or not it has been selected.
The easiest way to understand VoiceOver is to try it on some existing apps and get a feel for how it works. Before diving into an example app I will quickly review how to access VoiceOver and some other tools that you will want to use when testing your App.
Toggling VoiceOver Support on a Device
You can turn VoiceOver support on for a device from the Settings application (Settings > General > Accessibility > VoiceOver). However for testing purposes I find it more convenient to be able to quickly switch VoiceOver on and off from within the App. To do that I set the Triple-click Home button option to Toggle VoiceOver (from the Settings > General > Accessibility screen):

With this option enabled you can easily turn VoiceOver on and off at any point by triple-clicking the Home button on the device. This makes it easy to examine specific situations in your App with and without VoiceOver activated. It can also be an education to enable VoiceOver on other Apps to see how well or badly other developers are handling accessibility.
Accessibility Inspector in the iOS Simulator.
The iOS Simulator does not directly support VoiceOver so you will always need to test on a device to see how well your App performs. However the iOS Simulator does have an extremely useful tool for debugging UIAccessibility issues. It is called the Accessibility Inspector and it can be activated on the Simulator from Settings > General > Accessibility. Once enabled you should see the inspector window displayed:
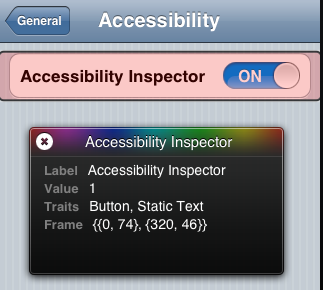
The Accessibility Inspector does not speak to you but it does provide you with information about the currently selected accessible element. The Inspector can be temporarily disabled/enabled by clicking the close control in the upper left corner of the Inspector. This can be useful when you need to navigate around the app as you can selectively enable the inspector to examine each element in your user interface.
TaskTimer - An Example in Adding Accessibility
The rest of this post is going to be a case study in adding VoiceOver support to an example App called TaskTimer. The app is based on the Xcode Master Detail template and is a variation on a task list manager - the variation being that you can time how long a particular task takes. This is a universal app so both iPhone and iPad User Interfaces are supported. The master view is a UITableView containing the list of tasks as shown in the iPhone screenshot below:
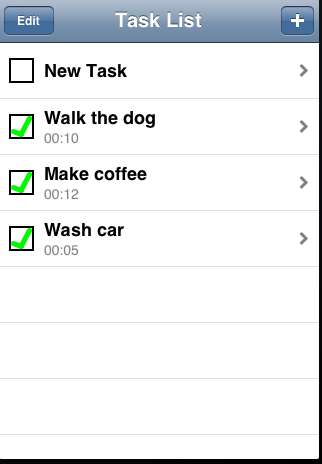
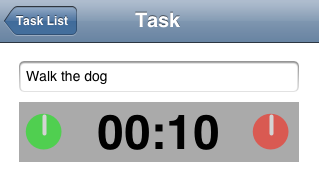
The task list follows the usual conventions of a table view in that new tasks can be inserted using the “+” button in the navigation bar and deleted via the “Edit” button. The actual task data is stored in a core data model. A completed task is shown by the green tick and the actual duration (mm:ss) is shown under the task name in the table cell view. The App is somewhat limited in that it only handles task durations up to 59 minutes 59 seconds long but it is good enough for the purposes of this post. Selecting a row in the table shows the detail view for the selected task which allows the task name to be edited. In addition a custom view allows the task timer to be stopped and started via two buttons with the current task duration displayed in a central text label:
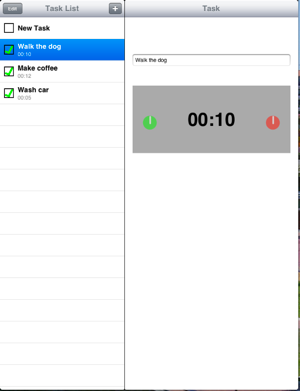
As I mentioned this is a Universal app so just for completeness the iPad user interface is shown below in portrait orientation:
UITableView Accessibility
If we use the Accessibility Inspector in the iOS Simulator we can see how well this App performs before we make any modifications. If we first take a look at the Task List table view we can find some UI elements that work fine and others that definitely need some work. The standard Navigation bar elements such as the Edit button, the title and the Add button all work fine without any effort on our part:
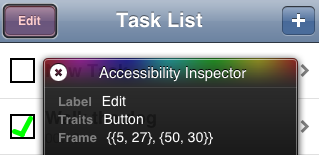
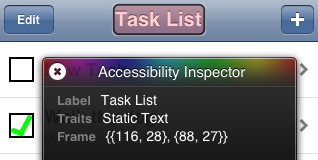
Note how the accessibility traits indicate that the first UI element is a button where as the second element is static text. Correctly setting the accessibility traits of an element is key to ensuring that VoiceOver interacts correctly with the App. Standard iOS UIKit elements such as the Navigation Bar are generally already properly configured. Simple UI elements can also be configured in Interface Builder when creating the interface.
Things are not so good if we look at one of the rows in the table for a completed task:
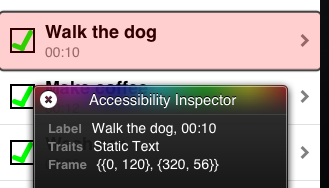
By default the table view cell has combined the main text label and the detailed text label for the accessibility label. The two fields are separated by a comma which means VoiceOver will pause briefly when reading the label. This is fine but VoiceOver does not understand that 00:10 actually means 0 minutes, 10 seconds - it simply reads “zero - ten” which is not very informative. Note also that there is no mention of the status of the task. In this case the green tick indicates that the task has been completed but the VoiceOver interface is unable to present that piece of information to the user.
So to improve the accessibility of this view we should in the first instance address the following issues:
- Ensure that when VoiceOver reads the task details it correctly interprets the duration making it clear that it is a time.
- We should also ensure that the task completion status is indicated for each row in the list
One thing we could also do is add a hint to the table view cell indicating that selecting a row will take the user to the detail task view. In this case I consider that unnecessary as I think it is OK to assume that users understand the basic iOS user interface idioms.
To customise the response from VoiceOver for a UITableView cell we simply need to set the accessibilityLabel property when we configure the cell in the table view controller. In the situation where the task is not yet completed and so does not have a final duration we will stick with the default provided by the cell text label which is the name of the task (task.note). However when the task is complete (task.complete) we want to both indicate the completion status and read the duration in a human friendly way. The following code added to the configureCell:atIndexPath method in UYLTaskListViewController should do the job:
cell.accessibilityLabel = task.note;
if ([task.complete boolValue]) {
NSUInteger minutes = [task.duration integerValue] / 60;
NSUInteger seconds = [task.duration integerValue] % 60;
cell.detailTextLabel.text = [NSString stringWithFormat:@"%02u:%02u",
minutes, seconds];
cell.imageView.image = [UIImage imageNamed:@"checked.png"];
NSString *durationText = [NSString stringWithFormat:@"%@ %@",
task.note,
NSLocalizedString(@"completed in", nil)];
durationText = [durationText stringByAppendingString:
[task.duration stringValueAsTime]];
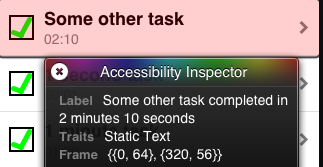
cell.accessibilityLabel = durationText;
}
To generate the text to represent the duration I have created a category (UYLTimeFormatter) on the NSNumber class to add the method stringValueAsTime since we will need it more than once. An example of the output using the Accessibility Inspector is shown below:
Custom View Accessibility
So far adding VoiceOver support has been very easy since it has just involved setting the accessibilityLabel for certain key UI elements. However for the detailed task view things get slightly more complicated. A custom class UYLCounterView is used to implement the numeric counter and the two buttons used to start and stop the counter. By default the buttons will use either the title if set or the name of the UIImage file to provide an accessibility label. In this case I am using images named start.png and stop.png which provides a reasonable default but note that these labels are of course not localised.
A more serious problem though is that the value of the counter is not accessible at all. The problem is that the text is drawn in the view using a drawAtPoint method so there is no way to directly set an accessibilityLabel or other accessibility properties for the counter. The solution is to implement the UIAccessibilityContainer Protocol for the custom view. This allows us to define arbitrary rectangles in the view that represent the elements we want to make accessible. In this case the view contains three elements, the start button, the stop button and the counter that we want to make accessible.
The UIAccessibilityContainer protocol is an informal protocol so we do not need to declare anything in our UYLCounterView class indicating that we are adopting it. What we will need though is a mutable array to hold our accessible elements. The following property is added to the UYLCounterView interface definition:
@property (nonatomic, strong) NSMutableArray *accessibleElements;
We need to create and configure a UIAccessibilityElement object for each of the three elements in our custom view and store them in this array. To avoid unnecessary effort when VoiceOver is not active we will lazily create them in the getter method in the UYLCounterView implementation. The first thing we do therefore in the getter is to check if we have already created the array and if not we allocate it:
- (NSArray *)accessibleElements {
  if (_accessibleElements != nil) {
      return_accessibleElements;
  }

  _accessibleElements = [[NSMutableArray alloc] init];
Now we need to create a UIAccessibilityElement and correctly set the accessibility properties for each view element. We need to add the elements to the accessibleElements array in the order they are presented to the user from top-left to bottom-right. So the first element we will create is for the start button:
UIAccessibilityElement *startElement = [[UIAccessibilityElement alloc]
                        initWithAccessibilityContainer:self];
startElement.accessibilityFrame = [self convertRect:self.startButton.frame
                                   toView:nil];
startElement.accessibilityLabel = NSLocalizedString(@"Start", nil);
startElement.accessibilityTraits = UIAccessibilityTraitButton;
if (self.startButton.enabled == NO)
  startElement.accessibilityTraits |= UIAccessibilityTraitNotEnabled;

[_accessibleElements addObject:startElement];
Some notes about each of the above lines of code
-
A
UIAccessibilityElementis created using theinitWithAccessibilityContainerinstance method. This method takes a single parameter which is the containing view. In this case theUYLCounterViewis the containing view so we can simply useself. -
The
accessibilityFrameproperty is where we specify the area of the view that we want to use for this accessibility element. For the start button this is just the frame of theUIButtonbut note that the accessibility frame must be specified in screen coordinates. This is an important point to understand, if you use the view coordinate system you will get unexpected results especially when the view rotates (more on handling view rotation later). The easiest way to convert the button frame to the screen coordinates is to use theUIViewinstance methodconvertRect:toView:specifyingnilas the target view, this will give us a frame in the screen coordinate system. -
Once we have an accessibility element allocated we can set the
accessibilityLabelas with standard UIKit controls. We can, if required, also set anaccessibilityHintbut in this case we will just set the label to “Start”. -
The
accessibilityTraitsproperty is this case indicates that this element behaves as a button -
We need to provide VoiceOver with a indication when the button is enabled/disabled. Usually a
UIButtonwill take care of this for us but since we are creating our own accessibility element to represent the button we need to add theUIAccessibilityTraitNotEnabledtrait when the button is not enabled. -
Finally we add the element to our array of
accessibileElements.
The next element represents the text drawn in the centre of the view for the timer counter. Calculating the frame for the text is complicated by the need to convert between the view and screen coordinate systems. The code to create the accessibilityElement for the counter is as follows:
CGRect frame = [self convertRect:self.accessibilityFramefromView:nil];

UIAccessibilityElement *counterElement = [[UIAccessibilityElement alloc]
                        initWithAccessibilityContainer:self];
CGRect textFrame = CGRectInset(frame, UYLCOUNTERVIEW_MARGIN +
                                      self.startButton.bounds.size.width +
                                      UYLCOUNTERVIEW_MARGIN,
                                      UYLCOUNTERVIEW_MARGIN);
counterElement.accessibilityFrame = [self convertRect:textFrame toView:nil];
counterElement.accessibilityLabel = NSLocalizedString(@"Duration", nil);
counterElement.accessibilityValue = [[NSNumber
                                      numberWithInteger:self.secondsCounter]
                                      stringValueAsTime];
counterElement.accessibilityTraits = UIAccessibilityTraitUpdatesFrequently;

[_accessibleElements addObject:counterElement];
Note that in this case we start by converting the accessibilityFrame of the view to our local view coordinate system from the screen coordinate system. We can then calculate the frame for the text using an inset for the margin and size of the buttons. Finally before setting the accessibilityFrame for the element we need to convert back again to screen coordinates.
As well as setting the accessibilityLabel for this element we also set an accessibilityValue string to represent the current value of the counter. We will see how this gets updated later but note that for elements that can have a value which changes (such as volume control) it is better to use the accessibilityLabel to describe the function of the control and accessibilityValue to represent the current value. In this case the label is set to “Duration” and the value will the actual value of the counter (for example “2 minutes 10 seconds”).
Since the value of the counter can update frequently (in this case once a second) we set the UIAccessibilityTraitUpdatesFrequently trait. We will discuss the impact of this attribute and some other options once we have seen the rest of the setup code.
Finally we add the element for the stop button and return the completed array. Since the stop button code is very similar to the code for the start button I will include the code without further comment:
  UIAccessibilityElement *stopElement = [[UIAccessibilityElement alloc]
                                  initWithAccessibilityContainer:self];
  stopElement.accessibilityFrame = [self convertRect:self.stopButton.frame
                                    toView:nil];
  stopElement.accessibilityLabel = NSLocalizedString(@"Stop", nil);
  stopElement.accessibilityTraits = UIAccessibilityTraitButton;
  if (self.stopButton.enabled == NO)
     stopElement.accessibilityTraits |= UIAccessibilityTraitNotEnabled;

  [_accessibleElements addObject:stopElement];

  return_accessibleElements;
}
With the accessibileElements defined we need to implement three very simple access methods required by the UIAccessibilityContainer protocol. These methods provide an interface to our accessibileElements array:
- (NSInteger)accessibilityElementCount {
  return [[self accessibleElements] count];
}

- (id)accessibilityElementAtIndex:(NSInteger)index {
    return [[self accessibleElements] objectAtIndex:index];
}

- (NSInteger)indexOfAccessibilityElement:(id)element {
    return [[self accessibleElements] indexOfObject:element];
}
To ensure the UIAccessibilityContainer protocol and our newly defined accessibileElements take effect we need to ensure that the UYLCounterView does not itself respond to accessibility requests. To do that we need to implement the isAccessibilityElement for the custom view and ensure it returns NO:
- (BOOL)isAccessibilityElement {
  return NO;
}
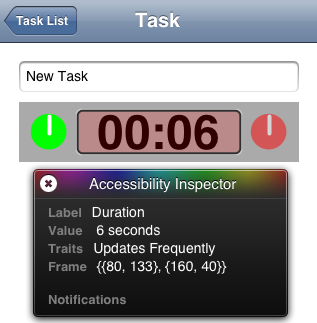
We still have a few refinements to make but we already have enough of an implementation to make our custom view accessible. The Accessibility Inspector now gives us a result when we select the counter text as follows:
Updating the Counter Value
When we created the UIAccessibilityElement for the counter text we set the accessibilityValue property to the current value of the counter. Since the counter is updated every second when the counter is running we need to ensure that we also update the accessibilityValue. We can easily do that in the setter for the secondsCounter value maintained by the UYLCounterView:
- (void)setSecondsCounter:(NSUInteger)secondsCounter {
  if (secondsCounter > UYLCOUNTERVIEW_LIMIT) {
      secondsCounter = UYLCOUNTERVIEW_LIMIT;
  }

  _secondsCounter = secondsCounter;

  if (_accessibleElements) {
      UIAccessibilityElement *counterElement = [self.accessibleElements
        objectAtIndex:UYLCOUNTERVIEW_ELEMENTINDEX_COUNTERTEXT];
      counterElement.accessibilityValue = [[NSNumber
                                          numberWithInteger:secondsCounter]
                                          stringValueAsTime];
  }

  [self setNeedsDisplay];
}
Note that that accessibleElements array should only be allocated via the getter method we saw previously when VoiceOver is active. We therefore use the ivar to check if it has been allocated before attempting to access it. After retrieving the UIAccessibilityElement for the counter we then set the accessibilityValue using our NSNumber stringValueAsTime category method.
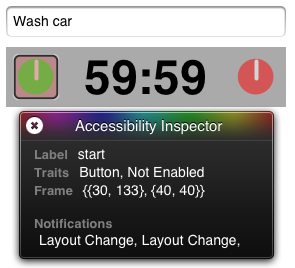
Setting UIButton Traits
The next refinement we need to make is to update the accessibility traits for the two UIButton controls. When the start button is used it disables itself and enables the stop button. We can update the accessibilityTraits of the corresponding UIAccessibilityElement in the method that is triggered by the UIButton action to indicate to VoiceOver which buttons are enabled:
- (void)startAction:(UIButton *)sender {
  ...
  ...

  if (_accessibleElements) {
      UIAccessibilityElement *startElement = [self.accessibleElements
                  objectAtIndex:UYLCOUNTERVIEW_ELEMENTINDEX_STARTBUTTON];
      startElement.accessibilityTraits = UIAccessibilityTraitButton |
                                         UIAccessibilityTraitNotEnabled;

      UIAccessibilityElement *stopElement = [self.accessibleElements
                    objectAtIndex:UYLCOUNTERVIEW_ELEMENTINDEX_STOPBUTTON];
      stopElement.accessibilityTraits = UIAccessibilityTraitButton;
  }
  ...
  ...
}
Likewise when the stop button is used it disables itself so we also need to set the accessibility trait to indicate the new button state:
- (void)stopAction:(UIButton *)sender {
  ...

  if (_accessibleElements) {
      UIAccessibilityElement *stopElement = [self.accessibleElements
                   objectAtIndex:UYLCOUNTERVIEW_ELEMENTINDEX_STOPBUTTON];
      stopElement.accessibilityTraits = UIAccessibilityTraitButton |
                                        UIAccessibilityTraitNotEnabled;
  }
  ...
}
Handling View Rotation
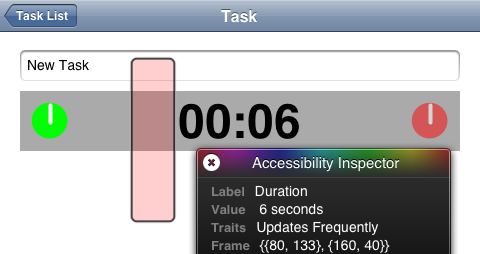
I am not sure why but most accessibility example Apps do not support device orientation changes. I can only suspect that this is due to the extra complexity involved in dealing with the conversion between screen and view coordinate systems. The implementation of the accessibileElements getter in our UYLCounterView takes this conversion into account when calculating the accessibilityFrame for each element. This ensures that the frame is set correctly based on the device orientation at the time the getter is invoked. There is however a problem if the orientation changes once we have calculated the frame. Since we never recalculate these frames they will no longer be correct if the orientation changes. To illustrate the problem this is how the accessibilityFrame for the counter text appears if we rotate from portrait to landscape:
To fix this problem we need to force the accessibility frames to be recalculated when the device orientation changes. The easiest way I have found to do that is to detect the orientation change in the view controller and force the accessibleElements array to be recreated. To detect the orientation change in the UYLTaskViewController we can implement the didRotateFromInterfaceOrientation method:
- (void)didRotateFromInterfaceOrientation:
        (UIInterfaceOrientation)fromInterfaceOrientation {
  self.taskCounterView.accessibleElements = nil;
}
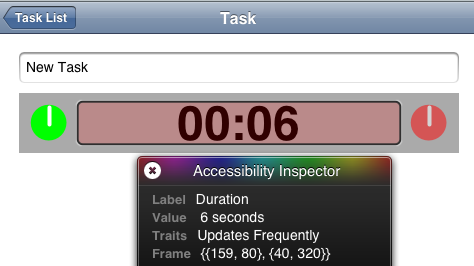
Now the next time that the accessibleElements array is accessed it will be created from scratch and the frames that are created will be based on the new orientation. We can check that with the inspector with the simulator in landscape:
Notifications
When I covered the creation of the UIAccessibilityElement for the text counter I mentioned that we were using the UIAccessibilityTraitUpdatesFrequently trait but I did not fully describe the effect that this achieves. To fully understand how VoiceOver works in this case you will need to build the example App and install it on a physical device. With the text element selected VoiceOver announces the changing timer value every few seconds. In this case that turns out to be a good choice as the value is changing too quickly for VoiceOver to keep up. In my testing I found that VoiceOver would announce a new value every 4-5 seconds. Note that a new announcement is only made when the value is actually changing so if the time is stopped the announcements also stop. If you take a look at how the StopWatch function within the Apple Clock App works you will find that it also uses a similar technique.
However if we wanted to force VoiceOver to announce every change to the counter view we can tell it that something has changed by posting a notification. The notifications used by VoiceOver are a little different from the usual iOS notifications. To create a notification you need to use a UIKit function named UIAccessibilityPostNotification. This function takes two parameters, the first to specify the notification type and the second an optional notification specific parameter which is usually nil.
To indicate that something on the screen has changed we have two choices for the notification type. The first possibility is to send a UIAccessibilityLayoutChangedNotification to indicate that one or more, but not all, elements on the screen have changed. The other possibility is to send a UIAccessibilityScreenChangedNotification to indicate that the whole screen has changed and VoiceOver should reset. In this case we are only changing the duration text so we could send the layout changed notification by inserting the following function call into the setter method setSecondsCounter:
UIAccessibilityPostNotification(
  UIAccessibilityLayoutChangedNotification, nil);
To test this change I also removed the UIAccessibilityTraitUpdatesFrequently trait from the text element. When run on the device VoiceOver does indeed attempt to announce the value of the duration every time it changes. Of course since it takes longer than a second to announce the duration it quickly falls behind which is not very useful. So in this situation where the value of an element is changing faster than VoiceOver can announce the changes it is better to use the UIAccessibilityTraitUpdatesFrequently trait.
Whilst on the subject of notifications there is another option which can be useful when you need to make an announcement for an event that does not update the user interface. You can post a UIAccessibilityAnnouncementNotification which causes VoiceOver to announce the NSString that is passed as the second parameter:
UIAccessibilityPostNotification(
  UIAccessibilityAnnouncementNotification, @"Hello World");
Wrapping Up
This has been a long post but I hope that if you have made it this far I have convinced you that adding accessibility support to your App is not difficult. If you do not have custom views it is often trivial and requires minimal coding. Even if you do have custom views creating the necessary accessibility container elements is not much more effort. The key point to remember is that the accessibility frames need to be specified in screen coordinates.
I’ve archived the old Xcode project for this post in my code examples repository: