The Network Link Conditioner (NLC) tool is an extremely useful tool introduced with Lion that allows you to test how well an application behaves when subject to various network conditions. Whilst it is an OS X tool that runs on a Mac it can still be used test iOS apps that are running in the iOS Simulator. In this post I will show some examples of how to use the tool to test an iOS app and verify how it well it handles various network error conditions.
Getting Up and Running
With Xcode installed on Lion you should find the NLC tool installed in /Developer/Applications/Utilities/Network Link Conditioner/. It is actually implemented as a System Preferences Pane which you can install with a double-click. The Xcode 4.2 release notes mention a limitation that you need to reboot before the NLC daemon will run or you can manually reload with the following command:
$ sudo launchctl load
  /system/library/launchdaemons/com.apple.networklinkconditioner.plist
Once installed you should find the Network Link Conditioner icon in the “Other” section of the System Preferences pane:
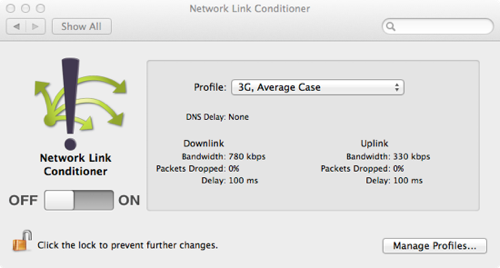
The User Interface is pretty simple, consisting of a master on/off switch, a list of pre-defined profiles and a manage profiles button to create your own profiles. Note that the NLC tool applies to the network interface of your Mac so it will impact ALL traffic on your computer when you turn it on. So you probably want to avoid doing anything else that is relying on a network connection whilst you are testing.
Creating Test Profiles
The NLC can be used limit bandwidth, add delays both to normal traffic and to DNS queries and create packet loss. It comes pre-configured with a number of typical network profiles to allow you to simulate common 3G cellular, cable modem, DSL and WiFi connections. For testing purposes I created three rather extreme network conditions as follows:
Slow Net - Very Limited Bandwidth
This profile severely limits the bandwidth by setting both the Downlink and Uplink Bandwidth to 32kbps. A 100ms delay is also added to packets in each direction and for good measure there is also a 200ms delay to DNS queries.
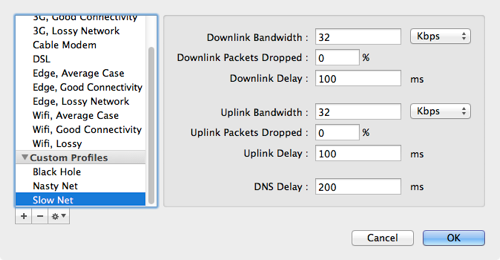
This configuration is useful for slowing down all network communication so that you can really see what your app is doing. This helps flush out any points in your code where you have network code blocking the main thread. It can also help you see any progress bars or temporary spinning activity indicators that might otherwise only be displayed for a split second when testing on a fast network.
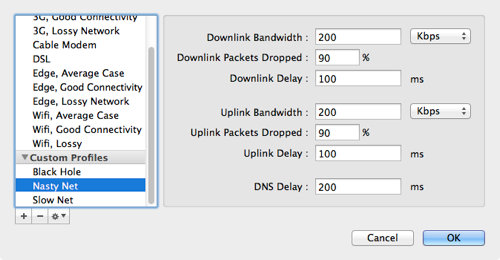
Nasty Net - High Packet Loss
This network profile increases the pain levels even further by dropping 90% of all packets in each direction:
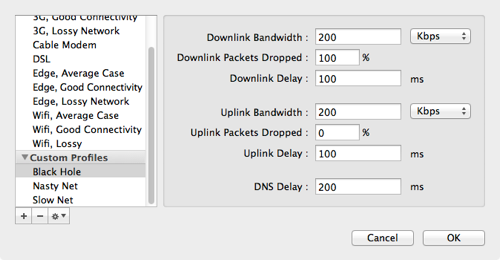
Black Hole - 100% Downlink Packet Loss
Finally I have a network profile which simply drops ALL downlink packets. This is useful for testing network timeout conditions. Try starting with Slow Net and switching to Black Hole once your network traffic gets underway if you really want to be mean….
Putting an App to the Test
So to try things out I will run the Twitter Search app that I used to explore NSURLConnection in the iOS Simulator. If you are interested in the code under test refer back to that earlier post for details. The app takes a single string and then uses NSURLConnection to query the Twitter search API and display the results in a table view. Normally when run in the iOS Simulator the results are displayed in under a second which makes it hard to see what is happening. If I turn on the Slow Net profile though the query takes 5-10 seconds making it a lot easier to verify how the app behaves.
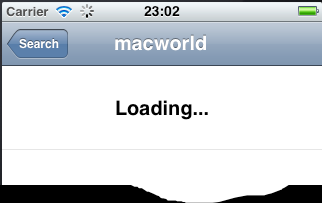
Since we are using an NSURLConnection the actual network connection happens asynchronously, the user interface is not blocked and our table view, displaying a Loading… message responds to touches. In addition we can see that the network activity spinner has been activated (more on this in a moment) to inform the user that we accessing the network.
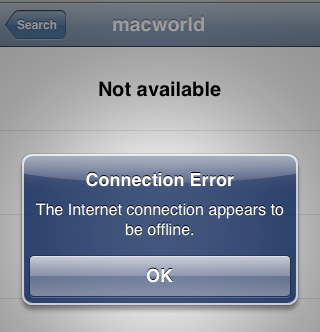
To further test what happens when our network connection fails we will switch to the Black Hole profile which will prevent all responses from reaching our app. Now if we wait long enough the network connection should time out and we can test how well we cope with that situation. Our application implements the connection:didFailWithError: delegate method of NSURLConnection to display the error message and we should also see our status message in the first row of the table update to indicate that the service is not available. Sure enough after about a minute the connection times out and the user interface responds correctly:
This is all very good but whilst playing around with this app I actually spotted some unintended behaviour (ok that is another way of saying a bug…). With either the Slow Net or the Nasty Net profile enabled it is very easy to reproduce. As I mentioned previously whilst we are waiting for the search query to complete so we can display the results the user interface is not blocked. This means that the user can hit the Search button in the Navigation bar to return to the initial screen. When they do that the NSURLConnection is still running and the network activity indicator is still active. Now it will eventually time out and clean itself up but there is nothing to stop the user from initiating another search before the old one has timed out. That is certainly not what I intended when I wrote the app but I never really considered this situation. The fix is easy if we implement the viewWillDisappear method in our view controller and use that to cancel the connection:
- (void)viewWillDisappear:(BOOL)animated {
   [self cancelConnection];
}
The cancelConnection method takes care of cleaning things up for us:
- (void)cancelConnection {
   if (self.connection != nil) {
    [UIApplication sharedApplication].networkActivityIndicatorVisible = NO;
    [self.connection cancel];
    self.connection = nil;
    self.buffer = nil;
  }
}
Now when we exit the search results table view controller any running connection is cancelled, the network activity spinner is stopped and the temporary buffer is cleaned up.
Wrapping Up
When I started out to write this post I was already sure that testing applications under challenging network conditions was a good idea. However I guess the fact that I actually also found an error in some previously posted code further demonstrates the point. You can find the updated code in my github CodeExamples repository.
One final note, don’t forget to turn NLC off when your done or you may find your Github commits take a bit longer than expected….