I previously posted about using the Network Link Conditioner to create realistic and “challenging” network conditions when testing iOS apps. In this post I want to highlight another useful network debugging tool which allows you capture network traffic from an iOS device.
Remote Virtual Interfaces
As with the Network Link Conditioner you need to use a host Mac computer to perform remote packet capture of an iOS device. The only other requirement is that the device be connected to the host computer via USB. No jailbreaking or hacking of your device is required to get this to work.
The basic technique is to create an OS X remote virtual network interface that represents the remote network stack of the iOS device. Once you have the virtual interface you can use your favourite network debugging tool such as tcpdump or wireshark to view the network traffic.
The steps to get the virtual network interface up and running are as follows:
- Plug your iOS device into the USB port of your Mac.
- Use the Xcode organizer to obtain the UDID of the device (the value you want is named Identifier):
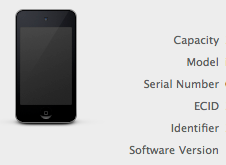
-
The remote virtual interface is created using the
rvictlcommand, using the UDID you obtained in the previous step. The following command needs to be entered in the terminal window:$ rvictl -s <UDID>
If you want to capture packets from more devices you can repeat this process with the UDID for each device. You can also use the rvictl command to list the active devices:
$ rvictl -l
The virtual interfaces are named rvi0, rvi1, rvi2, etc. and like all network interfaces are viewable using the ifconfig command:
$ ifconfig rvi0
rvi0: flags=3005<UP,DEBUG,LINK0,LINK1> mtu 0
Finally when you are finished you can remove the virtual interface:
$ rvictl -x <UDID>
Using tcpdump
The easiest way to capture and dump the network traffic is to use the tcpdump command which is included with OS X. The man page for tcpdump has lots of options but if you just want to see the live traffic the following will get you started:
$ tcpdump -n -i rvi0
To better illustrate the results I will use the Twitter Search app I showed in an earlier post to generate a simple http request and response.
$ tcpdump -n -t -i rvi0 -q tcp
tcpdump: WARNING: rvi0: That device doesn't support promiscuous mode
(BIOCPROMISC: Operation not supported on socket)
tcpdump: WARNING: rvi0: no IPv4 address assigned
tcpdump: verbose output suppressed, use -v or -vv for full protocol decode
listening on rvi0, link-type RAW (Raw IP), capture size 65535 bytes
IP 192.168.1.66.55101 > 192.168.1.64.51712: tcp 117
IP 192.168.1.64.51712 > 192.168.1.66.55101: tcp 0
IP 192.168.1.64.51712 > 192.168.1.66.55101: tcp 298
IP 192.168.1.66.55101 > 192.168.1.64.51712: tcp 0
IP 192.168.1.66.55324 > 199.59.148.201.80: tcp 0
IP 199.59.148.201.80 > 192.168.1.66.55324: tcp 0
IP 192.168.1.66.55324 > 199.59.148.201.80: tcp 0
IP 192.168.1.66.55324 > 199.59.148.201.80: tcp 269
IP 199.59.148.201.80 > 192.168.1.66.55324: tcp 0
IP 199.59.148.201.80 > 192.168.1.66.55324: tcp 1428
IP 199.59.148.201.80 > 192.168.1.66.55324: tcp 1428
IP 199.59.148.201.80 > 192.168.1.66.55324: tcp 1428
Note the tcpdump options I am using to cut down some of the noise. The -t option gets rid of the timestamp on each line, -q removes some of the packet header information which is not interesting and finally we specify that we are only interested in TCP/IP packets.
My local IP address is 192.168.1.66 and the IP of the remote Twitter server in this case is 199.59.148.201. The http request starts on line 5 where you can see an outgoing connection to port 80:
IP 192.168.1.66.55324 > 199.59.148.201.80: tcp 0
The following lines show the search results coming back. Of course, this trace is not very interesting as we cannot see the contents. You can add -x to the tcpdump command to see the actual packet contents but even that is not always that informative as you need to know how to decode and interpret the packet data. A quick and dirty way if you know you are dealing with http traffic is to add the -A option to get tcpdump to print the packet data in ASCII:
$ tcpdump -n -t -i rvi0 -q -A tcp
...
GET /search.json?rpp=100&q=apple HTTP/1.1
Host: search.twitter.com
User-Agent: TwitterSearch/1.0 CFNetwork/548.0.4 Darwin/11.0.0
Accept: */*
Accept-Language: en-us
Accept-Encoding: gzip, deflate
Cookie: k=86.168.77.194.5802087337bc706b
Connection: keep-alive
...
HTTP/1.1 200 OK
Cache-Control: max-age=15, must-revalidate, max-age=300
Expires: Tue, 07 Feb 2012 22:18:05 GMT
Content-Type: application/json;charset=utf-8
Vary: Accept-Encoding
Date: Tue, 07 Feb 2012 22:13:06 GMT
X-Varnish: 682230572
Age: 0
Via: 1.1 varnish
Server: tfe
Content-Encoding: gzip
Content-Length: 12715
This is a minor improvement in that we can now see the HTTP GET request with the query we are using and see the HTTP response but we still cannot easily drop down into the JSON in the result to see what Twitter is sending back. For that we need to use a more sophisticated tool than tcpdump.
Using Wireshark
Whilst tcpdump is a quick and easy way to see and capture traffic it is not exactly an easy tool to use when you want to figure out what is going on. Wireshark is a much easier tool if you want perform deeper packet inspection or if you just prefer your network debugging tools to have a user interface. Luckily Mac OS X ports are readily available, if you are following along I downloaded and installed version 1.6.5 for OS X 10.6 (Snow Leopard) Intel 64-bit from here.
Once you have Wireshark installed and running you should see a list of available interfaces that it can capture. The one we are interested in is of course our virtual interface rvi0:
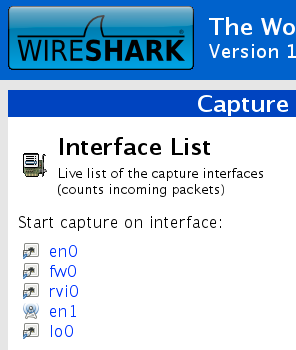
Selecting rvi0 switches us to a live capture of the packet data with a lot more information to help us decode and understand what is going on. This can be interesting to watch and see all of the things your iOS device is doing. For the purposes of this example it is useful to apply some filters so we can focus in on the HTTP request traffic. The easiest way to do that is to apply a display filter (Analyze -> Display Filters…). There are a number of pre-defined filter expressions including being able to limit the display to HTTP traffic:

Now if create our request it is immediately obvious what is going on as we can clearly see the HTTP GET request and the JSON response:
![]()
The central pane of wireshark allows you to drill down into the contents of each packet allowing us to see the JSON details:
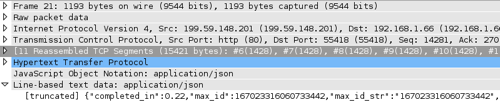
The full packet decode is also available in the lower pane if you need to see the whole packet.
Wrapping Up
I should say that this post is not an attempt to explain everything involved in debugging network communications using tcpdump or wireshark. That is a huge topic and requires some knowledge of the underlying protocols. What I did want to make clear is that the tools you need to capture and analyse live traffic off your iOS device are readily available and take just a few minutes to get setup. It is not something you will (hopefully) need to use every day but it is well worth having it in your toolbox for those occasions when you need to debug network communications.