In a recent post I covered a change introduced with iOS 5 that allows the master view of a split view controller to always remain visible in portrait mode. A couple of readers asked if there were any changes to allow the master view to be displayed/hidden with a swipe gesture similar to the way the mail app from Apple now works. My quick answer was that whilst there are no changes in iOS 5 to directly support that style of transition all the functionality to implement it already exists. I thought I would try to expand on that answer with a full example in this post.
Sliding Master View
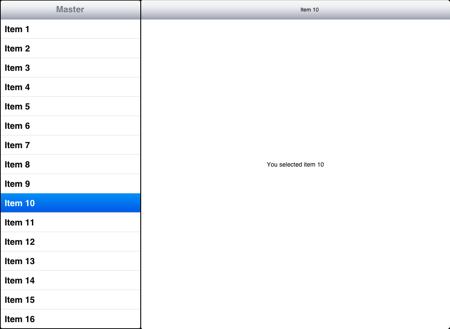
To illustrate the idea I will use a very simple master and detail view. The master view is a UITableView with each row named after the row index. The detail view is then simply a label showing the currently selected item. The title of the detail view also shows the selected item. The UI in landscape orientation is shown below:
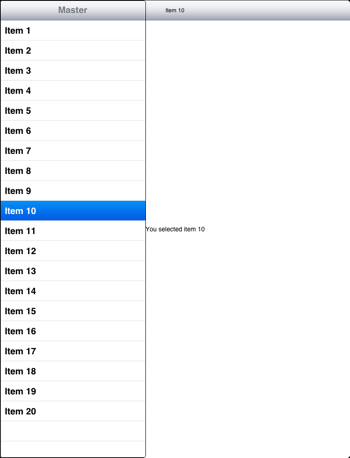
In portrait mode there is a button in the toolbar that can be used to show the master view as illustrated below. This looks similar to the standard layout of a split view controller when used with a popover.

The difference happens when the master view is displayed either by touching the toolbar button or by using a swipe right gesture. Instead of showing the master view in a popover it slides into view from the left margin covering a portion of the detail view (and the toolbar button). The master view can be dismissed by touching or swiping left in the detailed view.
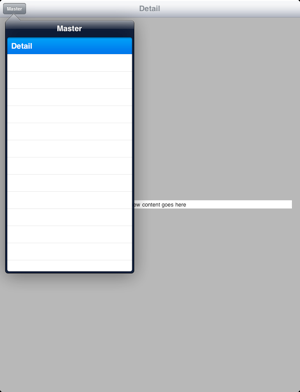
Compare this with the way a master view is displayed with a popover in the standard split view controller:
Xcode Master-Detail Template
I was going to base this example on the Xcode Master-Detail template but to be honest there is not much left from the template so if you want to follow along you may as well just start with an empty application. Whilst on the topic of Xcode templates it is interesting to note that the Master-Detail template does not follow the Apple iOS Human Interface Guidelines. In particular it is recommended not to use navigation controllers for both the master and detail views:
Avoid displaying a navigation bar in both panes at the same time. Doing this would make it very difficult for users to discern the relationship between the two panes.
In fact if you create the Split View Controller with Interface Builder it will not even allow you to place a navigation controller as the detail view controller. This is odd as the Apple settings apps actually appears to use a navigation controller for the detail controller, though not for the master view controller. Of course, if you really want to have navigation controllers in both panes you can create the split view controller in code which is what the Master-Detail template does:
UYLMasterViewController *masterViewController = [[[UYLMasterViewController alloc]
  initWithNibName:@"UYLMasterViewController" bundle:nil] autorelease];
UINavigationController *masterNavigationController = [[[UINavigationController alloc]
  initWithRootViewController:masterViewController] autorelease];

UYLDetailViewController *detailViewController = [[[UYLDetailViewController alloc]
  initWithNibName:@"UYLDetailViewController" bundle:nil] autorelease];
UINavigationController *detailNavigationController = [[[UINavigationController alloc]
  initWithRootViewController:detailViewController] autorelease];

self.splitViewController = [[[UISplitViewController alloc] init] autorelease];
self.splitViewController.delegate = detailViewController;
self.splitViewController.viewControllers = [NSArray arrayWithObjects:masterNavigationController,
                           detailNavigationController, nil];
self.window.rootViewController = self.splitViewController;
If you are going to use this template you should note that it omits to give the master view controller a reference to the detail view controller (see later) which means you can waste a lot of time wondering why your detail view is not getting updated…
Getting Started
So starting with a fresh Xcode iPad project the first thing I did was create the NIB file for the main window which contains the Split View Controller. The Object layout in Interface Builder is shown below:
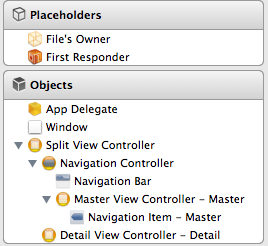
The Window and Split View Connector objects are connected to outlets in the Application Delegate:
@interface UYLAppDelegate : UIResponder <UIApplicationDelegate>
@property (retain, nonatomic) IBOutlet UIWindow *window;
@property (retain, nonatomic) IBOutlet UISplitViewController *splitViewController;
@end
The Split View Controller always contains two view controllers. The first is the master view controller which will appear in the left-hand pane and the second is the detailed view controller which will appear in the right-hand pane. In this example the master view controller is a navigation controller which contains our class UYLMasterViewController as its root view controller. The detailed view controlled is named UYLDetailViewController.
Normally when implementing the UISplitViewControllerDelegate protocol you would set the delegate of the split view controller to be the detail view controller. If you refer back to the code from the Xcode Master-Detail template you will see that it does exactly that. However the delegate protocol is only needed if you want to implement the popover controller approach or otherwise manage changes to the visibility of the master view controller. In this example we will not be implementing a popover controller so we do not need to set the delegate.
I will not show the NIB files for the master and detail views as they are trivial but for reference here is the interface definition for UYLMasterViewController:
@class UYLDetailViewController;
@interface UYLMasterViewController : UITableViewController
@property (retain, nonatomic) IBOutlet UYLDetailViewController *detailViewController;
@end
Note that we have defined a property (and IB outlet) for the detailViewController. We will use this later to allow the master view controller to update the detail view controller when the user selects a row. The connection between the master view controller outlet and the detail view controller object is made in the Main Window interface build NIB file.
The definition of the UYLDetailViewController is as follows:
@class UYLMasterViewController;
@interface UYLDetailViewController : UIViewController
@property (retain, nonatomic) NSNumber *detailItem;
@property (retain, nonatomic) IBOutlet UIToolbar *toolbar;
@property (retain, nonatomic) IBOutlet UILabel *detailTitle;
@property (retain, nonatomic) IBOutlet UILabel *detailDescriptionLabel;
@property (assign, nonatomic) BOOL masterIsVisible;
@end
This is a simple UIViewController containing a UIToolbar which we will use to hold a button and a couple of UILabel objects which will be updated based on the contents of the detailItem object. In this simple example the detailItem object is just an NSNumber which will be set directly from the master view controller. Finally we define a boolean flag which we will use to track when the master view controller view is visible.
Implementing the Master View Controller
Actually the master view controller is almost trivial in that it is pretty much a standard UITableViewController. The only difference is that when a row in the table is selected we need to inform the detail view controller so that it can update its view. For the purposes of this example I have hardcoded the table to have a single section containing 20 rows. The content of each row is then simply constructed from the row number:
NSUInteger row = [indexPath row];
cell.textLabel.text = [NSString stringWithFormat:@"Item %u", row+1];
Since we have a reference to the detail view controller we can directly set the detailItem whenever the user selects a row:
- (void)tableView:(UITableView *)tableView
        didSelectRowAtIndexPath:(NSIndexPath *)indexPath {
  NSUInteger item = [indexPath row] +1;
  NSNumber *detailItem = [NSNumber numberWithInteger:item];

  if (self.detailViewController) {
    self.detailViewController.detailItem = detailItem;
  }
}
Implementing the Detail View Controller
Before we look at how to make the master view slide on and off the screen I will cover the basic mechanism used to update the view whenever the master view controller makes a change. This is achieved by providing our own custom setter for the detailItem property which looks as follows:
- (void)setDetailItem:(NSNumber *)newDetailItem {
  if (_detailItem != newDetailItem) {
    [_detailItem release];
    _detailItem = [newDetailItem retain];
    [self configureView];
  }

  if (self.masterIsVisible) {
    [self hideMasterView];
  }
}
The storing of a value in the instance variable _detailItem is what you would expect to see in a compiler synthesised setter for a retained property. However in the situation where the value has changed we call the configureView method to update the view. In addition we also hide the master view but I will come back to that later. The configureView method is trivial in this example:
- (void)configureView {
  if (self.detailItem) {
    self.detailTitle.text = [NSString stringWithFormat:@"Item %@",
                             self.detailItem];
    self.detailDescriptionLabel.text = [NSString stringWithFormat:
                                        @"You selected item %@",
                                        self.detailItem];
  }
}
Adding Gestures
As described earlier we want to use a swipe right gesture to bring the master view controller into view and either a tap or swipe left to dismiss it. Of course we also only want this behaviour when we are in portrait mode. Gesture recognisers were introduced with the iPad in iOS 3.2 so we will make use of them here. A gesture recogniser is assigned to a view and in this case that means assigning them to the detail view controller view. We can do that easily enough in the viewDidLoad method of UYLDetailViewController:
- (void)viewDidLoad {
  [super viewDidLoad];

  self.masterIsVisible = NO;

  UISwipeGestureRecognizer *swipeLeft = [[UISwipeGestureRecognizer alloc]
                            initWithTarget:self
                            action:@selector(handleSwipeLeft)];
  swipeLeft.direction = UISwipeGestureRecognizerDirectionLeft;
  [self.view addGestureRecognizer:swipeLeft];
  [swipeLeft release];

  UISwipeGestureRecognizer *swipeRight = [[UISwipeGestureRecognizer alloc]
                            initWithTarget:self
                            action:@selector(handleSwipeRight)];
  swipeRight.direction = UISwipeGestureRecognizerDirectionRight;
  [self.view addGestureRecognizer:swipeRight];
  [swipeRight release];

  UITapGestureRecognizer *tap = [[UITapGestureRecognizer alloc]
                                  initWithTarget:self
                                  action:@selector(handleTap)];
  [self.view addGestureRecognizer:tap];
  [tap release];

  if (UIInterfaceOrientationIsPortrait(self.interfaceOrientation))
  {
    [self addMasterButton];
  }

  [self configureView];
}
That looks like a lot of code but it is mostly straightforward:
- to get started we initialised the boolean flag we are using to track if the master view is visible in portrait mode.
- Three separate gesture recognisers are then added to the view. Each gesture recogniser has a separate handler set as the action. The first two gestures are for swiping left and right which is specified by the direction property. The final gesture is for a tap which we will use for dismissing the master view.
- If when the view is loaded we are already in portrait mode then we need to add a button to the toolbar to allow the user to view the master view (assuming they do not use the swipe right gesture).
- Finally we call the
configureViewmethod we saw earlier to setup the view.
There are three methods (handleSwipeLeft, handleSwipeRight, handleTap) to handle the various gestures. Since they are very similar I will just show handleSwipeRight:
- (void)handleSwipeRight {
  if (UIInterfaceOrientationIsPortrait(self.interfaceOrientation)) {
    [self showMasterView];
  }
}
Since we only want our gestures to work when we are in portrait mode we first test the current device orientation. Then if we are in portrait mode we call the showMasterView method to actually bring the master view on screen. The other two methods are almost identical, the only difference is that they call hideMasterView to move the master view off screen.
Sliding the Master View On and Off Screen
The one thing that I was not sure about when starting to write this example was exactly how to manipulate the master view. Since the master view is managed internally by the split view controller it is not documented how it shows or hides it when the device changes orientation. A quick look at the view frame in portrait mode tells us the answer. We can move it on and offscreen by adding or subtracting the view width to the x-coordinate of the view frame origin:
(gdb) p rootFrame
$2 = {
origin = {
x = -320,
y = 0
},
size = {
width = 320,
height = 1004
}
}
At this point I have to add a small word or warning in case you decide to implement this approach in a shipping application. It does not use any undocumented API’s but it does rely on a specific behaviour of split view controllers that Apple could change in a future release of iOS. So whilst this works now and is very likely to continue to work in future releases there are no guarantees it will not at some point break.
With that warning out of the way we can look at the method to bring the master view controller view onscreen:
- (void)showMasterView {
  if (!self.masterIsVisible) {
    self.masterIsVisible = YES;
    NSArray *controllers = self.splitViewController.viewControllers;
    UIViewController *rootViewController = [controllers objectAtIndex:0];

    UIView *rootView = rootViewController.view;
    CGRect rootFrame = rootView.frame;
    rootFrame.origin.x += rootFrame.size.width;

    [UIView beginAnimations:@"showView" context:NULL];
    rootView.frame = rootFrame;
    [UIView commitAnimations];
  }
}
Some explanation to walk you through this method:
- the first thing we do is check our boolean flag
masterIsVisibleto see if the master view is already visible. If it is hidden we set the flag toYESand proceed with actually bringing the view onscreen. - To bring the view onscreen we need to retrieve the root view controller that owns the view we want to display. This is easy enough as all view controllers that are contained in a split view controller have a reference to the split view controller. The first object in the
viewControllersarray is the “master” view controller. Note though that this is not ourUYLMasterViewControllerobject but theUINavigationControllerthat is inserted at the root of the view controller hierarchy. - Once we have the view from the root view controller we can retrieve its frame and manipulate the x-coordinate of the frame origin to shift it onscreen by adding the width of the view. To make the view slide onto screen we enclose the change to view frame in an animation block.
The hideMasterView method is very similar with the exception that we subtract the width of the view from the x-coordinate.
Adding and Removing the Toolbar Button
With the view now sliding on and off screen we need to handle the adding (and removal) of a button to the toolbar. You can consider this button optional in that it duplicates the functionality of the swipe right gesture to bring the master view onscreen. However it is not always obvious to users what gestures your app supports so having an additional UI element can sometimes help. One way to think about gestures is to treat them like keyboard shortcuts. Power users will make use of them but not all users may even discover the gesture. If you are going to skip the button consider making the master view have a tab or other visual cue that is visible when the rest of the view is offscreen (the Flixster iPad app is a good example of this approach).
- (void)addMasterButton {
  UIBarButtonItem *barButtonItem = [[UIBarButtonItem alloc]
                                     initWithTitle:@"Master"
                                     style:UIBarButtonItemStyleBordered
                                     target:self
                                     action:@selector(showMasterView)];
  NSMutableArray *items = [[self.toolbar items] mutableCopy];
  [items insertObject:barButtonItem atIndex:0];
  [self.toolbar setItems:items animated:YES];
  [items release];
  [barButtonItem release];
}
To add a button to the toolbar we actually need to create a UIBarButtonItem and add that to the UIToolbar items array. The easiest way to do that is to make a copy of the existing items array and insert our new bar button item as the first element of the array. In this case we do not have any other buttons on the toolbar but if we did this approach will preserve those other buttons. Note that the target:action of the button item is set to call the showMasterView method we saw previously. I will skip showing the removeMasterButton method as it simply removes the first item from the toolbar items array.
Now if you refer back to the viewDidLoad method you will see that we already have code to show the button if the device is already in portrait mode when the detail view controller is loaded:
if (UIInterfaceOrientationIsPortrait(self.interfaceOrientation)) {
  [self addMasterButton];
}
This is great but what about when the device changes orientation after the view is loaded?
Handling Orientation Changes
To handle the situation where the device switches back and forth between portrait and landscape orientations we need to implement the willRotateToInterfaceOrientation:toInterfaceOrientation:duration method:
- (void)willRotateToInterfaceOrientation:
       (UIInterfaceOrientation)toInterfaceOrientation
                                duration:(NSTimeInterval)duration {
  if (UIInterfaceOrientationIsLandscape(toInterfaceOrientation)) {
    [self hideMasterView];
    [self removeMasterButton];
  } else {
    [self addMasterButton];
  }
}
So if we are moving to landscape orientation we hide the master view and remove the button for the toolbar. Likewise when moving to portrait orientation we simply need to add the button to the toolbar.
Adding a Border to the Master View
One final finishing touch is that we need to add a border to the master view to enclose the UITableView. You can spend some time making a nice shadowed box but for now I will just add a border in the App Delegate:
UIView *rootView = [[self.splitViewController.viewControllers
                     objectAtIndex:0] view];
rootView.layer.borderWidth = 1.0f;
rootView.layer.cornerRadius =5.0f;
rootView.layer.shadowOpacity = 0.8f;
rootView.layer.shadowOffset = CGSizeMake(-5, 0);
Wrapping Up
Congratulations if you made it this point - that was a lot of explanation for something which in the end is pretty straightforward. I will leave you with one final comment about this approach. As I mentioned during the post I am relying on a very specific implementation detail of the split view controller which could change in a future iOS release. It is always interesting to play with different implementations but I leave it to you to decide if you are comfortable with this approach for production code. My feeling is that if you want to go beyond Apple’s implementation of split view controller it might be better to build the complete container class and abandon split view controller completely.
The Xcode project for this post is now out of date but if you’re interested you can find it archived in my code examples repository: