19 June 2013: The Twitter API v1 has now been discontinued meaning that the search URL used in this post will no longer work. I have updated the example code to use the new Social framework introduced with iOS 6. I will post a more detailed explanation in the next few days in the meantime you can find the updated code in my GitHub repository.
8 June 2013: I have updated this post for iOS 6 which means I have converted it to use ARC memory management. Also since JSON is now supported directly in the foundation framework I have removed the SBJson library.
I thought I would show an example of using NSURLRequest to perform a simple web service query. In this case searching on Twitter.
The Twitter Search API
The documentation for the Twitter Search API provides the basic details on what we need to do to query recent Tweets. There are some more details and examples on using the Twitter Search API which are also very useful if you want perform more complex queries. The basic URL we need to perform an HTTP GET looks as below. In this case we are searching for the text “Apple”:
http://search.twitter.com/search.json?q=Apple
The search results are returned in JSON format, so the result that you get back looks something like this:
{
"results": [
{
"from_user_id_str": "12345678",
"profile_image_url": "http://a1.twimg.com/profile_images/...",
"created_at": "Wed, 15 Jun 2011 20:58:01 +0000",
"from_user": "SomeUser",
"id_str": "81103188895334400",
"metadata": {
"result_type": "recent"
},
"to_user_id": null,
"text": "The actual text from the tweet is here",
"id": 81103188895334400,
"from_user_id": 63215515,
"geo": null,
"iso_language_code": "en",
"to_user_id_str": null,
"source": "<a href="http://twitter.com/">web</a>"
},
{
... next result...
}
],
"max_id": 81103188895334400,
"since_id": 0,
"refresh_url": "?since_id=81103188895334400&q=apple",
"next_page": "?page=2&max_id=81103188895334400&q=apple",
"results_per_page": 15,
"page": 1,
"completed_in": 0.052526,
"since_id_str": "0",
"max_id_str": "81103188895334400",
"query": "apple"
}
The search results consists of an array of tweets named “results” along with some additional data to make it easier to page through the results. By default the search query returns 15 tweets but you can use the rpp parameter in the query to increase this up to a maximum of 100 results. There are a number of parameters you can use to search for specific languages, location, etc., but we will keep it simple. So the actual query URL we will use in our example app will be as follows (where query is replaced by the actual string we want to search for):
http://search.twitter.com/search.json?rpp=100&q=query
You can experiment with this from the command line using curl if you want to get a feel for it.
TwitterSearch - the example app
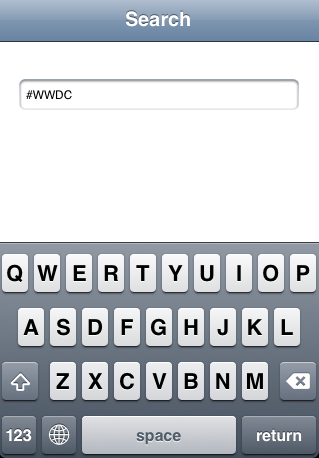
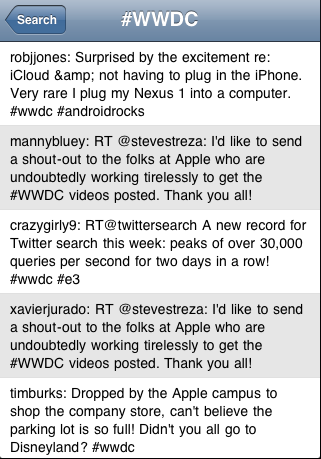
To demonstrate how you can access the Twitter search API from within an iOS app I have created a simple example app that allows you to enter a search term. The results of searching Twitter for that search term are then presented in a table view. The two view controllers are illustrated below
Adding JSON support
Updated 8-June-2013: When I first created this example there was not direct support for handling JSON in iOS. This made it necessary to include a third party JSON Framework. However since iOS 5 the Foundation framework includes the NSJSONSerialization class to convert between JSON and Foundation objects so there is no longer a need for external frameworks.
The SearchViewController
The SearchViewController is responsible for performing the query and displaying the results. I will use the NSURLConnection class to perform the actual network connection and return the results which we will then to process and feed a standard UITableView. I won’t show the NIB file as it is just a standard table view, the interface definition is as follows:
@interface SearchViewController : UITableViewController {
}

@property (nonatomic, copy) NSString *query;
@property (nonatomic, retain) NSURLConnection *connection;
@property (nonatomic, retain) NSMutableData *buffer;
@property (nonatomic, retain) NSMutableArray *results;
@end
The query property is set when the view controller is initialised and should be the text string that we will use to search Twitter. The other properties will become clear as we proceed but in brief the connection property holds a reference to our NSURLConnection object. The buffer is an NSMutableData object that is used to temporarily store the data that is being returned by the network connection and finally the results NSMutableArray is used to store the decoded tweets that the query returns.
Initiating an NSURLConnection
Before looking at the standard viewDidLoad and UITableViewDataSource delegate methods we will dive into the methods used to drive the network connection and processing of the results. The first method is used to setup a network connection to perform the query. It uses a URL constructed with the query string that should be passed to the view controller when it is first initialised.
- (void)loadQuery {
   NSString *path = [NSString stringWithFormat:
                     @"http://search.twitter.com/search.json?rpp=%d&q=%@",
                     RESULTS_PERPAGE,self.query];
  path = [path stringByAddingPercentEscapesUsingEncoding:NSUTF8StringEncoding];
  NSURLRequest *request = [NSURLRequest requestWithURL:[NSURL URLWithString:path]];
  self.connection = [[NSURLConnection alloc] initWithRequest:request
                                                     delegate:self];
  [UIApplication sharedApplication].networkActivityIndicatorVisible = YES;
}
The first thing we do is build an NSString which represents the URL we want to use for the request. This is constructed from the URL for the Twitter search API we saw earlier with two parameters for the results for page and the actual query term. The results per page is #defined as the value 100. So we should get back up to 100 results. One other thing to note about the URL is that we percent escape any special characters in the query. So for example if we were searching for the hashtag #WWDC the unencoded URL would be as follows:
http://search.twitter.com/search.json?rpp=100&q=#WWDC
The stringByAddingPercentEscapesUsingEncoding: method will percent escape the # symbol so that the resulting string would be as follows:
http://search.twitter.com/search.json?rpp=100&q=%23WWDC
Once we have the string in the correct format we use it to first construct an NSURL object and then use that to create an NSURLRequest. Finally we allocate and initialise an NSURLConnection passing it the NSURLRequest. The NSURLConnection object is what actually performs the network request and has a number of delegate methods which we need to implement to handle the results. Note that when we initialise the NSURLConnection object that we set ourselves (the SearchViewController) as the delegate. We also retain a reference to the object using the connection property so that we have the possibility to cancel the request if needed.
Finally once we have initiated the network connection we set the network activity indicator to be visible to inform the user that there is some network activity happening.
NSURLConnection delegate methods
The first delegate method we will implement is connection:didReceiveResponse which is called when the initial URL response is received. We use this method to initialise our data buffer which will be used to collect the incoming data. It is possible that this method will be called multiple times but it does not really matter as we simply initialise the buffer each time discarding any previously received data:
- (void)connection:(NSURLConnection *)connection
        didReceiveResponse:(NSURLResponse *)response {
   self.buffer = [NSMutableData data];
}
The next method is connection:didReceiveData which is called when some data has been delivered. The important thing to understand about this method is that it gets called multiple times as the data is received. So we need to concatenate the data in our buffer as each block is received:
- (void)connection:(NSURLConnection *)connection
    didReceiveData:(NSData *)data {
  [self.buffer appendData:data];
}
There are two ways we can be informed that the connection has finished. If things go well the method connectionDidFinishLoading: is called. If something goes wrong we get a call to the method connection:didFailWithError: The first of these methods needs to take the data that has built up in our buffer, decode it, store it in our results ivar and then signal to the table view to reload itself. The code is as follows:
- (void)connectionDidFinishLoading:(NSURLConnection *)connection {

  [UIApplication sharedApplication].networkActivityIndicatorVisible = NO;
  self.connection = nil;

  NSError *jsonParsingError = nil;
  NSDictionary *jsonResults = [NSJSONSerialization JSONObjectWithData:self.buffer options:0 error:&jsonParsingError];
  self.results = [jsonResults objectForKey:@"results"];

  self.buffer = nil;
  [self.tableView reloadData];
  [self.tableView flashScrollIndicators];
}
The first thing we do is turn off the network activity indicator and zero (which also releases) our reference to the NSURConnection object. Then we use the Foundation framework NSJSONSerialization class to convert the JSON data in our buffer to an NSDictionary.
Since we only want the tweet data we just need to get the object that corresponds to the “results” key in the JSON response. That should give us an array of NSDictionary objects, one for each tweet, that we can use to feed our table view. The last thing we do in this method is to trigger our table view to reload and flash the scroll bars on the table view.
Before looking at the table view delegate methods we should just cover the failure situation for completeness. We do not do anything special to handle the error other than clearing up and displaying an error to the user:
- (void)connection:(NSURLConnection *)connection
        didFailWithError:(NSError *)error {

  [UIApplication sharedApplication].networkActivityIndicatorVisible = NO;
  self.connection = nil;
  self.buffer = nil;

  [self handleError:error];
  [self.tableView reloadData];
}
I will not show the handleError method here as it is simply shows a UIAlertView to the end user.
UITableViewDataSource Delgates
To display the data in the table view we need to implement the usual table view delegate methods. I will omit showing numberOfSectionsInTableView as it simply returns 1, but the numberOfRowsInSection: method is more interesting:
- (NSInteger)tableView:(UITableView *)tableView
             numberOfRowsInSection:(NSInteger)section
{
  NSUInteger count = [self.results count];
  return count > 0 ? count : 1;
}
If we have successfully retrieved some search results then we can use the count of objects in the results array to determine the number of rows in our table. If we do not have any results we return a value of 1 so that we display a text message to the user. The ``tableView:cellForRowAtIndexPathmethod uses theresults` array to display the resulting tweets:
- (UITableViewCell *)tableView:(UITableView *)tableView
                     cellForRowAtIndexPath:(NSIndexPath *)indexPath
{
  static NSString *ResultCellIdentifier = @"ResultCell";
  static NSString *LoadCellIdentifier = @"LoadingCell";

  NSUInteger count = [self.results count];
  if ((count == 0) && (indexPath.row == 0)) {
    UITableViewCell *cell = [tableView dequeueReusableCellWithIdentifier:
                                       LoadCellIdentifier];
    if (cell == nil) {
      cell = [[[UITableViewCell alloc]
                initWithStyle:UITableViewCellStyleDefault
                reuseIdentifier:LoadCellIdentifier] autorelease];
      cell.textLabel.textAlignment = UITextAlignmentCenter;
    }

    if (self.connection) {
      cell.textLabel.text = @"Loading...";
    } else {
      cell.textLabel.text = @"Not available";
    }
    return cell;
  }

  UITableViewCell *cell = [tableView dequeueReusableCellWithIdentifier:
                                     ResultCellIdentifier];
  if (cell == nil) {
    cell = [[[UITableViewCell alloc]
              initWithStyle:UITableViewCellStyleDefault
              reuseIdentifier:ResultCellIdentifier] autorelease];
    cell.selectionStyle = UITableViewCellSelectionStyleNone;
    cell.textLabel.numberOfLines = 0;
    cell.textLabel.font = [UIFont systemFontOfSize:14.0];
  }

  NSDictionary *tweet = [self.results objectAtIndex:indexPath.row];
  cell.textLabel.text = [NSString stringWithFormat:@"%@: %@",
                                  [tweet objectForKey:@"from_user"],
                                  [tweet objectForKey:@"text"]];
  return cell;
}
There are two types of cell that we need to create. The first is used when we do not have any results to display. Rather than just leaving the user to look at a blank screen we show a text message in the first row. The text message is either set to “Loading…” if we have a request in progress (which we can tell by checking if we have an NSURLConnection object allocated) or “Not available” otherwise. If we have results to display we retrieve the NSDictionary object for the current row in our array of tweet results and then format a simple string using the “from_user” and “text” keys.
I have added one other tiny cosmetic effect which is to set the background color of alternate rows in the table. The way to do this is to implement the tableView:willDisplayCell:forRowAtIndexPath: method and set the cell background color:
- (void)tableView:(UITableView *)tableView
        willDisplayCell:(UITableViewCell *)cell
        forRowAtIndexPath:(NSIndexPath *)indexPath {
  if (indexPath.row & 1) {
    cell.backgroundColor = [UIColor colorWithWhite:0.9 alpha:1.0];
  } else {
    cell.backgroundColor = [UIColor whiteColor];
  }
}
Loading and Unloading the View
The final piece of the search view controller is to implement the viewDidLoad, viewDidUnload and dealloc methods. The viewDidLoad method simply sets the title and calls the loadQuery method we saw earlier to initiate the request:
- (void)viewDidLoad {
  [super viewDidLoad];
  self.title = self.query;
  [self loadQuery];
}
The viewWillDisappear and dealloc methods do what you would expect with the addition that they cancel any NSURLConnection that might be in progress when we remove or dealloc the view controller:
- (void)viewWillDisappear:(BOOL)animated {
  [super viewWillDisappear:animated];
  [self cancelConnection];
}

- (void)dealloc {
  [self.connection cancel];
}
Creating the Query
Now we have the SearchViewController we just need to create a root view controller that prompts the user for a search term. I will skip some of the details on this as the code is minimal. Our user interface is very simple consisting of a single UITextField. To retrieve the text when the user hits the return key we implement the textFieldShouldReturn delegate:
- (BOOL)textFieldShouldReturn:(UITextField *)textField {

  if (textField.text) {
    SearchViewController *viewController = [[SearchViewController alloc]
         initWithNibName:@"SearchViewController"
         bundle:nil];
    viewController.query = [NSString stringWithFormat:@"%@",
                                     textField.text];

    [[self navigationController] pushViewController:viewController
                                 animated:YES];
  }

  [textField resignFirstResponder];
  return YES;
}
There is nothing special here. After allocating out SearchViewController, we set the query and then push the view controller onto the navigation controller stack.
Wrapping Up
I hope that I managed to show how easy it is to access a simple web API using NSURLConnection and a bit of JSON. The example Xcode project for this post is now out-dated but you can still find it archived in my code examples repository: