It seems a long time ago that Apple released IOS 4.0 but I am still coming across things I missed in that release. One new class that was introduced is UINib which brings to iOS some functionality that has long been available via the NSNib class on Mac OS X.
The purpose of UINib on iOS (and NSNib on Mac OS X) is to speed up the loading of frequently used NIB files. It does that by caching the NIB file objects in memory the first time the NIB is loaded from disk. Subsequent attempts to load the NIB file then come from the memory copy avoiding the slower disk access. Apple claims that this provides a 2x speed boost when loading NIB files.
The most obvious place to use UINib is in UITableViewControllers where the table view cell is being loaded from a NIB file each time a new cell is created. The nice thing about UINib is that you can get the performance improvement without having to make a huge number of code changes. To illustrate we will first recap the standard mechanism for loading a table view cell from a NIB and then how to modify the code to take advantage of UINib.
Loading a table view cell from a NIB file
The Table View Programming Guide describes in detail the technique for loading a custom table view cell from a Nib file. I will skip some of the detail but the basic requirement is to create a Nib file that contains a single UITableViewCell that we will use to populate each row in our table. Starting from an Xcode template I created a sample app with two tab bar items each containing a table view controller. I will use the traditional Nib loading technique in the first controller and UINib in the second so that we can easily compare the two approaches.
To get started I will create a basic table view cell that contains three label subviews as illustrated below:
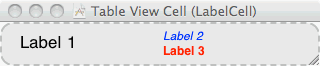
This cell is in its own Nib file named LabelCell.xib, the UITableViewCell has an identifier set to"LabelCell in Interface Builder and each of the UILabel views has a unique tag so that we can retrieve them later (again refer to the Table View Programming Guide for step by step instruction on this approach).
There is nothing special about the first table view controller. The most interesting method is the one that creates the cell for each row in the table and is shown below:
- (UITableViewCell *)tableView:(UITableView *)tableView cellForRowAtIndexPath:(NSIndexPath *)indexPath {

  static NSString *CellIdentifier = @"LabelCell";
  NSUInteger row = [indexPath row];

  UITableViewCell *cell = [tableView dequeueReusableCellWithIdentifier:CellIdentifier];
  if (cell == nil) {
    [[NSBundle mainBundle] loadNibNamed:@"LabelCell" owner:self options:nil];
    cell = self.labelCell;
    self.labelCell = nil;
  }

  UILabel *label1 = (UILabel *)[cell viewWithTag:TCTAG_LABEL1];
  label1.text = [NSString stringWithFormat:@"Item %d", row+1];
  UILabel *label2 = (UILabel *)[cell viewWithTag:TCTAG_LABEL2];
  label2.text = [NSString stringWithFormat:@"Item %d", row+1];
  UILabel *label3 = (UILabel *)[cell viewWithTag:TCTAG_LABEL3];
  label3.text = [NSString stringWithFormat:@"Item %d", row+1];

  return cell;
}
This is fairly standard stuff for a table view controller. If we do not have a cell queued that we can reuse we create a new one by loading it from the LabelCell Nib file. The labelCell outlet is wired up in interface builder to the UITableViewCell so after loading the Nib file it is set to the newly allocated object. After saving the value that the method will return the outlet is set to nil. The label subviews are located by searching for the tag set in Interface Builder.
The user interface looks as follows when run:
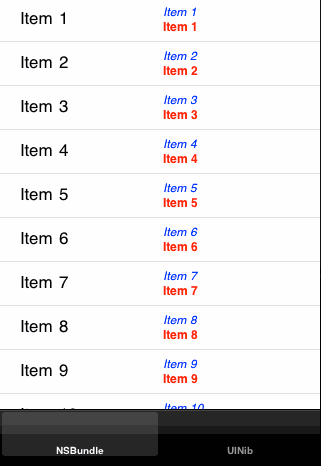
When the view is first loaded the cellForRowAtIndexPath:indexPath method is called for each visible row in the table and a new UITableViewCell is created. Each time a new cell is created the LabelCell Nib file is read from disk. Given the dimensions of the iPhone screen in portrait mode this will result in 10 cells being created meaning the Nib file is read 10 times. Note that when the table view is scrolled cells starts to disappear off the top or bottom of the screen and can be reused. This means that one or maybe two more cells will be allocated at most.
Using UINib
The second table view controller will make use of the UINib optimisation to load the LabelCell Nib once and then use the in-memory cached copy each time we need to create a new cell object. To store the cached copy of the cell object we need an instance variable stored in the table view controller. The property for this instance variable is as follows:
@property (nonatomic, retain) id labelCellNib;
The instance variable has its getter/setter methods (we will override the getter shortly) synthesized in the table view controller with the following statement:
@synthesize labelCellNib=_labelCellNib;
Since we specified the retain attribute in the property statement we need to be sure to release the object in the dealloc method:
- (void)dealloc {
  [_labelCellNib release];
  [super dealloc];
}
Note that the type for this property is set to id, this is necessary since the UINib class is only available from iOS 4.0 and later. This means that we need to check the class exists before we use if we want to create an application that will run on 3.x versions of iOS. The runtime checks that we need to perform to ensure this backward compatibility are more complicated than usual unfortunately.
A Word of Warning
The release notes for IOS 4.0 contain the following warning:
iOS 4 includes a new class to support rapidly unarchiving nib files. While this class is new to iOS SDK 4, it was present but private, in previous releases. Special care needs to be taken when deploying code that uses the UINib class and also runs on iOS releases prior to version 4. Specifically, you cannot determine the availability of the class solely using the NSClassFromString function, because that check returns a private class on iOS 3.x and earlier. Instead, after getting theUINib class using NSClassFromString, you must also use the respondsToSelector: method of the returned class to see if it responds to the nibWithNibName:bundle: method. If it responds to that method, you can use the class.
So it is not enough to check if the class UINib exists using the NSClassFromString function since the class does actually exist on prior versions. So in addition to check that the class exists we also need to check it responds to the nibWithNibName:bundle: method. To do that we will define a getter method for the instance variable labelCellNib which includes the runtime checks:
- (id)labelCellNib {

  if (!_labelCellNib) {
    Class cls = NSClassFromString(@"UINib");
    if ([cls respondsToSelector:@selector(nibWithNibName:bundle:)]) {
      _labelCellNib = [[cls nibWithNibName:@"LabelCell"
                        bundle:[NSBundle mainBundle]] retain];
    }
  }
  return _labelCellNib;
}
So the first time we attempt to access the labelCellNib property we will invoke the getter method which if the ivar is zero performs the necessary runtime checks. Only after we are sure we have a valid UINib object the nibWithNibName:bundle: method is used to load the Nib file from disk and store it in the ivar. Note that we need to retain the loaded Nib file since we want it to stick around whilst the view controller is loaded. Subsequent accesses will just return the stored value directly.
One last thing we should do is define a viewDidUnload method that releases the cached Nib objects since the view has been unloaded from memory:
- (void)viewDidUnload {
  [super viewDidUnload];
  self.labelCellNib = nil;
}
To make use of the cached UITableViewCell we need a slight modification to the cellForRowAtIndexPath method as follows (some duplicate code omitted for clarity):
- (UITableViewCell *)tableView:(UITableView *)tableView
         cellForRowAtIndexPath:(NSIndexPath *)indexPath {
  static NSString *CellIdentifier = @"LabelCell";
  NSUInteger row = [indexPath row];
  UITableViewCell *cell = [tableView dequeueReusableCellWithIdentifier:CellIdentifier];
  if (cell == nil) {

    if ([self labelCellNib]) {
      [[self labelCellNib] instantiateWithOwner:self options:nil];
    } else {
      [[NSBundle mainBundle] loadNibNamed:@"LabelCell"
                                    owner:self
                                  options:nil];
    }
    cell = self.labelCell;
    self.labelCell = nil;
  }

  ...
  return cell;
}
This time when we need to create a new UITableViewCell we first check if the labelCellNib ivar is set. On iOS 4.0 and later this will, via the getter method we saw previously, cause the Nib to be read from disk the first time we access it. All subsequent accesses will return us the cached version of the Nib objects. Either way the instantiateWithOwner:options: method is used to create a working copy of the Nib avoiding the need to read from disk. If we are running on iOS 3.x the code falls back to the original Nib loading code for each cell.
Is it Worth the Effort?
Using the UINib class in this example means that we avoid reading the LabelCell Nib file 10 times each time the view is loaded. This makes the view appear faster when it is loaded but I have to say it is pretty hard to see a speed improvement in practise when testing on an actual device.
Since the actual speed improvement is very limited in this example it is certainly worth asking if it is worth the effort? To be honest I am not totally convinced, especially as modern iOS devices have greatly improved performance compared to earlier generation devices. However, if you compare the two table view controllers you will see that the extra effort required is pretty low so it seems to me to be worthwhile whenever you are loading custom cells from a Nib file.
The Xcode project for this post is not out-of-date but you can still find it in archived in my code examples repository: