Updating for the iPhone 4 retinal display
Tuesday, June 29, 2010 The retinal display on the new iPhone 4 doubles the pixel resolution of the display. However when it comes to laying out the UI elements you can still think about a full screen display with dimensions of 320 x 480 in portrait mode. The big difference is that these dimensions are now expressed in points NOT pixels. What has changed is the scaling factor of the screen which determines how a point relates to a pixel. For the iPhone 4 the display has a scale of 2 so that 1 point = 2 pixels.
The number of pixels on the display has doubled to 640 x 960 but if you are using UIKit this added complexity is mostly hidden from the application. The UI layout is configured using the point dimensions so thankfully you do not have to worry about redoing the layout just for iPhone 4 devices. Also things like text and standard Apple UI components such as navigation bars, system buttons, etc are automatically displayed at the higher pixel resolution. Note that if you are using core graphics or core animation you will have some additional work to do as those frameworks only work with pixels not points.
There are some additional steps that are worth doing if you want your app to look its best on the iPhone 4.
2x Image Files
Apple has introduced a simple naming convention to allow image files at double the resolution to be loaded when the display will support it. To make use of this feature you need to go back to your original image files and create versions at twice the existing size. So if you have an image that is currently 100x100 pixels named myImage.png you need to create a new version which is 200x200 pixels named myImage@2x.png.
You should probably avoid just taking the existing image file and scaling it up to double the size. Ideally you want to create your images at the higher resolution and then scale down to the standard resolution so that both sizes look their best.
Once you have the high-resolution image files you just need to add them to your project and they will be selected automatically anytime you use UIImage class methods such as +imageNamed: or +imageWithContentsOfFile: So for example:
UIImage *myImage = [UIImage imageNamed:@”myImage.png”];
will load myImage.png on iPhone 3 and iPad devices but will load myImage@2x.png on the iPhone 4. It is possible to omit the filename extension from the name of the image file with iOS 4 but you will need to include it if you want to maintain compatibility with 3.x releases.
Applications Icons
As well as updating image files you should also update the application icon files to include high-resolution versions of each file. So since the original iPhone application icon file is 57x57 pixels the 2x version needs to be 114x114 pixels. In addition the settings/search icon which is normally 29x29 pixels needs a high-resolution version that is 58x58 pixels.
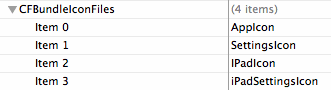
With iPhone OS 3.2 for the IPad a new key (CFBundleIconFiles) was introduced to Info.plist to specify the ever growing list of icon files. If you are producing an App that will only run only on iOS 4.0 and 3.2 you can use CFBundleIconFiles (you can delete the old CFBundleIconFile key if you want since it will no longer be used).
If you do not specify the filename extensions you can avoid listing all of the 2x variations of the file. So if we have an iPhone icon, an IPad icon and the corresponding settings/search icons the entry in Info.plist would be as follows:

If we want to maintain compatibility with pre-3.2 devices we cannot rely on the CFBundleIconFiles key. Instead we need to specify the icon files using the Apple determined naming convention. The files we would need to support all devices would be as follows:
- Icon.png - 57x57 pixels application icon for standard resolution iPhone
- Icon@2x.png - 114x114 pixels application icon for high resolution iPhone 4
- Icon-72.png - 72x72 pixels application icon for iPad
- Icon-Small.png - 29x29 pixels settings icon for standard resolution iPhone
- Icon-Small@2x.png - 58x58 pixels settings icon for high resolution iPhone
- Icon-Small-50.png - 50x50 pixels settings icon for iPad
Then in the Info.plist file we need to use the original CFBundleIconFile key to specify just the basename of the icon file (“Icon.png”) as follows:

Launch Images
As with the application icons you can also specify high-resolution versions of your launch images. So a standard resolution portrait launch image named Launch.png is 320x480 pixels. The high resolution version would be 640x960 pixels and named Launch@2x.png.
Likewise a landscape version of the file named Default-Landscape.png would be 480x320 in standard resolution (assuming a status bar) and named Default-Landscape@2x.png with 960x640 pixels in high resolution.
Keith
To avoid validation errors when uploading to the App Store I find that the old CFBundleIconFile needs to also specify the extension (Icon.png). I have created an example app to illustrate the different configurations that I will try to post in the next few days to clear up the confusion.
See this post for more details on the problem with the version of Application Loader shipped with Xcode 3.2.3: Application Icon Troubles.
33 Comments | tagged
retinal
Reader Comments (33)
Thanks for the info, it helped me get my HiRes app icons to load properly. I believe the HiRes size is 114x114 instead of 144x144 which you have specified.
well spotted it should be 114x114 not 144x144. I have corrected the post. Many thanks for the feedback.
Do you have any tips generating the high-resolution launch image? I used the xcode organizer screen shot functionality to generate the Default.png image and am now wondering how to generate the high-resoltuion version.
@Rich - did you try using the Simulator with the device type (Hardware -> Device) set to iPhone 4? That should give you a high resolution image that you can capture using Grab and clean up.
you should correct also this "2x version needs to be 114x144 pixels" to "2x version needs to be 114x114 pixels"
thanks poor typing on my part....
Question : How could I make an App for 3.0+ but with an highresolution icon for iPhone4 ? Your described solution is not really working.. I have some problems getting the retina icon (114x114) working. To be sure I made a red block (114x114) and called it Icon@2x.png but the app still uses the default iPhone Icon.
I tried to set the Icon File just to "Icon" instead of "Icon.png" - but then I just get a warning that the extention is missing and the same result - no red image on iPhone 4. Whats missing? I didnt find this "@2x" Stuff inside Apples reference manual where does this come from? Is it really working?
After setting _all_ images to their correct sizes it works ! Thank you very much !
re Launch Images, did you mean default.png and default@x2.png?
@Alex: actually I was thinking about the situation where you use the UILaunchImageFile key in Info.plist to specify a name for the launch image. However that key is only supported from iPhone OS 3.2 so for an App that needs to maintain backward compatibility with OS 3.1 apps it would probably be better to stick to Default.png.
I have used Icon.png (57X57) and also Icon@2x.png (114X114), but both 3.0 and iPhone4 shows the default icon (Icon.png) Do i need to make any change at info.plist or in any code, so that Icon2x.png can work properly? now my info.plist setting is
Icon file: Icon
Thanks
With Application loader, it lauch an error saying that "Icon must have an extension"...
Looks this tips is not allowed anymore :-(
I realize a new iPhone application, a web app. I developed it with web languages and I will switch to a native application. I know how to use the high resolution of the iphone 4 on a web app? :) Because the trick @ x2 does not, of course. I think if I pass in native and I save my images in 2 yours it will work (whatever), but some of my sites are not intended to become native app and would like to receive as a quick release a day "full compliant display retina." In the meantime, thank you in advance for those who bring me some answers! Have a nice day:)
PS: I'M FRENCH - - 'I hope you understand
@Sooners: not sure if I have understood. You have already created HTML web apps that you want to convert to native Objective-C compiled apps? If you already have both normal and high resolution images then you just need to follow the @2x naming convention and everything will work automatically.
Great, thanks for the info!
This is a basic and probably stupid question, but do you just upload a single version of the app? Or can you upload two versions so that the iPhone 3g's don't have to download the additional set of hi res images?
@Chris you upload a single version of the app containing all of the images. This does mean that the 3GS and older devices will have image files (the hi-res versions) that will remain unused.
If you leave away the extention ".png" in the bundle identifier you cannot upload the binary via "AppLoader" - Also XCode makes a warning for this. If you enter "Info.png" into the bundle Identifier the Retina-Icons are not active? What is the offical solution?
I tried to enter "Icon@2.png" in "CFBundleIconFile" and this seems to work - iPhone3G uses Icon.png and iPhone4 uses Icon@2.png.
But will this work in appstore, too?
For those of you going crazy because of validation errors when specifying icon files without the extension. Apple has acknowledged a bug in the application loader shipped with code 3.2.3 so you will need to fully specify the filenames (including the extension) for now.
What is the best way to set up Illustrator / Photoshop files? Do you just set it at the double resolution and then down grade? Or is there a way to set it at 320x416 and then to have Illustrator create the higher resolution for you?
You should create your graphics as vector files if possible - then create any resolution file you want. If you are not able to use vector formats you should create your highresolution image first and then downscale it to the low resolutions. Of course it does not always make sense to downscale the whole content - you could also think of the possibility to crop your image to get out the best motive for small icons (e.g. if you downscale a detailed high resolution image to 57x57, you onl get pixel hotchpotch - so better choose a small region and downscale just that one)
What's the best way to scale down a picture into the various iPhone icon sizes using Photoshop? It never looks right when I try it.
@Andrew - I am no photoshop expert so I cannot really offer much help. As mentioned by some of the previous commenters I also tend to work from vector files which can be sized to the required resolution before exporting in png format.
@Sooners:
For high res images to work on the iPhone 4 in webapps you must use the -webkit-border-image for all images you wish to be high res (from what I have found to work). Basically you will do all coding as though it is the old iPhone screen (element widths, borders, etc.), and iPhone will scale them up. You will have to have a separate css file for all of the elements with images that is only called for the iPhone 4, here is a more in depth guide: http://bit.ly/bcOU75
Thanks for a great article. I've made a web app inspired by your article that takes a 512 x 512 icon and generates the rest of the icons, appropriately named. You can find it here. http://empoc.com/ios-icons/