Each time I need to create a build for a beta tester I find myself hunting around for my notes on how to create and distribute an Ad Hoc build. So here, once and for all, are my notes on what to do to create an Ad Hoc distribution of an iPhone App.
Adding Beta Tester Devices
Apple allows an Ad Hoc build to be distributed to up to 100 devices which they enforce by making you add the devices to the distribution provisioning certificate. This means that you need to retrieve the UDID for all of the test devices, add them to the provisioning profile using the iOS Provisioning Portal and then download and install the profile.
Finding the UDID
To get started you need to ask your beta testers to supply the Unique Device ID (UDID) for their devices. Now unless the user is also an iOS developer they are unlikely to know what that means. You can try to explain to them how they need to connect the device to iTunes, select the device in the Devices section, find the Summary page, click on the Serial Number to reveal the “hidden” UDID and then command-c (Mac) or ctrl-c (Windows) to copy it into an email. However I find the easiest thing to do is to point them towards this article by Apple which explains the steps.
Registering the Device
Once you have the UDID you need to add it to your account in the iOS Provisioning Portal in the same way you would for a development device. You do this in the Devices section of the portal and can either use the ‘Add Device’ button to manually add a single device or use the Upload Devices button to bulk upload multiple UDIDs from a text file.

Note if you want to bulk upload multiple devices the format of the text file needs to be as follows with the two columns separated with tabs:
Device ID                                Device Name
1234567890123456789012345678901234567890 Test iPad
The contents of the first line are not important but you need to put something as the first line is ignored when you upload.
Also be aware that you can only register up to 100 devices each year. You can delete devices any time you want but once added they still count towards your annual allocation. (So if you add 100 devices and then delete 50 of them you still have to wait until the next year before you can add any more). This has never been an issue for me as I am nowhere near to having 100 beta testers or development devices.
Creating the Distribution Provisioning Profile
Assuming you already have a distribution certificate the process to create an Ad Hoc provisioning profile is quick and easy. In the Distribution tab of the Provisioning section use the New Profile button.

The only difference between an Ad Hoc profile and a normal App Store profile is the Distribution Method
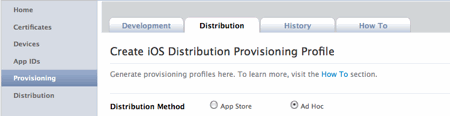
Ensure you select the Ad Hoc method and then enter a profile name, the App ID and finally ensure you select all of the devices you want the Ad Hoc build to run on. Once you have finished submitting the profile you should download it and save it somewhere safe as you will need to send it to each of the beta testers. The file should have an extension of .mobileprovision. You should also drag the file onto your Xcode icon to install it, you can use the Xcode organiser to verify that it installed ok. You should see the profile in the Provisioning Profiles section.
Building for Ad Hoc Distribution
With the provisioning profiles configured correctly the next step is to prepare the project in Xcode for an Ad Hoc build. I have found it useful to create a configuration just for Ad Hoc builds so that I do not have to worry about the details each time. The easiest way to do that is to copy an existing configuration, if you already have a Distribution configuration that is probably a good starting point otherwise you can start from the default “Release” configuration.
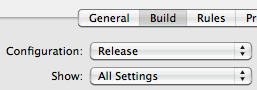
With the project open in Xcode, right-click on the target and select “Get Info” to bring up the Info dialog window and select the Build tab and then in the Configuration drop down menu select “Edit Configurations…”
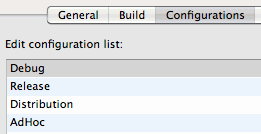
Select an existing configuration (e.g. Release or Distribution) and then at the bottom of the window use the Duplicate button to create a copy of the configuration and name it “AdHoc”.
In the Target Info window ensure this new AdHoc configuration is selected and then adjust the following settings in the Build tab. In the Code Signing section, look for the “Any iOS” setting under Code Signing Identity and make sure it is set to iPhone Distribution and matches the Ad Hoc provisioning profile we installed previously.
Entitlements
There is one additional step if your project includes an Entitlements.plist file (perhaps because you needed to enable keychain data sharing). For an Ad Hoc distribution you need to ensure that the get-task-allow flag is not set in the plist file. The way I handle this is to add a second file (Entitlements-adhoc.plist) just for the Ad Hoc build which is identical apart from the get-task-allow flag:

To ensure this new Entitlements file is used you need to modify the Code Signing Entitlements setting in the AdHoc configuration to reference the new file.

Build and Archive
With the AdHoc build settings active use the Build and Archive command to create the distribution build. Assuming the build was successful you should find it in the Xcode Organizer in the Archived Applications section. You can add a name and comment to the organizer for future reference at this point.
Sharing the Application
I find the easiest way to send the application files to a beta tester is to use the Xcode organizer to create an ipa file. To do that select the AdHoc build in the Archived Applications section and use the Share button and then select Save to Disk. Xcode will create a signed application file and save it to disk with a name of your choosing. Name the file something useful like appName-x.y.z.ipa where x.y.z is the version number.
You can then send this .ipa file together with the .mobileprovision file to your beta tester with instructions to drag onto their iTunes library to install it on the test device.