My notes and general comments on converting an existing iPhone App to a Universal binary. This first part covers the initial steps to get something up and running. The more detailed re-architecting of the view hierarchy to use split-views and other iPad features will be saved for another day.
Converting the target
The first step is to select your target in Xcode, right-click and use the “Upgrade Current Target for iPad…” command. You will presented with a choice:
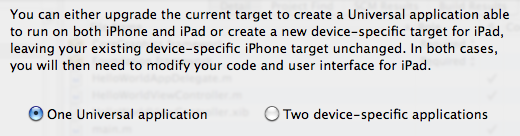
Select “One Universal application” and Xcode will do (some) of the hard work for us. The Apple guidelines warn against trying to manually migrate your target though to be honest it is hard to really see why. Also note that if your project has more than one target you can only run the upgrade task once. You will need to check all of your targets and adjust the build and Info.plist settings yourself.
MainWindow-iPad.xib
Once Xcode has done its stuff the most obvious change is the creation of the Resources-iPad directory containing a new Main Window NIB file named MainWindow-iPad.xib. This is a copy of your projects original MainWindow.xib but with the window resized for the iPad.
- If your existing
MainWindow.xibwas localized then localized versions of theMainWindow-ipad.xibwill also be created which saves some effort. - Only the Main Window NIB is converted. It is up to you to decide what to do about any other NIB files your project is using.
One thing to watch out, if when you build the project you get warnings compiling the new NIB file:
The "Full Screen at Launch" property is not available on iPhone OS
versions prior to 3.2
Open MainWindow-iPad.xib with Interface Builder and either click the warning triangle in the bottom right corner or open the Document Info dialog from the Window menu and correct the deployment target:
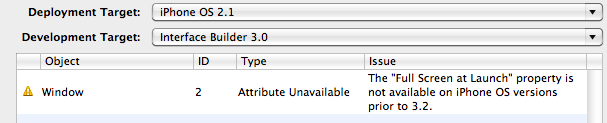
Since this NIB is intended only for the iPad ensure the Deployment Target is set to iPhone OS 3.2 and update the Development Target to Interface Builder 3.2 as the same time.
Changes to target build settings
Xcode makes a number of changes to the build settings for the target:
- Architectures: now set to optimized (armv6 armv7), the so-called “fat” binary now contains builds for both iPhone and iPad hardware architectures.
- Base SDK: must now be set to iPhone Device 3.2. Note that this is only set for this target. If you have multiple targets you will need to manually set this for each target. You should probably also change the Base SDK in the project settings.
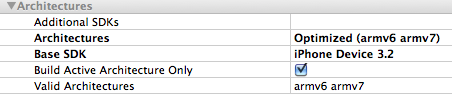
As mentioned before you should review these settings for all targets in your project. With the Base SDK set to 3.2 the deployment section of the settings is what ensures we can still deploy to older iPhone and iPod Touch devices:
![]()
- Targeted Device Family: If you were build an iPad only application you would set this to iPad but since this we want a universal app it must be set to iPhone/IPad
- iPhone OS Deployment Target: This setting is important as it determines the earliest version of the OS we can deploy to. Setting this to OS 3.1 means we can deploy to 3.1 or later.
Note that there is a known Xcode bug that means that the iPhone OS Deployment Target gets set to OS 3.2 after upgrading the target (which is not much use for a Universal app since 3.2 is only available on the iPad). Make sure you review it for each target in your project and set it to the appropriate value for your application.
Changes to Info.plist
Xcode only makes one change to your targets Info.plist file for you to ensure the correct Main Window NIB file is loaded depending on the device:
![]()
There are a number of other changes worth making at this point, mostly to add the long list of additional image files added with OS 3.2. To recap the icon files that you now need:
icon.png- 57x57 pixels for pre-3.2 devicesicon-ipad.png- 72x72 pixels for 3.2 devicesIcon-Small.png- 29x29 pixels for pre-3.2 spotlight searchesIcon-Small-50.png- 50x50 pixels for 3.2 spotlight searches
Assuming you add all the icon files to the target (which is recommended since it takes minimal effort) you end up with the following entries in the Info.plist file (with Xcode set to show raw values/data for clarity):
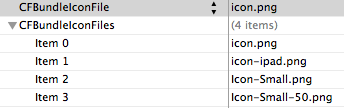
It is important to keep the existing CFBundleIconFile setting for the pre-3.2 devices. The CFBundleIconFiles key must be added manually, it does not yet exist in the drop-down list of values known by Xcode. Make sure you spell it correctly and set the type to Array.
Device orientation support
The final change to make in the Info.plist file is to specify the orientations that the application supports along with the related launch images. As before the key UISupportedInterfaceOrientations is not in the list of known Xcode values so some careful typing is required.

The set of required Default-???.png images should also be added to the target in addition to the existing Default.png used by pre-3.2 devices. The filenames and dimensions (h x w) are as follows:
Default-Portrait.png1004 x 768 pixelsDefault-Landscape.png748 x 1024 pixelsDefault-PortraitUpsideDown.png1004 x 768 pixelsDefault-LandscapeLeft.png748 x 1024 pixelsDefault-LandscapeRight.png748 x 1024 pixels
I just include Default-Portrait.png and Default-Landscape.png to get started as the UI may still change as we add the iPad specific elements.
Build the app
At this point a build for the device (and simulator) should work without error. We don’t really have a true iPad app at this point but even so using the full screen space of the iPad already makes the app better than the horrible pixel doubling that iPhone only apps are stuck with. To make true use of the iPad the view hierarchy needs to be changed which is a topic for a future post.