Have you wondered why your App doesn’t rotate to upside down on the iPhone but works fine on the iPad? How about preventing your App from rotating at all or restricting rotation for some view controllers but not all of them? Changing the orientations that your App supports is a complicated business. Here’s what you need to know. It’s a windy path to follow, but there’s a fun quote from Douglas Adams if you make it to the end…
Setting App Device Orientation
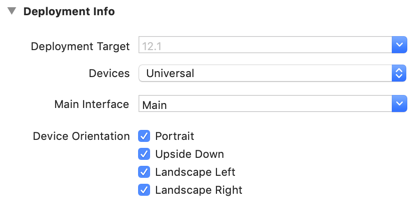
Let’s start by looking at the supported orientations in the settings for a target. Create a new iOS project with Xcode 10.1 and look at the deployment info section for the target:

The default is to build a Universal (iPhone + iPad) app, but this screen is as clear as mud. Why is the upside down orientation not selected?
The assumption for a universal App is that you support all four orientations on the iPad and all orientations except upside down on the iPhone.
Changing the supported orientations for a universal App only changes the iPhone settings. The assumption being that you always want all four selected for the iPad. You can confirm this by looking at the Info.plist file for the target:
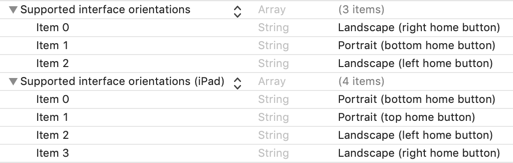
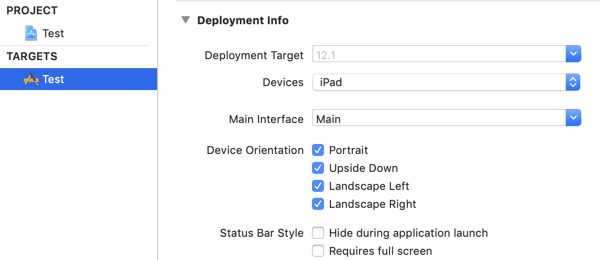
Note the default key (UISupportedInterfaceOrientations) has three values but the iPad specific version of the key (UISupportedInterfaceOrientations~ipad) has all four values. To change the iPad settings you need to switch to the iPad device:
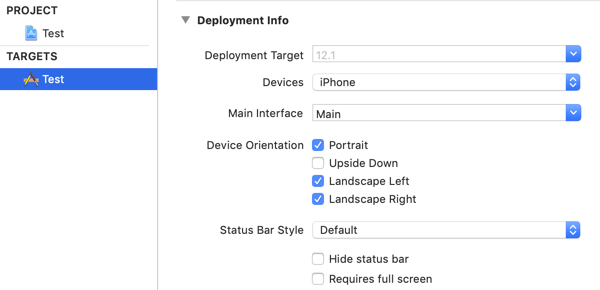
You can change the iPhone supported orientations using either the Universal or iPhone specific device settings :
I find it less confusing to edit the Info.plist file directly so I can be sure what I am ending up with. Either way, if you manage to get this setup the way you want you may still find your app doesn’t rotate the way you expect.
The Plot Thickens
Unfortunately, it is often not enough to set up Info.plist. Suppose I want to support upside down on the iPhone. I select it for the target:
However, when I build and run on an iPhone, the App does not rotate upside down. What’s going on? Understanding which orientations your App can use is tricky. There are three factors which control the supported orientations:
- Device support
- Application support
- View Controller support
Device Supported Orientations
Not all devices support all orientations. The iPad supports all orientations, but the iPhone does not.
The newer iPhones like the iPhone X, XS, XS Max, and XR don’t have a home button and use Face ID for authentication. Apple doesn’t want you using these iPhones upside down as the Face ID system doesn’t work in that orientation. It doesn’t matter if you select “Upside Down” in the target settings. The newer iPhones ignore the upside down orientation.
(Note that Face ID works in any orientation on the new iPads).
We’ll see how to make older iPhones rotate upside down in a moment. Apple doesn’t make it easy which is perhaps a hint not to do it.
App Supported Orientations
You have two ways to set the orientations your App supports:
-
Set the deployment info in the Xcode project settings for the target. This updates the
Info.plistfor the target as we saw earlier. -
Override the application delegate method and return the set of supported orientations:
func application(_ application: UIApplication, supportedInterfaceOrientationsFor window: UIWindow?) -> UIInterfaceOrientationMask {
  return [.portrait, .landscape]
}
Possible values for the
UIInterfaceOrientationMask:.portrait.landscapeLeft.landscapeRight.portraitUpSideDown.all- all four orientations.landscape- combines landscape left and right.allButUpSideDown- all orientations except portrait up side down
The App delegate method overrides the values from Info.plist allowing you to change the supported orientations at runtime. This can be useful if you have an initial screen that should be shown portrait but once completed you want to allow landscape. You can ask the device to attempt rotation once your App changes state:
UIViewController.attemptRotationToDeviceOrientation()
View Controller Supported Orientations
A view controller can control which orientations it supports by overriding supportedInterfaceOrientations:
var supportedInterfaceOrientations: UIInterfaceOrientationMask { get }
The default is .all for the iPad and .allButUpsideDown for the iPhone. The device, application and view controller all need to agree for the orientation to work. By default, a view controller doesn’t allow upside down on an iPhone regardless of what you specify for the application. To fix this, we can override this property in the view controller and return .all.
Note it still doesn’t rotate upside down on an iPhone X as the device doesn’t allow it.
One further trap. This property is only checked for the root view controller or top, full-screen presented view controller. If you embed your view controller in a parent controller, it is the parent that decides the supported orientations. The parent view controller never checks the property in our view controller.
To change which orientations a navigation or tab bar controller supports use their delegates rather than subclassing. For example, suppose I’m creating my navigation controller in the App delegate (you could also set the delegate in a storyboard):
let navigationController = UINavigationController(rootViewController: rootViewController)
navigationController.delegate = self
Use the delegate method to return the supported orientations:
extension AppDelegate: UINavigationControllerDelegate {
  func navigationControllerSupportedInterfaceOrientations(_ navigationController: UINavigationController) -> UIInterfaceOrientationMask {
    return .all
  }
}
If you want to prevent any rotation for a view controller, you can also override shouldAutorotate and return false.
override var shouldAutorotate: Bool {
  return false
}
Like the supportedInterfaceOrientations this is only called for the root or top presented full-screen view controller.
Other Traps For The Unwary
One more thing before you throw your iPad out the window. None of the above methods are called on an iPad when you have all four iPad orientations supported in Info.plist!
If you want to change the supported orientations at runtime or override for a view controller on an iPad, you need to change the defaults in Info.plist. So if I had a single view controller I wanted to be portrait only I could do this:
- Remove one of the orientations (e.g., Upside Down) for the iPad from
Info.plist. - Implement the App delegate method and return
.allso my App can still rotate to all orientations. - In the root view controller for my portrait-only view override
supportedInterfaceOrientationsand return.portrait.
What a headache!
To Summarize
- Set application wide supported orientations in
Info.plist. - The iPhone X family of iPhone devices do NOT support upside down.
- Use the application delegate to change supported orientations at runtime.
- Override the view controller
supportedInterfaceOrientationsproperty to change how a view controller rotates (root or top full-screen view controller only). - The device, application, and view controller settings must all agree for an orientation to work.
- To rotate upside down on older iPhones add upside down as a supported orientation in
Info.plistor using the App delegate and override the supported interface orientations in the root view controller (you probably shouldn’t do this).
But the plans were on display…
This quote came to mind when I was searching for the Apple documentation on orientation for this post:
It was on display in the bottom of a locked filing cabinet stuck in a disused lavatory with a sign on the door saying ‘Beware of the Leopard.”
Douglas Adams, The Hitchhiker’s Guide to the Galaxy