The Apple Push Notification Service (APNS) was released way back in iOS 3.0. That was only just over a year ago but given the pace of development in the mobile OS market that now seems like ancient history. APNS was a first tentative attempt by Apple to address the demand for background processes. It allows client applications to receive updates from a server without having to be running. Apple takes care of pushing the notification to the device and the user can then decide whether to launch the application or not.
Apple deprecated UILocalNotification in iOS 10, replacing it with the UserNotifications framework. See Local Notifications in iOS 10 for details.
Local Notifications
The big problem with APNS is that it requires you to run a server somewhere that interacts with APNS to push a notification to a device. For applications that already have a client-server architecture such as an IM client this is no big deal. There are also a number of third parties who can provide a cost efficient service for small scale users who do not want the trouble of running their own server. However for many applications this is still way too complicated.
The release of iOS 4 brought a number of new features aimed at adding multitasking support one of which was local notifications. I am not sure if you can really say that local notifications count towards multitasking but when compared to APNS they are much simpler to use. There is no central service in fact you do not even need an internet connection to schedule and deliver notifications to an application.
The Example App - RemindMe
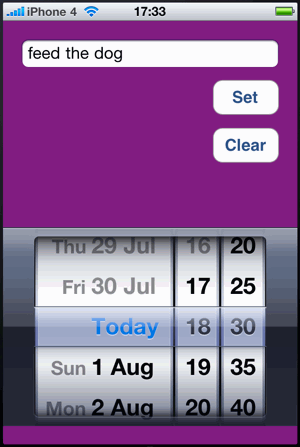
To provide a working example of how to add local notifications to an iOS 4 app I have a created a very simple sample application. The user interface is very simple and will not win any design awards. The basic idea is that you enter a message, set the date time and then click the “Set” button to schedule a reminder. At the designated time a message pops up on the screen to remind you.
I will spare you the basic setup of the app, you can download the code and look at that yourself if you are interested. What I want to focus on is the creation of the local notifications and the way the app interacts with iOS when they are delivered.
Creating a Local Notification
The set button is wired up to run a method called scheduleNotification in the view controller which uses the UILocalNotification class to schedule a notification. The code looks as follows:
- (void)scheduleNotification {

  [reminderText resignFirstResponder];
  [[UIApplication sharedApplication] cancelAllLocalNotifications];

  Class cls = NSClassFromString(@"UILocalNotification");
  if (cls != nil) {

    UILocalNotification *notif = [[cls alloc] init];
    notif.fireDate = [datePicker date];
    notif.timeZone = [NSTimeZone defaultTimeZone];

    notif.alertBody = @"Did you forget something?";
    notif.alertAction = @"Show me";
    notif.soundName = UILocalNotificationDefaultSoundName;
    notif.applicationIconBadgeNumber = 1;

    NSDictionary *userDict = [NSDictionary dictionaryWithObject:reminderText.text
                              forKey:kRemindMeNotificationDataKey];
    notif.userInfo = userDict;

    [[UIApplication sharedApplication] scheduleLocalNotification:notif];
    [notif release];
  }
}
I will walk through the code a few lines at a time highlighting the key points:
Cancel existing notifications
[reminderText resignFirstResponder];
[[UIApplication sharedApplication] cancelAllLocalNotifications];
The first couple of lines remove the onscreen keyboard if it is being displayed for the text field (reminderText) and also cancel any existing local notifications. For this app we will only allow a single outstanding notification but iOS 4 will allow you to schedule multiple notifications.
Ensuring backwards compatibility
Class cls = NSClassFromString(@"UILocalNotification");
if (cls != nil) {

  UILocalNotification *notif = [[cls alloc] init];
As an example of how to allow the code to compile and run on iOS 3.x I have protected the allocation of the UILocalNotification object using NSClassFromString. If you only need to support iOS 4 you can avoid this and allocate the object directly:
UILocalNotification *notif = [[UILocalNotification alloc] init];
Setting the fire date and time
notif.fireDate = [datePicker date];
notif.timeZone = [NSTimeZone defaultTimeZone];
The fire date is the date and time when the system should deliver the notification. For our example app we just use the NSDate object returned by the date picker. If you specify a date that is in the past (or nil) the notification is delivered immediately. The fire date is evaluated using the timeZone property of the UILocalNotification object. If you do not set the timezone the fire data is considered to be GMT time. Generally for alarm clock style reminders you want to use the local time zone when you create the notification. This means that if you set a fire date of 09:00 and then move to a different time zone the alarm will still fire at 09:00 in the new time zone.
Controlling the alert
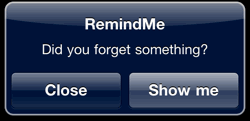
notif.alertBody = @"Did you forget something?";
notif.alertAction = @"Show me";
You control the alert message displayed when the notification is delivered by setting the alertBody and alertAction properties. If your app supports multiple languages you should of course make these localized strings. The alertBody sets the actual message text displayed in the alert, the alertAction property sets the label of the alert button:
One other nice touch is that the alertAction text is also shown as part of the unlock slider if the device is locked when the notification is delivered. The default “slide to unlock” message is changed so that the alertAction text replaces the word unlock. The system also takes care of changing the case of the initial letter so in our example we end up with “slide to show…”.

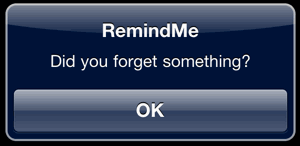
If you do not want to show the alert action button you can disable it by setting the hasAction property to NO. Assuming you have set alertBody this will still cause the alert to be shown with a single OK button. Note that without the action button there is no option for the user to launch the application from the alert. (If you do not want to see the alert at all you should set alertBody to nil.)
Setting the alert sound
notif.soundName = UILocalNotificationDefaultSoundName;
You can choose to play a sound when the alert is displayed. The sound file must be part of the application bundle and cannot be more than 30 seconds long. In this case we just use the default system sound. Apple guidelines state that you should only play a sound when also displaying an alert or changing the application icon badge. This makes sense if you think how confusing it would be for the user hearing the device play a sound with no other indication as to which application is the target of the notification.
Setting the application badge
notif.applicationIconBadgeNumber = 1;
In addition to showing an alert and playing a sound when the application is delivered you can also set the application icon badge. If you want to increment the existing badge number you can get the current value from the application instance:
[[UIApplication sharedApplication] applicationIconBadgeNumber].
Sending custom user data
NSDictionary *userDict = [NSDictionary dictionaryWithObject:reminderText.text
                          forKey:kRemindMeNotificationDataKey];
notif.userInfo = userDict;
If you need to pass some custom data you can add it a dictionary that is included with the notification. In this example we use it to send the reminder text that the user entered into the text field. We will retrieve this custom data when the notification is delivered.
Scheduling the notification
[[UIApplication sharedApplication] scheduleLocalNotification:notif];
[notif release];
Finally after going though (nearly) all the options you call a method on the application instance to actually schedule the notification after which we can release the allocated notification object.
Handling the Notification
There are three different situations to consider when handling the delivery of a notification to the application:
- application is not running (either in the foreground or background)
- application is in the background (suspended or running a background task)
- application is already running in the foreground (active)
Note that Apple documentation is confusing in that it does not distinguish between the situations where the application is not running at all and when it is in the background.
Application not running
If the application is not actually running when the notification is delivered the system displays the alert if configured with the alertAction button. If the user taps the button the application is launched and the application delegate method application:didFinishLaunchingWithOptions: is called.
Note if your application currently uses applicationDidFinishLaunching you should convert to the newer method in order to access the launch options.
- (BOOL)application:(UIApplication *)application
    didFinishLaunchingWithOptions:(NSDictionary *)launchOptions {

  Class cls = NSClassFromString(@"UILocalNotification");
  if (cls) {
    UILocalNotification *notification = [launchOptions objectForKey:
                         UIApplicationLaunchOptionsLocalNotificationKey];

    if (notification) {
      NSString *reminderText = [notification.userInfo
                objectForKey:kRemindMeNotificationDataKey];
      [viewController showReminder:reminderText];
    }
  }

  application.applicationIconBadgeNumber = 0;

  [window addSubview:viewController.view];
  [window makeKeyAndVisible];

  return YES;
}
As before we first check to see if the UILocalNotification class exists to maintain backward compatibility with iOS 3.x versions. Then we check the launchOptions dictionary to see if it contains a local notification object. If it does we retrieve our custom data from the userInfo dictionary and pass it to the view controller to show the reminder text to the user.
Application is in the background
In the application is the background (either running a background task or suspended) when the notification is delivered the system displays the alert dialog as before. If the users taps the action button the application is brought to the foreground and the application delegate method didReceiveLocalNotification: will be called and passed the notification object:
- (void)application:(UIApplication *)application
        didReceiveLocalNotification:(UILocalNotification *)notification {

  application.applicationIconBadgeNumber = 0;
  NSString *reminderText = [notification.userInfo
                            objectForKey:kRemindMeNotificationDataKey];
  [viewController showReminder:reminderText];
}
The handling is in this case similar to the situation when the application is launched. The custom data is retrieved from the userInfo dictionary contained in the notification and passed to our viewController method for display to the user.
Application in the foreground
The situation when the application is already running in the foreground is very similar to when it is in the background with the exception that the system does not display the notification alert to the user. The application delegate will have its didReceiveLocalNotification: method called as when it was running in the background. If you want to distinguish between these two situations you can check the application state:
- (void)application:(UIApplication *)application
      didReceiveLocalNotification:(UILocalNotification *)notification {

UIApplicationState state = [application applicationState];
if (state == UIApplicationStateInactive) {
  // Application was in the background when notification
  // was delivered.
}
Downloading the example code
Apple deprecated UILocalNotification in iOS 10, replacing it with the UserNotifications framework. See Local Notifications in iOS 10 for details. You can still find the now out-dated Xcode project for this post archived in my code examples repository: